Electrolux EW23CS70IB Use and Care Guide - Page 6
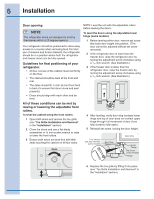
raising or lowering the adjustable front
 |
UPC - 012505694790
View all Electrolux EW23CS70IB manuals
Add to My Manuals
Save this manual to your list of manuals |
Page 6 highlights
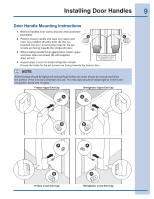
6 Installation Door opening NOTE The refrigerator doors are designed to shut by themselves within a 20 degree opening. Your refrigerator should be positioned to allow easy access to a counter when removing food. For best use of drawers and freezer baskets, the refrigerator should be in a position where both the refrigerator and freezer doors can be fully opened. Guidelines for final positioning of your refrigerator: • All four corners of the cabinet must rest firmly on the floor. • The cabinet should be level at the front and rear. • The sides should tilt ¼ inch (6 mm) from front to back (to ensure that doors close and seal properly). • Doors should align with each other and be level. NOTE: Level the unit with the adjustable rollers before leveling the doors. To level the doors using the adjustable lower hinge (some models): 1 Before leveling either door, remove set screw that locks door height into position. (The door cannot be adjusted without set screw removed). 2 If the refrigerator door is lower than the freezer door, raise the refrigerator door by turning the adjustment screw clockwise using a 7/16 inch wrench. (See illustration.) 3 If the freezer door is lower than the refrigerator door, raise the freezer door by turning the adjustment screw clockwise using a 7/16 inch wrench. (See illustration.) All of these conditions can be met by raising or lowering the adjustable front rollers. To level the cabinet using the front rollers: 1 Open both doors and remove the toe grille (see "Toe Grille Installation and Removal" in the "Installation" section). 2 Close the doors and use a flat-blade screwdriver or ³⁄₈ inch socket wrench to raise or lower the front rollers. 3 Ensure both doors are bind-free with their seals touching the cabinet on all four sides. 4 After leveling, verify door stop contacts lower hinge and top of door does not contact upper hinge through full movement of door (from fully closed to fully open). 5 Reinstall set screw, locking the door height. 7/16" Wrench and 3/32" Hex Key (some models) Door Stop Flange Open Door Hinge Flange Set Screw (some models) Hinge 6 Replace the toe grille by fitting it into place (see "Toe Grille Installation and Removal" in the "Installation" section).
-
 1
1 -
 2
2 -
 3
3 -
 4
4 -
 5
5 -
 6
6 -
 7
7 -
 8
8 -
 9
9 -
 10
10 -
 11
11 -
 12
12 -
13
-
14
-
15
-
16
-
17
-
18
-
19
-
20
-
21
-
22
-
23
-
24
-
25
-
26
-
27
-
28
-
29
-
30
-
31
-
32
-
33
-
34
-
35
-
36
-
37
-
38
-
39
-
40
-
41
-
42
 |
 |