Electrolux EW27MO55HS Installation Instructions (All Languages) - Page 3
Removing Oven For Servicing, Anti-tip Bracket Installation, Finished Anti-tip Bracket Installation - 27
 |
UPC - 012505559112
View all Electrolux EW27MO55HS manuals
Add to My Manuals
Save this manual to your list of manuals |
Page 3 highlights
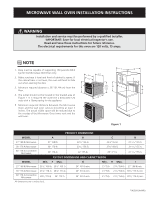
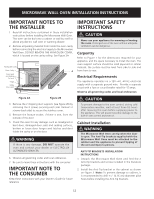
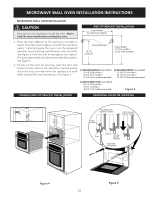
MICROWAVE WALL OVEN INSTALLATION INSTRUCTIONS Microwave Wall Oven Installation Two persons are required to install the oven. Never hold the door handle when moving the oven. anti-tip bracket installation Cutout Width (See dimensions below) 3. Place the oven adjacent to the opening on a table or stand. Plug the power supply cord into the electrical outlet. Carefully guide the oven into the prepared opening. Avoid pinching cord between oven and wall. See Figure 4. Push the unit in and against the cabinet. The oven side bracket will clip into the Anti-Tip brackets. See Figure 3. 4. To pull out the oven for servicing, open the door and locate the two holes on the side frame. Simultaneously insert the tools provided with the appliance in both holes and pull the oven towards you. See Figure 5. Anti-Tip Brackets 16-1/2" (41.9 cm) Cutout Height 21" (53.3 cm) Min.* 21-1/2" (54.6 cm) Max.* 27-INCH MICROWAVE Cutout Width 25-1/8" (63.8 cm) Min.* 25-5/8" (65.1 cm) Max.* 25-3/8" (64.5 cm) Recommended* 30-INCH MICROWAVE Cutout Width 27-5/8" (70.2 cm) Min.* 28-1/8" (71.4 cm) Max.* 27-7/8" (70.8 cm) Recommended* 30-INCH CONVECTION Cutout Width 28-1/2" (72.4 cm) Min.* 29" (73.7 cm) Max.* 28-3/4" (73.0 cm) Recommended* Figure 3 finished anti-tip bracket installation removing oven for servicing Anti-Tip Bracket installed in cabinet Oven Bracket Oven removed from the cabinet Oven Cabinet Anti-Tip Bracket released Right Side Tool supplied Figure 4 Figure 5 E3
-
 1
1 -
 2
2 -
 3
3 -
 4
4
 |
 |
