Electrolux EW30DS65GS Installation Instructions (All Languages)
Electrolux EW30DS65GS - 30" Slide-In Dual Fuel Range Manual
 |
UPC - 057112097015
View all Electrolux EW30DS65GS manuals
Add to My Manuals
Save this manual to your list of manuals |
Electrolux EW30DS65GS manual content summary:
- Electrolux EW30DS65GS | Installation Instructions (All Languages) - Page 1
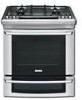
30" DUAL FUEL SLIDE-IN RANGE INSTALLATION INSTRUCTIONS (Models with an Electric Oven and a Gas Cooktop) INSTALLATION AND SERVICE MUST BE PERFORMED BY A QUALIFIED INSTALLER. IMPORTANT: SAVE FOR LOCAL ELECTRICAL INSPECTOR'S USE. READ AND SAVE THESE INSTRUCTIONS FOR FUTURE REFERENCE. If the - Electrolux EW30DS65GS | Installation Instructions (All Languages) - Page 2
30" DUAL FUEL SLIDE-IN RANGE INSTALLATION INSTRUCTIONS (Models with an Electric Oven and a Gas Cooktop) NOTE: 1. Do not pinch the power supply cord or the flexible gas conduit between the range and the wall. 2. Do not seal the range to the side cabinets. 3. 24" (61 cm) minimum clearance between the - Electrolux EW30DS65GS | Installation Instructions (All Languages) - Page 3
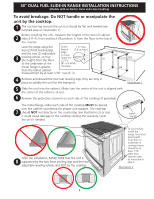
30" DUAL FUEL SLIDE-IN RANGE INSTALLATION INSTRUCTIONS (Models with an Electric Oven and a Gas Cooktop) To avoid breakage: Do NOT handle or manipulate the unit by the cooktop. 1 The counter-top around the cut-out should be flat and leveled (see hatched area on illustration 1). Before installing - Electrolux EW30DS65GS | Installation Instructions (All Languages) - Page 4
30" DUAL FUEL SLIDE-IN RANGE INSTALLATION INSTRUCTIONS (Models with an Electric Oven and a Gas Cooktop) Important Notes to the Installer 1. Read all instructions contained in these installation instructions before installing range. 2. Remove all packing material from the oven compartments before - Electrolux EW30DS65GS | Installation Instructions (All Languages) - Page 5
30" DUAL FUEL SLIDE-IN RANGE INSTALLATION INSTRUCTIONS (Models with an Electric Oven and a Gas Cooktop) 1 Power Supply Cord 125/250 volts 30 Amps should be used. Cord must have either 3 or 4 conductors. For mobile homes, new installations, recreational vehicles, or areas where local codes do not - Electrolux EW30DS65GS | Installation Instructions (All Languages) - Page 6
30" DUAL FUEL SLIDE-IN RANGE INSTALLATION INSTRUCTIONS (Models with an Electric Oven and a Gas Cooktop) 3 Electrical Connection to the Range (U.S.A.) This appliance is manufactured with the neutral terminal connected to the frame. Note: Refer to the wiring diagram in the center pages of this manual - Electrolux EW30DS65GS | Installation Instructions (All Languages) - Page 7
30" DUAL FUEL SLIDE-IN RANGE INSTALLATION INSTRUCTIONS (Models with an Electric Oven and a Gas Cooktop) Terminal Block Silver appliance. Figure 5 3-Wire (Grounded Neutral) Electrical System (Example: Junction Box) Where local codes DO NOT permit connecting the appliance-grounding conductor - Electrolux EW30DS65GS | Installation Instructions (All Languages) - Page 8
30" DUAL FUEL SLIDE-IN RANGE INSTALLATION INSTRUCTIONS (Models with an Electric Oven and a Gas Cooktop) 4 Cabinet Construction To eliminate the risk of burns or fire by reaching over heated surface units, do not have cabinet storage space above the range local codes permit use. The gas supply - Electrolux EW30DS65GS | Installation Instructions (All Languages) - Page 9
30" DUAL FUEL SLIDE-IN RANGE INSTALLATION INSTRUCTIONS (Models with an Electric Oven and a Gas Cooktop) Connection to Pressure Regulator The regulator is already installed on the appliance. Do not make the connection too tight. The regulator is die cast. Overtightening may crack the regulator - Electrolux EW30DS65GS | Installation Instructions (All Languages) - Page 10
30" DUAL FUEL SLIDE-IN RANGE INSTALLATION INSTRUCTIONS (Models with an Electric Oven and a Gas Cooktop) 6 LP/Propane Gas Conversion This appliance can be used with Natural gas or LP/ Propane gas. It is shipped from the factory for use with natural gas. If you wish to convert your range for use with - Electrolux EW30DS65GS | Installation Instructions (All Languages) - Page 11
30" DUAL FUEL SLIDE-IN RANGE INSTALLATION INSTRUCTIONS (Models with an Electric Oven and a Gas Cooktop) 9 Leveling the Range Models Equipped with Leveling Device Level the range after installation in the cutout opening. 1. Open the range drawer. The leveling screws control the height of the rear - Electrolux EW30DS65GS | Installation Instructions (All Languages) - Page 12
30" DUAL FUEL SLIDE-IN RANGE INSTALLATION INSTRUCTIONS (Models with an Electric Oven and a Gas Cooktop) D. Be sure that have been checked. 10.5 Adjust the "LOW" Setting of the Dual Burner Surface Valve (Figure 16) Note: On the dual valve the low setting of each portion should be adjusted - Electrolux EW30DS65GS | Installation Instructions (All Languages) - Page 13
30" DUAL FUEL SLIDE-IN RANGE INSTALLATION INSTRUCTIONS (Models with an Electric Oven and a Gas Cooktop) 10.6 warranty and service information in your Use and Care Guide for phone number and address. Please call or write if you have inquiries about your range product and/or need to order parts - Electrolux EW30DS65GS | Installation Instructions (All Languages) - Page 14
30" DUAL FUEL SLIDE-IN RANGE INSTALLATION INSTRUCTIONS (Models with an Electric Oven and a Gas Cooktop) 11 Anti-Tip Brackets Installation Instructions To reduce the risk of tipping of the range, the range must be secured to the floor by properly installed anti-tip bracket and screws packed with the - Electrolux EW30DS65GS | Installation Instructions (All Languages) - Page 15
INSTRUCCIONES DE INSTALACIÓN PARA LA ESTUFA DE FUEL DUAL DE 30" (Para Modelos con un Horno Eléctrico y una Estufa a Gas) LA INSTALACIÓN Y EL SERVICIO DEBEN SER EFECTUADOS POR UN INSTALADOR CALIFICADO. IMPORTANTE: GUARDE ESTAS INSTRUCCIONES PARA USO DEL INSPECTOR LOCAL DE ELECTRICIDAD. LEA Y GUARDE - Electrolux EW30DS65GS | Installation Instructions (All Languages) - Page 16
ESTUFA DE FUEL DUAL DE 30" (Para Modelos con un Horno Eléctrico y una Estufa a Gas) NOTA: 1. No pellizque el cordón eléctrico o el conducto flexible de gas entre soportada por las patas adelante y por las ruedas en la parte de atrás y NO por la cubierta superior sobre la encimera. 22 7/8" (58,1 - Electrolux EW30DS65GS | Installation Instructions (All Languages) - Page 17
ÓN PARA LA ESTUFA DE FUEL DUAL DE 30" (Para Modelos con un Horno Eléctrico y una Estufa a Gas) Para evitar fractura de este centrada con el centro de la abertura del gabinete. Ilustración 1 6 Remueva la parte en plástico extruido en cada lado de la cubierta. (Algunos modelos) Es imprescindible - Electrolux EW30DS65GS | Installation Instructions (All Languages) - Page 18
FUEL DUAL DE 30" (Para Modelos con un Horno Eléctrico y una Estufa a Gas) Notas importantes para el Instalador 1. Lea todas las instrucciones contenidas en este manual tulo 24, HUD (parte 280)] o cuando tal estándar no se aplica, el Standard for Manufactured Home Installation 1982 (Manufactured Home - Electrolux EW30DS65GS | Installation Instructions (All Languages) - Page 19
INSTRUCCIONES DE INSTALACIÓN PARA LA ESTUFA DE FUEL DUAL DE 30" (Para Modelos con un Horno Eléctrico y una Estufa a Gas) 1 Estuche de cable del suministro eléctrico (U.S.A.) ón de la cocina al bloque terminal cuando esté instalándola. El corte o la perdida de corriente eléctrica puede ocurrir. 19 - Electrolux EW30DS65GS | Installation Instructions (All Languages) - Page 20
ÓN PARA LA ESTUFA DE FUEL DUAL DE 30" (Para Modelos con un Horno Eléctrico y una Estufa a Gas) 2 Conexión Eléctrico de la Estufa (U.S.A.) Este aparato se fabrica con el terminal neutro conectado al marco. Refiere al diagrama de alambraje en las paginas de centro de este manual. Conexión de tres - Electrolux EW30DS65GS | Installation Instructions (All Languages) - Page 21
INSTRUCCIONES DE INSTALACIÓN PARA LA ESTUFA DE FUEL DUAL DE 30" (Para Modelos con un Horno Eléctrico y una Estufa a Gas) Bloque terminal Terminal plata Alambre Rojo Alambre Negro 1-1/8" Dia. Agujero de la conexión directa.Retira la arandela pre-cortada para 1-3/8" Dia. Agujero Una arazadera de - Electrolux EW30DS65GS | Installation Instructions (All Languages) - Page 22
INSTALACIÓN PARA LA ESTUFA DE FUEL DUAL DE 30" (Para Modelos con un Horno Eléctrico y una Estufa a Gas) 3 Construcción del armario válvula distribuidora y DEBE ser conectado en serie con la tubería de suministro de gas. Para la operación apropiada, la máxima presión de entrada al regulador no debe - Electrolux EW30DS65GS | Installation Instructions (All Languages) - Page 23
PARA LA ESTUFA DE FUEL DUAL DE 30" (Para Modelos con un Horno Eléctrico y una Estufa a Gas) Conecte el Regulador la estufa del sistema del suministro de gas cerrando su válvula manual de cierre individual durante cualquier prueba de presión del suministro del gas a presiones iguales a menos de 1/2 - Electrolux EW30DS65GS | Installation Instructions (All Languages) - Page 24
INSTALACIÓN PARA LA ESTUFA DE FUEL DUAL DE 30" (Para Modelos con un Horno Eléctrico y una Estufa a Gas) 6 Conversión para uso de Propano Líquido Este aparato puede ser usado con gas natural o propano líquido. Ha sido ajustado en la fábrica para operar con gas natural solamente. Si desea convertir - Electrolux EW30DS65GS | Installation Instructions (All Languages) - Page 25
FUEL DUAL DE 30" (Para Modelos con un Horno Eléctrico y una Estufa a Gas) 9 Nivelación de la estufa Nivele la cocina después de haberla instalado en la abertura del mostrador. 1. Abra la gaveta. 2. Ajuste las patas del electrodoméstico y las ruedas como se muestra a seguir hasta que la parte Instale - Electrolux EW30DS65GS | Installation Instructions (All Languages) - Page 26
DE INSTALACIÓN PARA LA ESTUFA DE FUEL DUAL DE 30" (Para Modelos con un Horno Eléctrico y una Estufa a Gas) Tapa del quemador Base del aire no se requiere en los quemadores de superficie 10.5 Ajuste bajo "LOW" para la válvula de quemador de superficie puente o triple (Figura 16) (algunos modelos - Electrolux EW30DS65GS | Installation Instructions (All Languages) - Page 27
FUEL DUAL DE 30" (Para Modelos con un Horno Eléctrico y una Estufa a Gas) 10.6 Funcionamiento de los Elementos del Horno El horno está equipado con un control electr Llamar al Servicio Lea la sección Evite Llamadas de Servicio en su Manual del Usuario. Esto le podrá ahorrar tiempo y gastos. Esta - Electrolux EW30DS65GS | Installation Instructions (All Languages) - Page 28
INSTALACIÓN PARA LA ESTUFA DE FUEL DUAL DE 30" (Para Modelos con un Horno Eléctrico y una Estufa a Gas) 11 Instrucciones de instalación de hay pared posterior, dibujar otra línea en el piso que corresponda a la parte posterior de la cocina. 2. Desplegar el molde de papel y colocarlo alisado sobre - Electrolux EW30DS65GS | Installation Instructions (All Languages) - Page 29
POUR CUISINIÈRE ENCASTRABLE DE 30" À ALIMENTATION MIXTE (Modèles avec four électrique et plaque de cuisson à gaz) UN INSTALLATEUR QUALIFIÉ DOIT EFFECTUER L'INSTALLATION ET LE SERVICE. IMPORTANT: CONSERVEZ CES INSTRUCTIONS POUR LES INSPECTEURS LOCAUX. LISEZ CES INSTRUCTIONS ET CONSERVEZ‑LES POUR - Electrolux EW30DS65GS | Installation Instructions (All Languages) - Page 30
INSTRUCTIONS D'INSTALLATION POUR CUISINIÈRE ENCASTRABLE DE 30" À ALIMENTATION MIXTE (Modèles avec four é ), insérez l'appareil dans le comptoir et ensuite nivelez- le. Assurez-vous que l'appareil est bien supporté par les pattes et roulettes de nivellement et non par la table de cuisson. 22 7/8" (58 - Electrolux EW30DS65GS | Installation Instructions (All Languages) - Page 31
INSTRUCTIONS D'INSTALLATION POUR CUISINIÈRE ENCASTRABLE DE 30" À ALIMENTATION MIXTE (Modèles avec four électrique et de la table de cuisson DOIT reposer sur le comptoir pour que l'appareil soit bien supporté. 7 La table de cuisson ne doit PAS toucher directement le comptoir (voir illustration 2), - Electrolux EW30DS65GS | Installation Instructions (All Languages) - Page 32
instructions avec le guide de l'utilisateur pour référence ultérieure. INSTRUCTIONS DE SÉCURITÉ IMPORTANTES Cette cuisinière doit être install ), ANSI Z225.1/NFPA 501A-dernière édition, ou aux codes locaux. Lorsque l'installation se fait au Canada, elle doit se conformer à la norme CAN/ACNOR‑Z240 MH - Electrolux EW30DS65GS | Installation Instructions (All Languages) - Page 33
installations, les véhicules récréatifs ou tout autre endroit où les codes locaux interdisent la mise à la terre au moyen du conducteur neutre, un cordon d'alimentation de 4 conducteurs d'un minimum de 125/250 volts 30 est inadéquate, si les instructions d'installation ne sont pas suivies ou si le - Electrolux EW30DS65GS | Installation Instructions (All Languages) - Page 34
INSTRUCTIONS D'INSTALLATION POUR CUISINIÈRE ENCASTRABLE DE 30" À ALIMENTATION MIXTE (Modèles avec four électrique fil blanc est interdite, soit dans les nouvelles installations, les maisons mobiles, les véhicules récréatifs ou à d'autres endroits où les codes locaux interdisent la mise à la terre au - Electrolux EW30DS65GS | Installation Instructions (All Languages) - Page 35
INSTRUCTIONS D'INSTALLATION POUR CUISINIÈRE ENCASTRABLE DE 30" À ALIMENTATION MIXTE (Modèles avec un connecteur homologué UL. Complétez les raccordements électriques conformément aux codes et ordonnances locaux. Si les codes locaux permettent le raccordement du conducteur de mise à la terre du châ - Electrolux EW30DS65GS | Installation Instructions (All Languages) - Page 36
INSTRUCTIONS D'INSTALLATION POUR CUISINIÈRE ENCASTRABLE DE 30" À ALIMENTATION MIXTE (Modèles avec four é de l'angle du découpage du dessus de comptoir sans le toucher. 5 Alimentation en gaz - Installation Cet appareil a été conçu en usine pour fonctionner au gaz naturel avec une pression d'admission - Electrolux EW30DS65GS | Installation Instructions (All Languages) - Page 37
INSTRUCTIONS D'INSTALLATION POUR CUISINIÈRE ENCASTRABLE DE 30" À ALIMENTATION MIXTE (Modèles avec four électrique et La ligne de gaz doit être munie d'un robinet d'arrêt manuel approuvé. Ce robinet doit être installé dans la même pièce que l'appareil et doit être facile d'accès. Ne bloquez pas l'acc - Electrolux EW30DS65GS | Installation Instructions (All Languages) - Page 38
«POUR CONVERSION AU GAZ PROPANE». Suivez les instructions d'installation se trouvant dans l'enveloppe. Un installateur qualifié doit effectuer la conversion conformément aux instructions du fabricant et à tous les codes et règlements applicables. Si ces instructions ne sont pas suivies à la lettre - Electrolux EW30DS65GS | Installation Instructions (All Languages) - Page 39
INSTRUCTIONS D'INSTALLATION POUR CUISINIÈRE ENCASTRABLE DE 30" À ALIMENTATION MIXTE (Modèles avec four électrique et plaque de cuisson à gaz) 8.7 Installez le support anti- bascule maintenant avant de placer l'appareil à sa position finale. Suivez les instructions à la page 42 ou sur le gabarit - Electrolux EW30DS65GS | Installation Instructions (All Languages) - Page 40
INSTRUCTIONS D'INSTALLATION POUR CUISINIÈRE ENCASTRABLE DE 30" À ALIMENTATION MIXTE (Modèles avec four électrique et plaque de cuisson à gaz) 10 Vérification du Fonctionnement Référez‑vous au Guide aient été vérifiés. 10.4 Réglage de la position "LOW" des robinets des brûleurs de surface réguliers ( - Electrolux EW30DS65GS | Installation Instructions (All Languages) - Page 41
INSTRUCTIONS D'INSTALLATION POUR CUISINIÈRE ENCASTRABLE DE 30" À ALIMENTATION MIXTE (Modèles avec four électrique et plaque de cuisson à gaz) 10.5 Réglage de la position "LOW à la garantie et aux renseignements sur les services d'entretien dans votre Guide de l'utilisateur. Prière de nous téléphoner - Electrolux EW30DS65GS | Installation Instructions (All Languages) - Page 42
POUR CUISINIÈRE ENCASTRABLE DE 30" À ALIMENTATION MIXTE (Modèles avec four électrique et plaque de cuisson à gaz) 10 Instructions d'installation du support anti‑bascule Pour réduire le risque de basculement de la cuisinière, protégez-la en installant les vis et le support anti‑bascule fournis avec - Electrolux EW30DS65GS | Installation Instructions (All Languages) - Page 43
WIRING DIAGRAM - Diagrama de cables- SCHÉMA DE CÂBLAGE For models/ Para el modelos/ Pour les modèles: EI30DS55JX & EI30D5CJX 43 - Electrolux EW30DS65GS | Installation Instructions (All Languages) - Page 44
WIRING DIAGRAM - Diagrama de cables- SCHÉMA DE CÂBLAGE For models/ Para el modelos/ Pour les modèles: EW30DS65GX & EW30DS6CGX 44
-
 1
1 -
 2
2 -
 3
3 -
 4
4 -
 5
5 -
 6
6 -
 7
7 -
8
-
9
-
10
-
11
-
12
-
13
-
14
-
15
-
16
-
17
-
18
-
19
-
20
-
21
-
22
-
23
-
24
-
25
-
26
-
27
-
28
-
29
-
30
-
31
-
32
-
33
-
34
-
35
-
36
-
37
-
38
-
39
-
40
-
41
-
42
-
43
-
44
 |
 |
30" DUAL FUEL SLIDE-IN RANGE INSTALLATION INSTRUCTIONS
(Models with an Electric Oven and a Gas Cooktop)
P/N 318201687 (1007) Rev. A
English – pages 1-14;
Español – páginas 15-28;
Français – pages 29-42;
Wiring Diagrams - pages 43-44
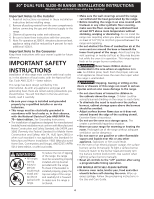
If the information in this manual is not followed exactly, a fire
or explosion may result causing property damage, personal injury or death.
FOR YOUR SAFETY:
—
Do not store or use gasoline or other flammable vapors and liquids in the
vicinity of this or any other appliance.
—
WHAT TO DO IF YOU SMELL GAS:
•
Do not try to light any appliance.
•
Do not touch any electrical switch; do not use any phone in your building.
•
Immediately call your gas supplier from a neighbor's phone. Follow the
gas supplier's instructions.
•
If you cannot reach your gas supplier, call the fire department.
—
Installation and service must be performed by a qualified installer, service
agency or the gas supplier.
INSTALLATION AND SERVICE MUST BE PERFORMED BY A QUALIFIED INSTALLER.
IMPORTANT: SAVE FOR LOCAL ELECTRICAL INSPECTOR'S USE.
READ AND SAVE THESE INSTRUCTIONS FOR FUTURE REFERENCE.
NOTE: Wiring diagram for these appliances are enclosed in this booklet.
Printed in United States
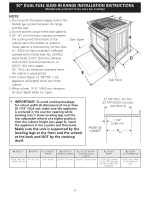
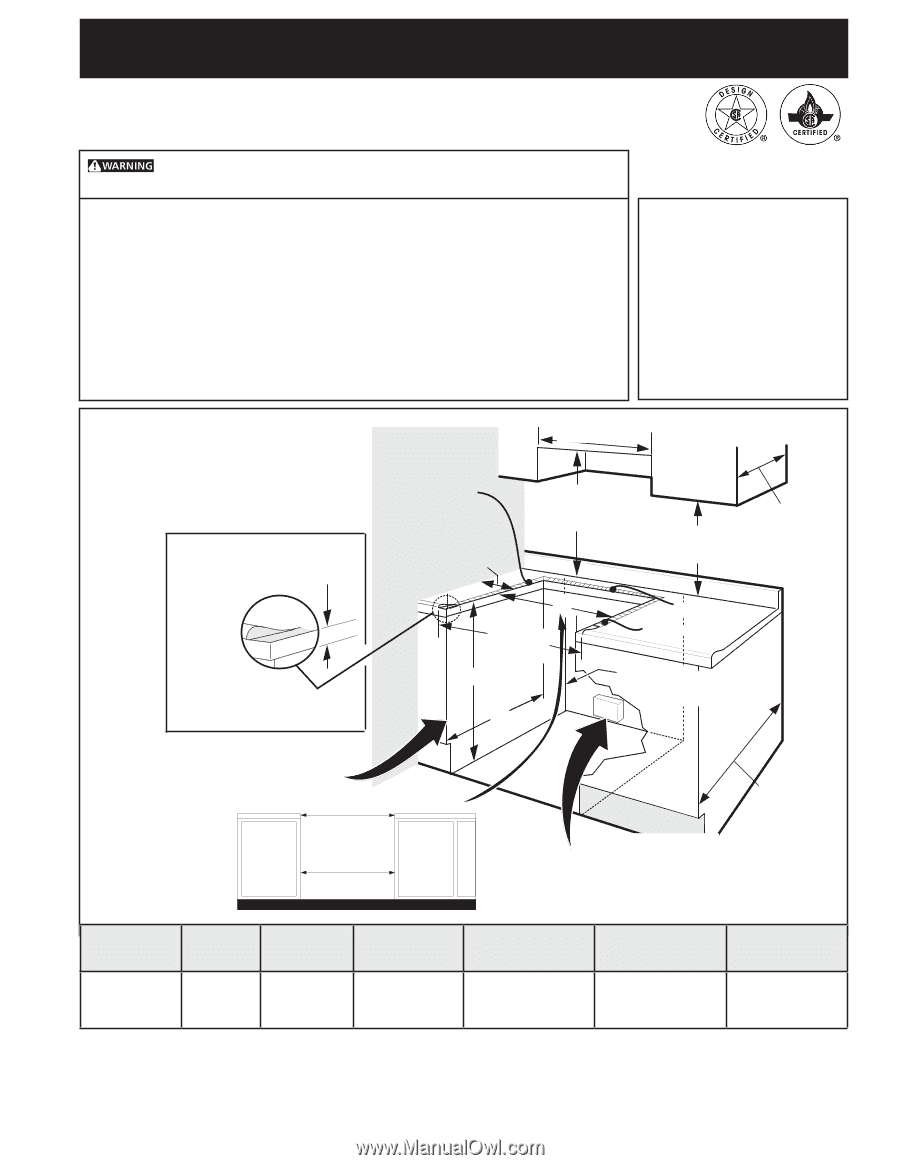
1/2” min.
3/8” min.
1/2” min.
WALL
5" Min.
(12,7 cm Min.)
From Wall Both Sides
30" Min.
(76,2 cm Min.)
30" Min.
(76,2 cm) Min.
(see Note 3)
18" Min.
(45,7 cm) Min.
Approx. 1 7/8"
(4,8 cm)
Grounded Junction Box or Wall Outlet
Should Be Located 8" to 17" (20,3 cm to
43,2 cm) From Right Cabinet and 2" to 4"
(5,1 cm to 10,2 cm) From Floor.
Locate Cabinet Doors 1" (2,5 cm)
Min. from Cutout Opening.
F
G
E
31 1/2"
(81 cm)
Exact
13"
(33 cm)
24" Min.
(61 cm Min.)
Shave
Raised
Edge
to Clear
Space
for a 31½"
(80 cm) Wide
Cooktop.
1 ½" Max.
(3,8 cm Max.)
These surfaces should be flat
& leveled (hatched area).
Appliances Installed in the
state of Massachusetts:
This Appliance can only
be installed in the state of
Massachusetts by a Massachusetts
licensed plumber or gasfitter.
This appliance must be installed
with a three (3) foot / 36 in. long
flexible gas connector.
A"T" handle type manual gas
valve must be installed in the gas
supply line to this appliance.
Refer to your serial plate
for applicable agency
certification
E
E
A
. HEIGHT
B
.
WIDTH
C.
COOKTOP
WIDTH
D
.
DEPTH TO
FRONT OF RANGE
E
.
CUTOUT WIDTH*
(Countertop and
Cabinet)
F
.
CUTOUT
DEPTH
G
.
HEIGHT
OF COUNTERTOP
35 5/8" (90.5 cm)
- 36 5/8" (93 cm)
30" (76,2 cm)
31½" (80 cm)
28 5/16" (71,9 cm)
30±1/16" (76,2±0,15 cm)
21 3/4" (55,2 cm) Min.
22 1/8" (56,2 cm) Max
24" (61 cm) Min. with
backguard
36 5/8" (93 cm) Max.
35 ¾" (90,8 cm) Min.
IMPORTANT:
Cabinet and
countertop width
should match the
cutout width.