Electrolux EW30GC55GS Installation Instructions (All Languages)
Electrolux EW30GC55GS - 30 Inch Gas Cooktop Manual
 |
UPC - 057112097169
View all Electrolux EW30GC55GS manuals
Add to My Manuals
Save this manual to your list of manuals |
Electrolux EW30GC55GS manual content summary:
- Electrolux EW30GC55GS | Installation Instructions (All Languages) - Page 1
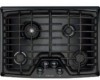
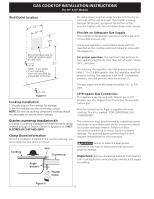
GAS COOKTOP INSTALLATION INSTRUCTIONS (For 30" & 36" Models) INSTALLATION AND SERVICE MUST BE PERFORMED BY A QUALIFIED INSTALLER. IMPORTANT: SAVE FOR LOCAL ELECTRICAL INSPECTOR'S USE. READ AND SAVE THESE INSTRUCTIONS FOR FUTURE REFERENCE. If the information in this manual is not followed exactly, a - Electrolux EW30GC55GS | Installation Instructions (All Languages) - Page 2
Keep these instructions with your Use and Care Guide for future reference. IMPORTANT SAFETY INSTRUCTIONS Installation of this cooktop must conform Guide, read it carefully. • Be sure your cooktop is installed and grounded properly by a qualified installer or service technician. • This cooktop - Electrolux EW30GC55GS | Installation Instructions (All Languages) - Page 3
GAS COOKTOP INSTALLATION INSTRUCTIONS (For 30" & 36" Models) 13" (33 cm) Max. Depth For Cabinet Installed Above A Cooktop. 18" Min. (45.7 cm) B Minimum Distance Between Rear Edge of Cutout and Nearest Combustible Surface Above Countertop. Clearance 30" (76.2 cm) Min. Clearance Between the - Electrolux EW30GC55GS | Installation Instructions (All Languages) - Page 4
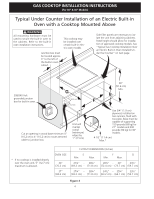
the built-in oven installation instructions. This cooktop may be installed over certain built-in electric oven models. Junction box must be located capable of supporting 150 pounds (68 kg) for 27" models and 200 pounds (90 kg) for 30" models. 4 1/2" (11.4 cm) Max.* * If no cooktop is installed - Electrolux EW30GC55GS | Installation Instructions (All Languages) - Page 5
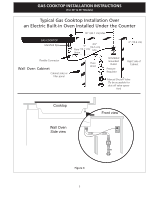
COOKTOP INSTALLATION INSTRUCTIONS (For 30" & 36" Models) Typical Gas Cooktop Installation Over an Electric Built-in Oven Installed Under the Counter 18" (45.7 cm) Max. GAS COOKTOP Side of Cabinet Manual Shutoff Valve (To be accessible for shut-off valve opera- tion) Cooktop Wall Oven Side view - Electrolux EW30GC55GS | Installation Instructions (All Languages) - Page 6
GAS COOKTOP INSTALLATION INSTRUCTIONS (For 30" & 36" Models) Wall Outlet Location kit for converting to LP gas is supplied with your cooktop. The kit is marked "FOR LP/PROPANE GAS CONVERSION". The conversion must be performed by a qualified service technician in accordance with the kit instructions - Electrolux EW30GC55GS | Installation Instructions (All Languages) - Page 7
GAS COOKTOP INSTALLATION INSTRUCTIONS (For 30" & 36" Models) Install Pressure Regulator Install the pressure regulator crack the regulator resulting in a gas leak and possible fire or explosion. Manual Shutoff Valve Flare Union GAS FLOW Pressure Flare Regulator Union On Nipple Off Flexible - Electrolux EW30GC55GS | Installation Instructions (All Languages) - Page 8
GAS COOKTOP INSTALLATION INSTRUCTIONS (For 30" & 36" Models) Do not, under any circumstances, cut or remove the third (ground) prong from the power cord. Disconnect electrical supply cord from wall receptacle before servicing cooktop. Preferred Method Grounding type wall receptacle Do not, under - Electrolux EW30GC55GS | Installation Instructions (All Languages) - Page 9
OFF position. Make sure the flow of combustion and ventilation air to the cooktop is unobstructed. Before You Call for Service Read the Before You Call for Service Checklist and operating instructions in your Use and Care Guide. It may save you time and expense. The list includes common occurrences - Electrolux EW30GC55GS | Installation Instructions (All Languages) - Page 10
ESTAS INSTRUCCIONES PARA USO DEL INSPECTOR ELÉCTRICO LOCAL. LEA Y GUARDE ESTAS INSTRUCCIONES PARA FUTURAS REFERENCIAS Si todas las instrucciones de éste manual no son observadas a la letra, se puede ocurrir incendios o explosiones que pueden causar daños materiales, lesiones o la muerte. PARA SU - Electrolux EW30GC55GS | Installation Instructions (All Languages) - Page 11
reducirse un 4% por cada 1000 ft sobre el nivel del mar. Notas importantes para el consumidor Guarde todas las instrucciones con su manual del usuario para futuras referiencias. INSTRUCCIONES DE SEGURIDAD IMPORTANTES La instalación de esta plancha de cocinar debe realizarse en conformidad con los - Electrolux EW30GC55GS | Installation Instructions (All Languages) - Page 12
INSTRUCCIONES DE INSTALACION PARA PLANCHA DE COCINAR A GAS (Para modelos de 30 & 36 pulgadas) Máx. profundidad de gabinetes instalados por encima de la plancha de empotar es 13" (33 cm). A 18" Min. (45.7 cm) B Mínimo Distancia entre el borde posterior del hueco y la más cerca superficie - Electrolux EW30GC55GS | Installation Instructions (All Languages) - Page 13
INSTRUCCIONES DE INSTALACION PARA PLANCHA DE COCINAR A GAS (Para modelos de 30 & 36 pulgadas) Típica instalación de un horno eléctrico empotrado con una plancha de cocinar por encima Todas las fijaciones de montaje deben de estar utilizadas para sujetar el horno empotrado a los armarios. Refiere a - Electrolux EW30GC55GS | Installation Instructions (All Languages) - Page 14
ón Unión Unión 120V/60Hz Toma de corriente a regultaiedrorra de presión 4" (10.2cm) Lado derecho del armario Válvula de cierre manual (Debe de ser accessible para el funciona-miento de la válvula de cierre) ESCTUoFoAktDoEp GAS Wall Oven VhiostranodSedidelaepdaovrideedewl VisFtaroannttevriieowr - Electrolux EW30GC55GS | Installation Instructions (All Languages) - Page 15
plancha de cocinar en el recorte del mostrador. El kit de instalación para una cubierta en granito Un kit de instalación # 903103-9010 para una cubierta de a través del Valvula de FLUJO DEL GAS Regulator cierre Unión manual Unión de presión soporte y hasta la parte de abajo del mostrador - Electrolux EW30GC55GS | Installation Instructions (All Languages) - Page 16
la plancha de cocinar en la fábrica. La placa de se- Figura 9 rie está ubicada bajo la hornilla. Verifique la operación Refiera al Manual del Usuario que viene con la plancha de cocinar para las instrucciones de funcionamiento y el mantenimiento y la limpieza de su plancha de cocinar. No - Electrolux EW30GC55GS | Installation Instructions (All Languages) - Page 17
: El ajuste de la mezcla del aire no se requiere en los quemadores de superficie Lea la garantía y la información sobre el servicio en su Manual del Usuario para obtener el número de teléfono y la dirreción del servicio. Por favor llame o escriba si tiene preguntas acerca de su estufa o necesita - Electrolux EW30GC55GS | Installation Instructions (All Languages) - Page 18
30" et 36") UN INSTALLATEUR QUALIFIÉ DOIT EFFECTUER L'INSTALLATION ET LE SERVICE IMPORTANT: CONSERVEZ CES INSTRUCTIONS POUR LES INSPECTEURS LOCAUX. LISEZ CES INSTRUCTIONS ET CONSERVEZ-LES POUR RÉFÉRENCES ULTÉRIEURES. Si les instructions de ce manuel ne sont pas suivies à la lettre, il pourrait en - Electrolux EW30GC55GS | Installation Instructions (All Languages) - Page 19
appareil devrait être réduite de 4% pour chaque 1000 pieds additionnels. Note importante au consommateur Conservez ces instructions avec le guide de l'utilisateur pour référence ultérieure. INSTRUCTIONS DE SÉCURITÉ IMPORTANTES Cet appareil doit être installé conformément aux règlements locaux, ou en - Electrolux EW30GC55GS | Installation Instructions (All Languages) - Page 20
INSTRUCTIONS D'INSTALLATION POUR PLAQUE DE CUISSON À GAZ (Pour les modèles 30" et 36") Pour éliminer les risques de brûlures ou de feu en allongeant - Electrolux EW30GC55GS | Installation Instructions (All Languages) - Page 21
INSTRUCTIONS D'INSTALLATION POUR PLAQUE DE CUISSON À GAZ (Pour les modèles 30" et contre-plaqué de ¾" (1.9 cm) d'épaisseur monté sur deux solives et à égalité avec le coup-de-pied. La base doit pouvoir supporter 150 lbs (68 kg) pour les modèles 27" et 200 lbs (90 kg) pour les modèles 30". 4 ½" Max.* - Electrolux EW30GC55GS | Installation Instructions (All Languages) - Page 22
INSTRUCTIONS D'INSTALLATION POUR PLAQUE DE CUISSON À GAZ (Pour les modèles 30" et 36") 18" Max. (45.7 cm) PLAQUE DE CUISSON Tube en métal flexible pour - Electrolux EW30GC55GS | Installation Instructions (All Languages) - Page 23
service ou en téléphonant au 1-877-ELECTROLUX (1-877435-3287). Instructions de fixation Une fois l'appareil installé dans l'ouverture du comptoir, fixez-le tel qu'indiqué. Plaque de cuisson Joint d'étanchéité Comptoir Support de ½" (1.2 cm) à ¾" (1.9 cm). Conversion au gaz de pétrole liquéfié ou - Electrolux EW30GC55GS | Installation Instructions (All Languages) - Page 24
de se déplacer dans le tuyau d'alimentation. Vérifiez qu'il n'y ait pas de fuites. La vérification pour les fuites doit être faite selon les instructions du manufacturier. Après avoir raccordé l'alimentation en gaz à la plaque de cuisson, à l'aide d'un manomètre vérifiez si le système ne fuit pas - Electrolux EW30GC55GS | Installation Instructions (All Languages) - Page 25
INSTRUCTIONS D'INSTALLATION POUR PLAQUE DE CUISSON À GAZ (Pour les modèles 30" et de cuisson. Emplacement de la plaque signalétique Figure 10 Vérification du fonctionnement Référez-vous au Guide de l'utilisateur fourni avec votre appareil pour le mode de fonctionnement et l'entretien de votre plaque - Electrolux EW30GC55GS | Installation Instructions (All Languages) - Page 26
s'éteint, tournez le bouton de commande à la position OFF (arrêt). Avant d'appeler le service d'entretien Consultez la liste des vérifications préventives et les instructions d'opération dans votre Guide de l'utilisateur. Vous sauverez probablement du temps et de l'argent. La liste contient les - Electrolux EW30GC55GS | Installation Instructions (All Languages) - Page 27
WIRING DIAGRAM - SCHÉMA DE CÂBLAGE - DIAGRAMA DE LA INSTALACIÓN ALÁMBRICA (30" Gas Cooktop - Table de cuisson à gaz 30" - Plancha de cocinar a gas modelos de 30 pulgadas) 27 - Electrolux EW30GC55GS | Installation Instructions (All Languages) - Page 28
WIRING DIAGRAM - SCHÉMA DE CÂBLAGE - DIAGRAMA DE LA INSTALACIÓN ALÁMBRICA (36" Gas Cooktop - Table de cuisson à gaz 36" - Plancha de cocinar a gas modelos de 36 pulgadas) 28
-
 1
1 -
 2
2 -
 3
3 -
 4
4 -
 5
5 -
 6
6 -
 7
7 -
8
-
9
-
10
-
11
-
12
-
13
-
14
-
15
-
16
-
17
-
18
-
19
-
20
-
21
-
22
-
23
-
24
-
25
-
26
-
27
-
28
 |
 |
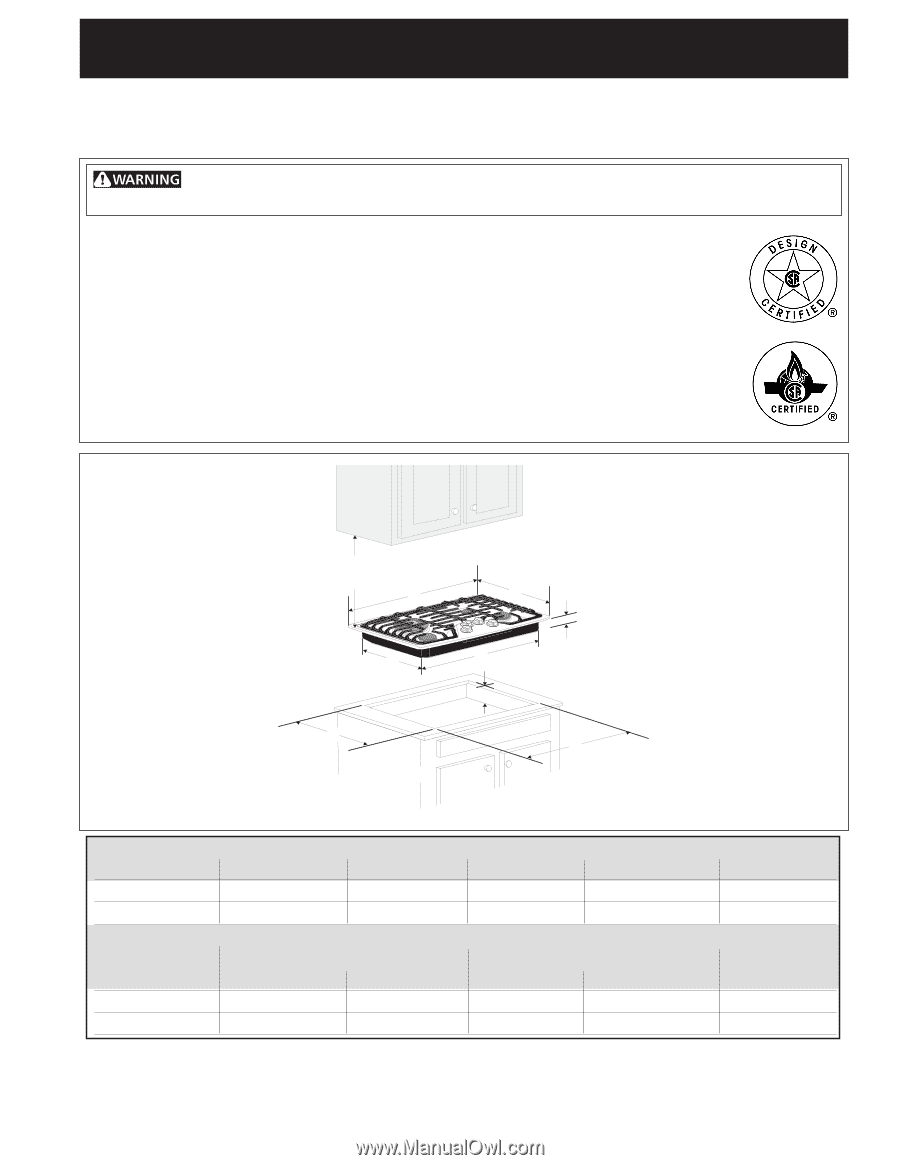
GAS COOKTOP INSTALLATION INSTRUCTIONS
(For 30" & 36" Models)
H
A
B
E
30” Min. *
(76.2 cm)
F
D
C
G
INSTALLATION AND SERVICE MUST BE PERFORMED BY A QUALIFIED INSTALLER.
IMPORTANT: SAVE FOR LOCAL ELECTRICAL INSPECTOR'S USE.
READ AND SAVE THESE INSTRUCTIONS FOR FUTURE REFERENCE.
318201472 (0812) Rev. E
English - pages 1-9
Español - páginas 10-17
Français - pages 18-26
Wiring Diagram 27-28
If the information in this manual is not followed exactly, a fire or explosion may result
causing property damage, personal injury or death.
FOR YOUR SAFETY:
—
Do not store or use gasoline or other flammable vapors and liquids in
the vicinity of this or any other appliance.
—
WHAT TO DO IF YOU SMELL GAS:
•
Do not try to light any appliance.
•
Do not touch any electrical switch; do not use any phone in your building.
•
Immediately call your gas supplier from a neighbor's phone.
Follow the gas supplier's instructions.
•
If you cannot reach your gas supplier, call the fire department.
—
Installation and service must be performed by a qualified installer,
service agency or the gas supplier.
All dimensions are stated in inches and (cm).
Dimension
H
includes a 5" (12.7 cm) space underneath the cooktop for connection to gas supply line.
NOTE: Wiring diagrams for this cooktop are enclosed in this booklet
Figure 1
Printed in United States
PRODUCT DIMENSIONS
MODEL
A
. WIDTH
B
. DEPTH
C
. HEIGHT
D
. BOX WIDTH
E
. BOX DEPTH
30" Gas Cooktop
30
(76.2)
21¾ (55.2)
4¼
(10.8)
27 (68.6)
19
(48.3)
36" Gas Cooktop
36
(91.4)
21¾ (55.2)
4¼
(10.8)
33¼ (84.5)
19 (48.3)
CUTOUT DIMENSIONS
F
. WIDTH
G
. DEPTH
H
. HEIGHT BELOW
MODEL
MINIMUM
MAXIMUM
MINIMUM
MAXIMUM
COOKTOP
30" Gas Cooktop
27¼ (69.2)
28½ (72.4)
19
1
/
8
(48.6)
19¾
(50.2)
8 (20.3)
36" Gas Cooktop
33
7
/
8
(86.1)
34¼ (87)
19
1
/
8
(48.6)
19¾
(50.2)
8 (20.3)
Gas Cooktop
Cutout Dimensions
Gas Cooktop
Dimensions