Electrolux EW30IS65JS Product Specifications Sheet (English) - Page 2
Front - installation
 |
UPC - 057112104607
View all Electrolux EW30IS65JS manuals
Add to My Manuals
Save this manual to your list of manuals |
Page 2 highlights
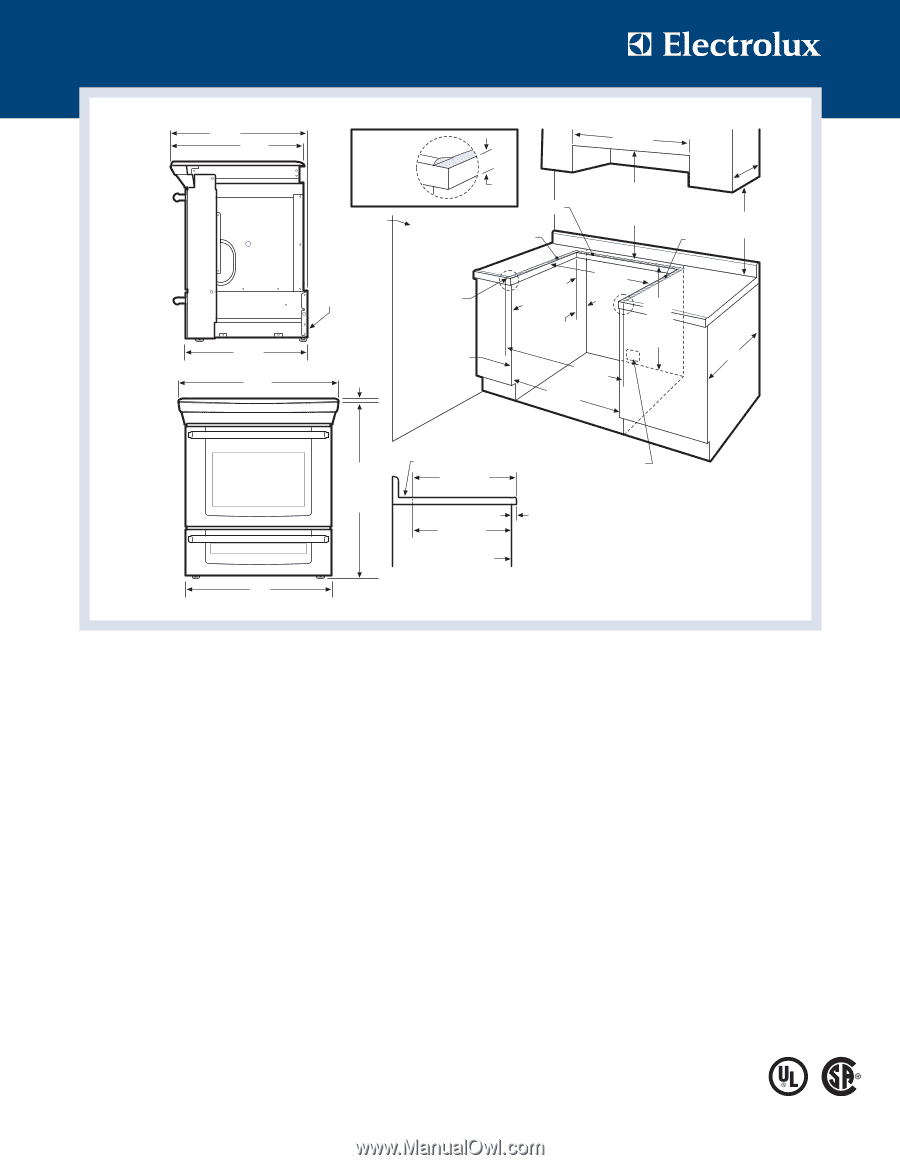
Induction Built-In Range EW30IS65J S Side Overall depth including oven door in 90°open position - 45 1/4" 285/16" 271/2" Front 253/4" 311/2" 30" Shave raised edge to clear space for 311/2" wide cooktop rim WALL Power supply location (left bottom rear) Hatched area should be flat and leveled Locate cabinet doors 1" min. 13/16" from cutout opening 30" min. 13" max. 11/2" max. 24" min. clearance 3/8" min. with protected cabinet bottom 30" min. for unprotected 18" 1/2" min. 1/2" min. min. 21 3/4" min. 22 1/8" max.** Approx. 17/8" 30 ±1/16"* 35 3/4" min. 36 5/8" max. 311/2" (critical) 30 ±1/16"* 24"min. 35 5/8" Adjustable to 36 5/8" *Cabinet and countertop **24" with optional cutout width should match backguard installed Countertop 22 7/8" min. 23 1/4" max. Locate grounded junction box or wall outlet 8" - 17" from right cabinet and 2"- 4" from floor 11/8" 21 3/4" min. 22 1/8" max.** Front Face of Cabinet 30" Induction Built-In Range Specifications • Product Weight - 250 Lbs. • Single phase 3- or 4-wire cable, 120 / 240 or 120 / 208 Volt, 60 Hertz, fused on both sides of line with ground. (If local code permits, range may be connected by hard-wiring or by means of power supply cord kit.) • Connected Load (kW Rating) @ 240 / 208 Volts = 13.2 / 9.9 kW • Amps @ 240 / 208 Volts = 55 / 48 Amps • Recommended Circuit Breaker - 50 Amps • Always consult local and national electric codes. • Countertop MUST be level in all directions and adjustable range height at least 1/16" greater than tallest cabinet height, to ensure metal rangetop flange will fit properly on countertop edge. • When installing optional Backguard Kit, cutout depth of 21-3/4" minimum / 22-1/8" maximum needs increased to 24". • Overhead cabinetry should not exceed a 13" maximum depth. • Absolute minimum horizontal distance between overhead cabinets installed to either side of appliance must be no less than maximum width of appliance. • Allow 24" minimum clearance between rangetop and bottom of cabinet when bottom of wood or metal cabinet is protected by not less than 1/4" flame-retardant millboard covered with not less than No. 28 MGS sheet steel, 0.015" stainless steel, 0.024" aluminum or 0.020" copper. Allow 30" minimum clearance when cabinet is unprotected. • To reduce risk of fire when using overhead cabinetry, install range hood that projects horizontally a recommended minimum of 5" beyond bottom of cabinets. • When installing range into existing cutout depth greater than 22-1/8", optional 2" Rear Filler Kit available. Countertop Preparation For detailed preparation instructions, refer to installation guide on the web. • Flat square-finish (flat) countertop requires no preparation since rangetop flange lays directly on countertop edge. • Formed front-edged countertops require front molded edge to be shaved flat 3/4" from each front corner of opening. • Tile countertops may need cut back 3/4" from each front corner of opening and / or rounded edge flattened. • For existing cutout width greater than 30-1/16" reduce the 3/4" overlap dimension or for cutout width of 29", replace actual side trim panels with smaller side trim panels, available with optional Side Trim Kit (refer to detailed kit installation instructions). Note: For planning purposes only. Refer to Product Installation Guide on the web at electroluxappliances.com for detailed instructions. Optional Accessories • 2" Rear Filler Kit: S - (PN # 903113-901S). • Side Panel Kit: S - (PN # 903102-901S). • Backguard Kit: S - (PN # 903111-901S). • Side Trim Kit: S - (PN # 903110-901S). Electrolux Major Appliances, N.A. USA • 250 Bobby Jones Expressway • Augusta, GA 30907 • 1-877-4electrolux (1-877-435-3287) • electroluxappliances.com CANADA • 5855 Terry Fox Way • Mississauga, ON L5V 3E4 • 1-800-265-8352 • electroluxappliances.ca EW30IS65J 01/10 © 2010 Electrolux Home Products, Inc. High standards of quality at Electrolux Home Products, Inc. mean we are constantly working to improve our products. We reserve the right to change specifications or discontinue models without notice. Printed in the U.S.A.
-
 1
1 -
 2
2
 |
 |