Electrolux EWMED7CJIW Installation Instructions (English Español Fran
Electrolux EWMED7CJIW Manual
 |
View all Electrolux EWMED7CJIW manuals
Add to My Manuals
Save this manual to your list of manuals |
Electrolux EWMED7CJIW manual content summary:
- Electrolux EWMED7CJIW | Installation Instructions (English Español Fran - Page 1
Installation Instructions Electrolux Front-Load Gas & Electric Dryer Instructions d'installation Sécheuse à gaz et à l'électricité à chargement frontal Electrolux Instrucciones de Instalación Secadora eléctrica y a gas de carga frontal Electrolux 137382100 A (1106) - Electrolux EWMED7CJIW | Installation Instructions (English Español Fran - Page 2
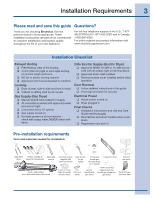
in Canada, the Canadian electrical code C22.1 part 1. • The gas service to the dryer must conform with local codes and ordinances and the latest edition Do not stack washer on top of another washer. • The instructions in this manual and all other literature included with this dryer are not meant to - Electrolux EWMED7CJIW | Installation Instructions (English Español Fran - Page 3
all corners Gas Supply (Gas Dryer) ‰ Manual shutoff valve present in supply ‰ All connections service cord with all screws tight on terminal block ‰ Approved strain relief installed ‰ Terminal access cover installed before initial operation Door Reversal ‰ Follow detailed instructions in this guide - Electrolux EWMED7CJIW | Installation Instructions (English Español Fran - Page 4
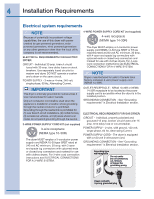
open end spade lug connectors with upturned ends or closed loop connectors and marked for use with clothes dryers. For 3-wire cord connection instructions see ELECTRICAL CONNECTIONS FOR A 3-WIRE SYSTEM. 4-WIRE POWER SUPPLY CORD KIT (not supplied) 4-wire receptacle (NEMA type 14-30R) The dryer MUST - Electrolux EWMED7CJIW | Installation Instructions (English Español Fran - Page 5
12 inches (30.5 cm) clearance between the vent hood and the ground or any other obstruction. WARNING FIRE HAZARD Failure to follow these instructions can create excessive drying times and fire hazards. Correct Incorrect The following are specific requirements for proper and safe operation of your - Electrolux EWMED7CJIW | Installation Instructions (English Español Fran - Page 6
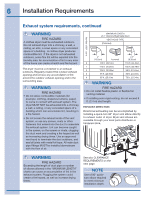
6 Installation Requirements Exhaust system requirements, continued WARNING FIRE HAZARD A clothes dryer must be exhausted outdoors. Do not exhaust dryer into a chimney, a wall, a ceiling, an attic, a crawl space or any concealed space of a building. A clothes dryer produces combustible lint. If the - Electrolux EWMED7CJIW | Installation Instructions (English Español Fran - Page 7
outside (outdoors, not beneath the mobile home) using metal ducting that will not support combustion. Metal ducting must be 4 inches (10.16 cm) in diameter mobile home structure. 4. Refer to previous sections in this guide for other important exhaust venting system requirements. 5. When installing - Electrolux EWMED7CJIW | Installation Instructions (English Español Fran - Page 8
the back of the dryer (for other than straight back venting), a quick-turn 90° dryer vent elbow must be installed as described previously in this manual. - Electrolux EWMED7CJIW | Installation Instructions (English Español Fran - Page 9
Installation Requirements Dryer dimensions 53.5" (136 cm)* to clear open door 31.5" (79.5 cm)* to front of closed door 38.0" (96.5 cm) 27.0" (68.5 cm) electrical supply on rear of unit1 freestand dryer on floor floor line dryer mounted on optional pedestal floor line 53.5" (136 cm)* to clear - Electrolux EWMED7CJIW | Installation Instructions (English Español Fran - Page 10
ELECTRICAL SHOCK HAZARD • This appliance MUST be properly grounded. Electrical shock can result if the dryer is not properly grounded. Follow the instructions in this manual for proper grounding. • Do not use an extension cord with this dryer. Some extension cords are not designed to withstand the - Electrolux EWMED7CJIW | Installation Instructions (English Español Fran - Page 11
Installation Instructions 11 Grounding requirements - Electric dryer (Canada) WARNING ELECTRICAL SHOCK HAZARD Improper connection of the equipment grounding conductor can result in a risk of electrical shock. Check - Electrolux EWMED7CJIW | Installation Instructions (English Español Fran - Page 12
12 Installation Instructions Electrical connection (non-Canada) - 3 wire cord 3-wire receptacle (NEMA type 10-30R) WARNING ELECTRICAL SHOCK HAZARD Failure to disconnect power source before servicing could result in personal injury or even death. 1. Turn off power supply to outlet. 2. Remove the - Electrolux EWMED7CJIW | Installation Instructions (English Español Fran - Page 13
Installation Instructions 13 Electrical connection (non-Canada) - 4 wire cord 4-wire receptacle (NEMA type 14-30R) WARNING ELECTRICAL SHOCK HAZARD Failure to disconnect power source before servicing could result in personal injury or even death. 1. Turn off power supply to outlet. 2. Remove the - Electrolux EWMED7CJIW | Installation Instructions (English Español Fran - Page 14
Instructions Gas connection 1. Remove the shipping cap from gas pipe at the rear of the dryer. IMPORTANT DO NOT connect the dryer to L.P. gas service open flame. IMPORTANT The supply line must be equipped with an approved manual shutoff valve. This valve should be located in the same room as the - Electrolux EWMED7CJIW | Installation Instructions (English Español Fran - Page 15
Installation Instructions 15 Water connection (Steam Model only) WATER SUPPLY REQUIREMENTS Cold water faucet MUST be installed within 42 inches (107 cm) of your dryer's water inlet. - Electrolux EWMED7CJIW | Installation Instructions (English Español Fran - Page 16
16 Installation Instructions Water connection, con't (Steam Model only) 5. If your installation has room for the COLD water supply to accept the "Y" connector directly, thread the "Y" connector to - Electrolux EWMED7CJIW | Installation Instructions (English Español Fran - Page 17
your new dryer. 7. If you have any questions during initial operation, please review the "Avoid Service Checklist" in your Use & Care Guide before calling for service. 8. Place these instructions in a location near the dryer for future reference. NOTE A wiring diagram and technical data sheet are - Electrolux EWMED7CJIW | Installation Instructions (English Español Fran - Page 18
Instructions WARNING service 877 435 3287, review the installation steps and make the necessary corrections before you attempt to use the dryer. 5. Your dryer will exit the Installation Cycle and return to normal operation the next time you wake it up. 6. Please read the Use & Care Guide - Electrolux EWMED7CJIW | Installation Instructions (English Español Fran - Page 19
WARNING ELECTRICAL SHOCK HAZARD Failure to disconnect power source before servicing could result in personal injury or even death. Removing door trim approximately ¾" counterclockwise and pull ring away from door. 3 While supporting the weight of the door with both hands, separate the door from the - Electrolux EWMED7CJIW | Installation Instructions (English Español Fran - Page 20
20 Reversing Door Reversing door and hardware C) Removing Hinge from Front Panel 1 With the hinge in open position, remove 2 short, course-thread, panhead screws on hinge plate. 2 Rotate striker and move to opposite opening. Attach with 2 short, course-thread, panhead screws. 2 Remove 3 short, fi - Electrolux EWMED7CJIW | Installation Instructions (English Español Fran - Page 21
Reversing Door 21 F) Removing Striker Plate H) Removing Hole Plug 1 Remove 2 long, course-thread, counter-sunk screws and latch plate. 2 Set the latch plate to the side for later. G) Removing Latch Indicator 1 Insert flat blade screwdriver into open slot of hole plug. 2 Gently pry upward to - Electrolux EWMED7CJIW | Installation Instructions (English Español Fran - Page 22
22 Reversing Door I) Reinserting Latch Indicator 1 Rotate the latch indicator and move it to the opposite hole in the door. insert indicator through slot J) Reattaching Latch Plate 1 Rotate latch plate and move to opposite side of door above indicator. 2 Reattach with 2 long, course-thread, - Electrolux EWMED7CJIW | Installation Instructions (English Español Fran - Page 23
Reversing Door 23 Reattaching door and hardware L) Reattaching Door Assembly 1 Open the hinge to a 90 degree angle. 2 Install the door onto the hinge locating pins. N) Reinstalling Trim Ring 1 Close door. 2 Orient trim so UP position is approximately ¾" to the left of top center. Opening in ring - Electrolux EWMED7CJIW | Installation Instructions (English Español Fran - Page 24
, or visit our website, www.electroluxappliances.com, for the Electrolux Authorized Parts Distributor nearest you. WARNING ELECTRICAL HAZARD Label all wires prior to disconnection when servicing controls. Wiring errors can cause improper and dangerous operation. Verify proper operation after - Electrolux EWMED7CJIW | Installation Instructions (English Español Fran - Page 25
Installation Instructions Electrolux Front-Load Gas & Electric Dryer Instructions d'installation Sécheuse à gaz et à l'électricité à chargement frontal Electrolux Instrucciones de Instalación Secadora eléctrica y a gas de carga frontal Electrolux - Electrolux EWMED7CJIW | Installation Instructions (English Español Fran - Page 26
qualifié, un technicien de service ou le fournisseur de gaz. • Installez l'appareil conformément aux instructions du fabricant et aux codes superposez pas une laveuse sur une autre laveuse. • Les instructions comprises dans ce guide et toute autre documentation fournie avec cet appareil ne sont - Electrolux EWMED7CJIW | Installation Instructions (English Español Fran - Page 27
instructions d'installation font partie de notre engagement à vous satisfaire et à vous fournir un produit de qualité pendant toute la durée de vie de votre nouvel appareil. Des questions? Pour rejoindre le service la porte ‰ Suivez les instructions détaillées contenues dans ce guide ‰ Vérifiez que - Electrolux EWMED7CJIW | Installation Instructions (English Español Fran - Page 28
autre source d'alimentation différente de celle fournie par les services publics n'est pas recommandée. EXIGENCES ÉLECTRIQUES DE LA SÉCHEUSE spécialement indiqués pour une utilisation avec une sécheuse. Pour les instructions de raccordement du cordon à 3 fils, consultez la section CONNEXIONS É - Electrolux EWMED7CJIW | Installation Instructions (English Español Fran - Page 29
po) entre le bas de la bouche d'évacuation et le sol ou toute autre obstruction. AVERTISSEMENT RISQUE D'INCENDIE Le non-respect de ces instructions pourrait augmenter démesurément les temps de séchage et entraîner des risques d'incendie. Correct Incorrect Vous trouverez ci-dessous les exigences - Electrolux EWMED7CJIW | Installation Instructions (English Español Fran - Page 30
6 Exigences d'installation Exigences du système d'évacuation (suite) AVERTISSEMENT RISQUE D'INCENDIE Une sécheuse doit être évacuée vers l'extérieur. N'évacuez pas une sécheuse dans une cheminée, un mur, un plafond, un grenier, un vide sanitaire ou dans tout espace clos d'un bâtiment. La sécheuse - Electrolux EWMED7CJIW | Installation Instructions (English Español Fran - Page 31
l'extérieur de la cloison et être fixé solidement à la structure de la maison. 4. Reportez-vous aux sections précédentes de ce guide relativement aux autres exigences d'évacuation importantes. 5. Lors de l'installation d'une sécheuse à gaz dans une maison mobile, des dispositions doivent être prises - Electrolux EWMED7CJIW | Installation Instructions (English Español Fran - Page 32
installation autre qu'avec une sortie directe), un coude de 90° à courbe immédiate doit être installé, comme il est décrit précédemment dans ce guide. - Electrolux EWMED7CJIW | Installation Instructions (English Español Fran - Page 33
Exigences d'installation 9 Dimensions de sécheuse 53.5" (136 cm)* avec la porte grande ouverte 31.5" (79.5 cm)* à partir de l'avant de la porte lorsqu'elle est fermée 38.0" (96.5 cm) 27.0" (68.5 cm) alimentation électrique à l'arrière de la sécheuse1 sécheuse autonome sur le plancher plancher - Electrolux EWMED7CJIW | Installation Instructions (English Español Fran - Page 34
équatement mis à la terre. La mise à la terre inadéquate de la sécheuse pourrait entraîner des risques de choc électrique. Suivez les instructions de ce guide pour une mise à la terre adéquate. • N'utilisez pas de rallonge avec cet appareil. Certains cordons prolongateurs ne sont pas conçus pour la - Electrolux EWMED7CJIW | Installation Instructions (English Español Fran - Page 35
Instructions d'installation 11 Exigences de mise à la terre - Sécheuse électrique (Canada) AVERTISSEMENT RISQUE DE CHOC ÉLECTRIQUE Un raccordement inadéquat du conducteur de mise à la terre - Electrolux EWMED7CJIW | Installation Instructions (English Español Fran - Page 36
le couvercle d'accès du bornier dans le coin inférieur du dos de la sécheuse. 3. Installez un réducteur de tension certifié UL conformément aux instructions du fabricant de cordon d'alimentation ou de réducteur de tension dans l'orifice de cordon d'alimentation sous le panneau d'accès. À ce moment, le - Electrolux EWMED7CJIW | Installation Instructions (English Español Fran - Page 37
le couvercle d'accès du bornier dans le coin inférieur du dos de la sécheuse. 3. Installez un réducteur de tension certifié UL conformément aux instructions du fabricant de cordon d'alimentation ou de réducteur de tension dans l'orifice de cordon d'alimentation sous le panneau d'accès. À ce moment, le - Electrolux EWMED7CJIW | Installation Instructions (English Español Fran - Page 38
14 Instructions d'installation Connexion de gaz 1. Retirez le capuchon d'expédition de la conduite de gaz à l'arrière de l'appareil. IMPORTANT NE RACCORDEZ PAS la sécheuse à une - Electrolux EWMED7CJIW | Installation Instructions (English Español Fran - Page 39
Instructions d'installation 15 Raccordement d'eau (modèles à la vapeur uniquement) EXIGENCES RELATIVES La pression de l'eau DOIT se situer entre 206,8 et 827,4 kPa (30 et 120 lb/po²). Le service des eaux de votre localité peut vous informer sur la pression de votre alimentation en eau. 1. Fermez l' - Electrolux EWMED7CJIW | Installation Instructions (English Español Fran - Page 40
16 Instructions d'installation Raccordement d'eau, suite (modèles à la vapeur uniquement) 5. Si votre installation offre suffisamment d'espace pour installer directement un raccord en Y à votre tuyau d'arrivée d' - Electrolux EWMED7CJIW | Installation Instructions (English Español Fran - Page 41
au disjoncteur ou au boîtier de fusibles. 5. Reportez-vous au Guide d'utilisation et d'entretien fourni avec la sécheuse. Il contient des vérification » de votre Guide d'utilisation et d'entretien avant d'effectuer une demande de service. 8. Laissez ces instructions à proximité de la sécheuse - Electrolux EWMED7CJIW | Installation Instructions (English Español Fran - Page 42
la réactiverez. 6. Veuillez lire le Guide d'utilisation et d'entretien et profitez sur n'importe quel bouton et suivez les instructions qui s'affichent sur l'interface utilisateur ACL SERVICE CORD (Cordon d'alimentation), NO GAS (aucun gaz) ou CALL SERVICE 800 265 8352 (Placer un appel de service - Electrolux EWMED7CJIW | Installation Instructions (English Español Fran - Page 43
Inversion de la porte 19 Préparation à l'inversion de la porte 1 Assurez-vous qu'il y a suffisamment d'espace avant d'inverser la porte. 2 Vous aurez besoin d'un tournevis à pointe carrée n° 2. Tools needed: 3 Protégez la surface de travail, comme le dessus de la sécheuse ou le plancher près de - Electrolux EWMED7CJIW | Installation Instructions (English Español Fran - Page 44
20 Inversion de la porte Inversion de la porte et de la quincaillerie C) Retrait de la charnière du panneau avant 1 Avec la charnière en position ouverte, retirez les deux vis courtes à tête cylindrique large de la plaque de charnière. 2 Faites tourner la gâche et déplacez-la vers l'ouverture - Electrolux EWMED7CJIW | Installation Instructions (English Español Fran - Page 45
Inversion de la porte 21 F) Retrait de la plaque-percuteur 1 Retirez les deux vis longues à tête fraisée et la plaque de loquet. H) Retrait du bouchon 2 Réservez la plaque de loquet pour une utilisation ultérieure. G) Retrait du voyant de loquet 1 IInsérez un tournevis à pointe plate dans la - Electrolux EWMED7CJIW | Installation Instructions (English Español Fran - Page 46
22 Inversion de la porte I) Réinstallation du voyant de loquet 1 Faites pivoter le voyant de loquet et déplacez-le dans le trou opposé de la porte. insérez l'indicateur du loquet dans la fente J) Fixation de la plaque de loquet 1 Faites pivoter la plaque de loquet et déplacez-la du côté opposé de - Electrolux EWMED7CJIW | Installation Instructions (English Español Fran - Page 47
Inversion de la porte 23 Remontage de la porte et de la quincaillerie L) Remontage de la porte 1 Ouvrez la charnière à un angle de 90 degrés. 2 Installez la porte sur les tiges de positionnement de la charnière. N) Réinstallation de l'anneau de garniture 1 Fermez la porte. 2 Dirigez la garniture - Electrolux EWMED7CJIW | Installation Instructions (English Español Fran - Page 48
24 Inversion de la porte Accessoires SOCLE DE RANGEMENT ASSORTI Socle Blanc des îles - Pièce nº EPWD15IW Socle Bleu méditerranéen - Pièce nº EPWD15MB Socle Sables argentés - Pièce nº EPWD15SS Socle Ciel turquoise - Pièce nº EPWD15TS Socle Rouge - Pièce nº EPWD15RR Socle Vert Kelly - Pièce nº - Electrolux EWMED7CJIW | Installation Instructions (English Español Fran - Page 49
Installation Instructions Electrolux Front-Load Gas & Electric Dryer Instructions d'installation Sécheuse à gaz et à l'électricité à chargement frontal Electrolux Instrucciones de Instalación Secadora eléctrica y a gas de carga frontal Electrolux - Electrolux EWMED7CJIW | Installation Instructions (English Español Fran - Page 50
Nacional (National Fuel Gas Code), el ANSI Z223.1, o bien en Canadá, el CAN/CGA B149,1-2000. Se debe instalar una válvula de cierre individual manual a una distancia no mayor a 1,83 m (6 pies) de la secadora de conformidad con el Código Nacional de Gas Combustible ANSI Z223.1/NFPA 54. • La secadora - Electrolux EWMED7CJIW | Installation Instructions (English Español Fran - Page 51
a lado y de adelante hacia atrás ‰ El secadora descansa firmemente sobre sus cuatro esquinas Suministro de gas (secadora a gas) ‰ Válvula de cierre manual instalada en la tubería de suministro ‰ Todas las conexiones selladas con un sellante aprobado y bien apretadas con una llave ‰ Kit de conversi - Electrolux EWMED7CJIW | Installation Instructions (English Español Fran - Page 52
4 Requisitos de instalación Requisitos del sistema eléctrico NOTA Debido a posibles variaciones en el voltaje, no se recomienda utilizar esta secadora con electricidad generada a partir de generadores a gas, solares, eólicos ni de ninguna otra clase que no sean los empleados por su empresa de - Electrolux EWMED7CJIW | Installation Instructions (English Español Fran - Page 53
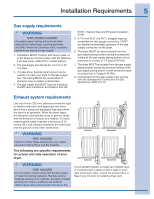
Requisitos de instalación 5 Requerimientos del suministro de gas ADVERTENCIA PELIGRO DE EXPLOSIÓN Las tuberías de cobre sin recubrimiento se corroen al exponerse al gas natural, lo que provoca pérdidas de gas. Utilice SOLAMENTE tuberías de hierro negro, acero inoxidable o latón plastificado para el - Electrolux EWMED7CJIW | Installation Instructions (English Español Fran - Page 54
6 Requisitos de instalación Requisitos del sistema de escape, continuación ADVERTENCIA PELIGRO DE INCENDIO Una secadora de ropa debe tener ventilación al exterior. No ventile la secadora a una chimenea, pared, techo, ático, pasajes entre pisos ni ningún espacio oculto de la vivienda. Las secadoras - Electrolux EWMED7CJIW | Installation Instructions (English Español Fran - Page 55
Requisitos de instalación 7 Requisitos del sistema de escape, continuación ADVERTENCIA PELIGRO DE EXPLOSIÓN No instale la secadora en el mismo lugar en el que haya o se almacene gasolina u otros productos inflamables. Si la secadora se instala en un garaje, debe estar a una altura mínima de 45,7 cm - Electrolux EWMED7CJIW | Installation Instructions (English Español Fran - Page 56
8 Requisitos de instalación Requisitos de despeje IMPORTANTE NO INSTALE LA SECADORA: 1. En una zona expuesta a la humedad o a las condiciones climáticas externas. 2. En un área en la que esté en contacto con cortinas, telas colgantes o cualquier otra cosa que pueda obstruir el flujo de aire de - Electrolux EWMED7CJIW | Installation Instructions (English Español Fran - Page 57
Requisitos de instalación 9 Dimensiones de la secadora 53.5" (136 cm)* para destapar abra la puerta 31.5" (79.5 cm)* al frente de la puerta cerrada 38.0" (96.5 cm) 27.0" (68.5 cm) secadora independiente sobre el piso línea del piso secadora colocada sobre pedestal opcional línea del piso 53.5" ( - Electrolux EWMED7CJIW | Installation Instructions (English Español Fran - Page 58
10 Requisitos de instalación Instalación eléctrica Los siguientes son requisitos necesarios para la instalación eléctrica segura y correcta de su secadora. El no seguir estas instrucciones puede producir una descarga eléctrica y/o incendio. ADVERTENCIA PELIGRO DE DESCARGA ELÉCTRICA • Este - Electrolux EWMED7CJIW | Installation Instructions (English Español Fran - Page 59
Instrucciones de instalación 11 Requisitos de conexión a tierra: secadora eléctrica (Canadá) ADVERTENCIA PELIGRO DE DESCARGA ELÉCTRICA Una conexión incorrecta del conductor de conexión a tierra del equipo puede provocar un peligro de descarga eléctrica. Si no está seguro de haber realizado - Electrolux EWMED7CJIW | Installation Instructions (English Español Fran - Page 60
12 Instrucciones de instalación Conexión eléctrica (fuera de Canadá): trifilar Receptáculo trifilar (tipo NEMA 10-30R) ADVERTENCIA PELIGRO DE DESCARGA ELÉCTRICA El no desconectar el suministro eléctrico antes de realizar cualquier reparación puede ocasionar lesiones personales o incluso la muerte. - Electrolux EWMED7CJIW | Installation Instructions (English Español Fran - Page 61
Instrucciones de instalación 13 Conexión eléctrica (fuera de Canadá): tetrafilar Receptáculo tetrafilar (tipo NEMA 14-30R) ADVERTENCIA PELIGRO DE DESCARGA ELÉCTRICA El no desconectar el suministro eléctrico antes de realizar cualquier reparación puede ocasionar lesiones personales o incluso la - Electrolux EWMED7CJIW | Installation Instructions (English Español Fran - Page 62
ón. Aplique un sellador para roscas que sea resistente a la acción corrosiva de los gases licuados en todas las conexiones de los tubos. Válvula de cierre manual FLUJO DE GAS Conector doble Conector doble 3. Abra la válvula de cierre de la línea de suministro de gas para que el gas fluya a trav - Electrolux EWMED7CJIW | Installation Instructions (English Español Fran - Page 63
Instrucciones de instalación 15 Conexión de agua (modelo al vapor solamente) REQUISITOS DE LA ENTRADA DE AGUA Los grifos de agua fría DEBEN instalarse a una distancia no mayor de 107 cm (42 pulgadas) de la entrada de agua de secadora. Los grifos DEBEN estar a 1,9 cm (3/4 pulgadas) con roscas para la - Electrolux EWMED7CJIW | Installation Instructions (English Español Fran - Page 64
16 Instrucciones de instalación Conexión de agua (modelo a vapor solamente) (cont.) 5. Si es posible instalar la conexión en "Y" directamente en el suministro de agua fría, enrosque el conector en "Y" a la tubería de agua FRÍA y apriételo bien a mano. Luego apriételo 2/3 de vuelta más usando - Electrolux EWMED7CJIW | Installation Instructions (English Español Fran - Page 65
Instrucciones de instalación 17 Instalación general 1. Conecte el tubo de escape al sistema de escape exterior (consulte las páginas 7 a 9). Se recomienda usar una abrazadera (pieza A) de 4" (102 mm) para conectar las secadora al sistema de ventilación de escape. Utilice cinta de papel de aluminio - Electrolux EWMED7CJIW | Installation Instructions (English Español Fran - Page 66
fica que su nueva secadora está correctamente instalada y lista para ser usada. Si la pantalla solicita una acción como "SERVICE CORD" (cordón eléctrico), "NO GAS" (no hay gas) o "CALL SERVICE 877 435 3287" (obtenga servicio técnico al 877-435-3287), repase los pasos de instalación y realice las modi - Electrolux EWMED7CJIW | Installation Instructions (English Español Fran - Page 67
Inversión de la puerta 19 Preparación para invertir la orientación de la puerta 1 Asegúrese de que haya suficiente espacio de giro antes de invertir la puerta. 2 Necesitará un destornillador con punta cuadrada n.º 2. Herramientas necesarias: 3 Proteja las superficies de trabajo planas, como la - Electrolux EWMED7CJIW | Installation Instructions (English Español Fran - Page 68
20 Inversión de la puerta Inversión de la puerta y los accesorios C) Desinstalación de la bisagra del panel delantero 1 Con la bisagra abierta, retire los 2 tornillos cortos, con rosca gruesa y cabeza plana de la placa de la bisagra. 2 Gire el pestillo y muévalo hacia la abertura opuesta. Fíjelo - Electrolux EWMED7CJIW | Installation Instructions (English Español Fran - Page 69
Inversión de la puerta 21 F) Desinstalación de los accesorios de la puerta 1 Retire los 2 tornillos largos, con rosca gruesa y avellanados, y la placa del pestillo. H) Desinstalación del tapón para agujero 2 Deje el pestillo a un lado. G) Extracción del indicador de pestillo 1 Inserte un - Electrolux EWMED7CJIW | Installation Instructions (English Español Fran - Page 70
22 Inversión de la puerta I) Reinstalación del indicador de pestillo 1 Gire el indicador de pestillo y muévalo hacia el agujero opuesto de la puerta. introduzca el indicador por la ranura J) Reinstalación de la placa del pestillo 1 Gire la placa del pestillo y muévala hacia la abertura opuesta de - Electrolux EWMED7CJIW | Installation Instructions (English Español Fran - Page 71
Inversión de la puerta 23 Reinstalación de la puerta y los accesorios L) Reinstalación del conjunto de la puerta 1 Abra la bisagra en un ángulo de 90 grados. 2 Inserte la puerta en los pasadores de ubicación de la bisagra. N) Reinstalación del anillo de moldura 1 Cierre la puerta. 2 Oriente la - Electrolux EWMED7CJIW | Installation Instructions (English Español Fran - Page 72
24 Opciones Accesorios PEDESTAL DE ALMACENAMIENTO CONCORDANTE Pedestal de color Blanco Isleño - P/N EPWD15IW Pedestal de color Azul Mediterráneo - P/N EPWD15MB Pedestal de color Arena Plateada - P/N EPWD15SS Pedestal de color Turquesa Celestial - P/N EPWD15TS Pedestal de color Rojo Vivo - P/N - Electrolux EWMED7CJIW | Installation Instructions (English Español Fran - Page 73
- Electrolux EWMED7CJIW | Installation Instructions (English Español Fran - Page 74
- Electrolux EWMED7CJIW | Installation Instructions (English Español Fran - Page 75
- Electrolux EWMED7CJIW | Installation Instructions (English Español Fran - Page 76
-
 1
1 -
 2
2 -
 3
3 -
 4
4 -
 5
5 -
 6
6 -
 7
7 -
8
-
9
-
10
-
11
-
12
-
13
-
14
-
15
-
16
-
17
-
18
-
19
-
20
-
21
-
22
-
23
-
24
-
25
-
26
-
27
-
28
-
29
-
30
-
31
-
32
-
33
-
34
-
35
-
36
-
37
-
38
-
39
-
40
-
41
-
42
-
43
-
44
-
45
-
46
-
47
-
48
-
49
-
50
-
51
-
52
-
53
-
54
-
55
-
56
-
57
-
58
-
59
-
60
-
61
-
62
-
63
-
64
-
65
-
66
-
67
-
68
-
69
-
70
-
71
-
72
-
73
-
74
-
75
-
76
 |
 |

Installation Instructions
Electrolux Front-Load Gas & Electric Dryer
Instructions d’installation
Sécheuse à gaz et à l’électricité à chargement frontal Electrolux
Instrucciones de Instalación
Secadora eléctrica y a gas de carga frontal Electrolux
137382100 A (1106)