Epson 1280 Quick Start - Page 1
Epson 1280 - Stylus Photo Color Inkjet Printer Manual
 |
UPC - 010343844230
View all Epson 1280 manuals
Add to My Manuals
Save this manual to your list of manuals |
Page 1 highlights
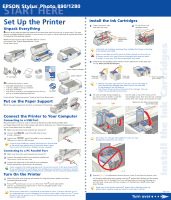
Install the Ink Cartridges START HERE EPSON Stylus® Photo 890/1280 Set Up the Printer Unpack Everything Remove all the tape and packing material from the printer before you set up, as shown here. The tape may be in slightly different locations on your printer, so be sure to check inside and all around the printer for tape and other packing material. Make sure you've got a USB or parallel cable to connect your printer. See "System Requirements" in the Printer Basics book. paper support adapter Install the Ink Cartridges 1 Lower the output tray and open the cover. 2 Lift up the two ink cartridge clamps. Yellow ink replacement button Install both ink cartridges, and leave them installed for all types of printing, or the printer won't work. Keep ink cartridges out of the reach of children and do not drink the ink. If ink gets on your skin, wash the area thoroughly with soap and water. If ink gets in your eyes, flush them immediately with water. 3 Unwrap the ink cartridges, then remove only the yellow part of the tape seal on top. Don't pull off the blue part. ink cartridges uncurling sheet roll paper holders Printer Basics Don't place the printer in areas: • with high temperature or humidity • in direct sunlight or dusty conditions • with poor ventilation • near sources of heat or electromagnetic interference, such as a cordless telephone base unit CD-ROM Follow all the "Safety Instructions" listed in the Printer Basics book. Put on the Paper Support Insert the paper support into the slots on the back of the printer. paper support printer Black ink cartridge Color ink cartridge Don't touch the green chips • Remove the yellow tape seal from the top of the ink cartridges or you'll permanently damage them. Don't remove the clear seals on the bottom or ink will leak out. • Don't touch the green chip on the back of the cartridge. This may inhibit normal operation and printing. 4 Tilt each cartridge forward slightly as you lower it into its holder. Locate the tabs at the back of the cartridge. hooks tabs Rest the tabs on top of the hooks on the ink cartridge clamp. Then close the ink cartridge clamp. (The color clamp is a bit harder to close.) Make sure the tabs are positioned above the hooks Connect the Printer to Your Computer Connecting to a USB Port (Recommended connection; only for Windows® 98, Windows Me, Windows 2000, iMac™, and Power Macintosh® G3 or later systems with built-in USB ports; see "System Requirements" in the Printer Basics book for details) 1 Make sure the printer and computer are turned off. 2 Connect the printer's USB port. end of the USB cable to your 3 Connect the end of the cable to your computer's USB port or a first tier USB hub port. If you're using a USB hub, connect the printer to a first tier hub or the printer may malfunction. If the printer doesn't work there, connect it directly to a USB port on your computer. Connecting to a PC Parallel Port 1 Make sure the printer and computer are turned off. 2 Connect the parallel cable to your printer's parallel port. Then secure it with the wire clips. 3 Connect the other end of the cable to your computer's built-in parallel port and secure it as necessary. If your computer has multiple parallel ports, connect your printer to the built-in port (LPT1). To use a different port, see Windows help. Configure your computer to match your printer's maximum speed by enabling ECP/DMA mode, if possible. See your computer documentation. Turn On the Printer 1 With the printer and computer still turned off, plug the printer's power cord into a grounded electrical outlet. 2 Press the power button to turn on the printer. The power light flashes and the maintenance light come on. The ink cartridge holders move left into loading position. Don't use an outlet that is controlled by a wall switch or timer, or one on the same circuit as a large appliance, to avoid damaging the printer's power supply. Always use the power button to turn the printer on or off. Never use an external switch, such as a power strip switch or wall switch. Don't place the cartridge tabs under the hooks; you may damage the clamp when you close it. 5 Press the yellow ink replacement button (shown in step 1) and close the printer cover. Ink charging takes about two minutes, with the power light flashing and the printer making noise until it's finished. Don't turn off the printer or interrupt charging or it will start over, using more ink than necessary. It's finished when the power light stops flashing. Never turn off the printer when the power light is flashing, unless the printer hasn't moved or made any noise for more than 5 minutes. Turn over CPD-11717
-
 1
1 -
 2
2
 |
 |