Epson 2080 Service Manual - Page 34
Overview - lq dot matrix
 |
View all Epson 2080 manuals
Add to My Manuals
Save this manual to your list of manuals |
Page 34 highlights
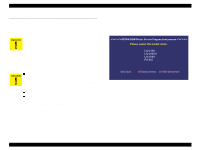
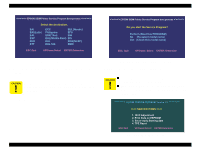
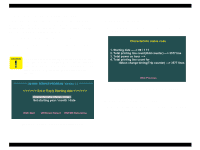
LQ-2080 Revision A 4.1 Overview The adjustment items required for the LQ-2080 are the same as for the LQ-2070. Therefore, see Table 4-1 in the LQ-2170 Service Manual and perform any necessary adjustment after disassembling/assembling the printer. Though the conditions for each adjustment are the same as for the LQ-2070, the adjustment program used for the LQ-2080 is different. Therefore, observe the instructions given in the following sections. NOTE: If you omit this operation, the printer will perform Uni-D print instead of Bi-D. 5. Double-click "LQSERIES.EXE". The program starts up and the screen below appears. 4.1.1 Pre-operation for the Adjustment Program 1. Get a continuous paper. (136-column paper should be used to avoid printing on the platen.) Do not use cut sheet for the Bi-D adjustment. Since the Bi-D adjustment has to be performed with the top and bottom edges of the sheet firmly set in the paper path, use of cut sheet will not provide accurate adjustment. Use single continuous paper. Adjustment program for serial dot matrix printer does not run without any paper loaded. So, be sure to turn the printer on first and then load paper. 2. Set the release lever to the continuous paper position. 3. Connect the printer and the PC and turn the printer on. 4. Press the Load/Eject button to send the paper to the stand-by position. Then press the LF/FF button more than 10 times until the leading edge of the paper is completely out of the printer. Figure 4-1. LQSERIES.EXE Initial Screen 6. Move the cursor to "LQ-2080" and press the Enter key. 7. The following screen appears. Adjustment Overview 34
-
 1
1 -
2
-
3
-
4
-
5
-
6
-
7
-
8
-
9
-
10
-
11
-
12
-
13
-
14
-
15
-
16
-
17
-
18
-
19
-
20
-
21
-
22
-
23
-
24
-
25
-
26
-
27
-
28
-
 29
29 -
 30
30 -
 31
31 -
 32
32 -
 33
33 -
 34
34 -
 35
35 -
 36
36 -
 37
37 -
 38
38 -
 39
39 -
40
-
41
-
42
-
43
-
44
-
45
-
46
-
47
-
48
-
49
-
50
-
51
-
52
-
53
-
54
-
55
 |
 |