Epson 2450 Start Here Card - Page 2
Connect the Scanner, Where To Get Help, Your First Scan - driver download
 |
UPC - 010343837836
View all Epson 2450 manuals
Add to My Manuals
Save this manual to your list of manuals |
Page 2 highlights
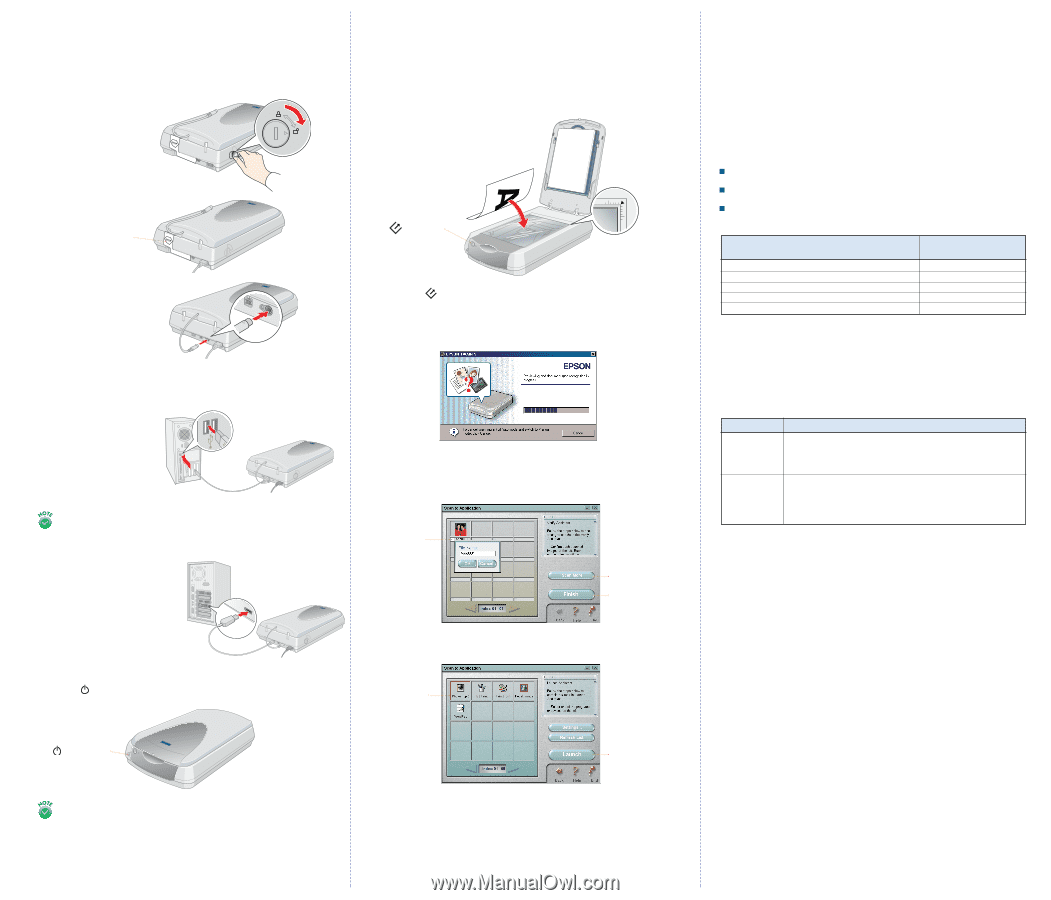
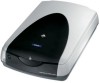
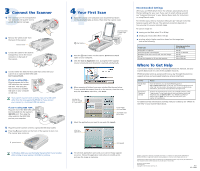
33Connect the Scanner 1 Use a coin to turn the transportation lock clockwise one-quarter turn to unlock the scanner carriage. 2 Remove the white sticker from the back of the scanner. remove sticker 3 Connect the cable for the built-in transparency unit to the round connector on the back of the scanner. 4 Connect either the USB interface cable that comes with your scanner or an optional IEEE 1394 cable. Don't connect both. If you're using USB... Plug the square end of the USB cable into the scanner's USB port. Then plug the flat end into any available USB port on your computer or USB hub. Your scanner may not work correctly if you use a USB cable other than the one supplied by EPSON or if you connect your scanner to a multi-level USB hub system. If you're using IEEE 1394... Plug one end of the IEEE 1394 cable (not included) into the scanner's IEEE1394 port. Then plug the other end into the IEEE 1394 port on your computer. 5 Plug the scanner's power cord into a grounded electrical outlet. 6 Press the power button on the front of the scanner to turn it on. The scanner lamp comes on. power button 44Your First Scan 1 Open the scanner cover and place your document face down on the document table as shown. Then close the scanner cover. place document in upper right corner Start button 2 Press the Start button on the scanner. EPSON Smart Panel opens on your computer. 3 Click the Scan to Application icon. A progress meter appears on your screen and your document is scanned automatically. 4 When scanning is finished, you see a window like the one below. To scan another document, place it on the scanner, close the cover, and click Scan More. Otherwise, click Finish. click the file name to change it, if you want to scan again, click Scan More click Finish when you're done 5 Select the application you want to use and click Launch. select an application click Launch In Windows 2000, you see the Digital Signature Not Found window after turning on your scanner. Click Yes to continue. 6 The selected application opens and your scanned image appears on screen. Follow the application instructions to modify, print, and save the image as necessary. Recommended Settings When you use EPSON Smart Panel, the software automatically selects the best settings for your scan. If you want to select settings yourself, see "Advanced Scanning" in your Scanner Basics book for instructions on using Manual mode. For the best scans, select a resolution setting (in dpi-dots per inch) that balances quality with file size. The optimum resolution depends on how you plan to use your scanned image. To scan an image for: viewing on the Web, select 72 to 96 dpi. sending via e-mail, select 96 to 150 dpi. printing, select a higher resolution based on the image type, such as the following: Image type Photograph or magazine Small photograph to be enlarged Newspaper (text only), text for OCR, text with images Line art 35 mm film (negative) or 35 mm slide (positive) Scanning resolution (for printing) 300 dpi 300 dpi to 3200 dpi 400 dpi 300 to 3200 dpi 300 to 3200 dpi Where To Get Help Your scanner includes a variety of printed and electronic manuals. See your Scanner Basics book for a list of the available resources. EPSON provides technical assistance 24 hours a day through the electronic support services and automated telephone services listed here: Service World Wide Web Automated Telephone Services Access From the Internet, you can reach EPSON Support at http://support.epson.com. At this site, you can download drivers and other files, look at product documentation, access troubleshooting information, and receive technical advice through e-mail. A variety of automated help services are available 24 hours a day, 7 days a week. To use these services, you must have a touch tone telephone and call (800) 922-8911. Your EPSON SoundAdviceSM Express Code is 70365. Use this code to quickly select your scanner in SoundAdvice. For additional help information and help with your software, see "Where To Get Help" in your Scanner Basics book. EPSON is a registered trademark and EPSON Smart Panel is a trademark of SEIKO EPSON CORPORATION. EPSON Perfection is a registered trademark and SoundAdvice is a service mark of Epson America, Inc. General Notice: Other product names use herein are for identification purposes only and may be trademarks of their respective owners. EPSON disclaims any and all rights in those marks. Printed on recycled paper Printed in USA Copyright © 2001 by Epson America, Inc. 9/01 CPD-12888
-
 1
1 -
 2
2
 |
 |