Epson 2480 Product Information Guide - Page 4
Scan and Save button or open EPSON Smart Panel, Epson Perfection 2480 Photo - windows 7
 |
UPC - 010343850545
View all Epson 2480 manuals
Add to My Manuals
Save this manual to your list of manuals |
Page 4 highlights
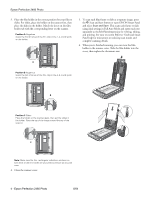
Epson Perfection 2480 Photo 3. Place the film holder in the correct position for your film or slides. For slides, place the holder on the scanner first, then place the slides in the holder. Match the letter on the film holder tab with the corresponding letter on the scanner. Position A Negatives Scans the first 3 frames of the film strip in the 1, 2, and 3 spots on the holder. 5. To scan each film frame or slide as a separate image, press the 4 Scan and Save button or open EPSON Smart Panel and select Scan and Save. This scans each frame or slide using ideal settings in Full Auto Mode and opens each one separately in ArcSoft PhotoImpression for viewing, editing, and printing. See your on-screen Reference Guide and Smart Panel help for instructions on selecting scan modes and complete scanning details. 6. When you're finished scanning, you can store the film holder in the scanner cover. Slide the film holder into the cover, then replace the document mat. A Position B Negatives Scans the last 3 frames of the film strip in the 4, 5, and 6 spots on the holder. B Position C Slides Place the holder on the scanner glass, then put the slides in the holder. Place the top of the image toward the top of the scanner. C Note: Make sure the thin, rectangular calibration windows on both ends of the film holder are uncovered to ensure an accurate scan. 4. Close the scanner cover. 4 - Epson Perfection 2480 Photo 6/04
-
 1
1 -
 2
2 -
 3
3 -
 4
4 -
 5
5 -
 6
6
 |
 |
