Epson 4855WU User Manual - Page 52
Wireless Network Projection, IP Address Display, Complete, Parent topic, Related references
 |
View all Epson 4855WU manuals
Add to My Manuals
Save this manual to your list of manuals |
Page 52 highlights
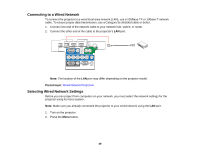
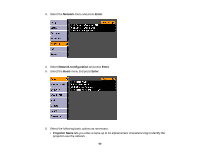
10. To prevent display of the IP address on the standby screen, turn off IP Address Display. 11. When you finish selecting settings, select Complete and follow the on-screen instructions to save your settings and exit the menus. Parent topic: Wired Network Projection Wireless Network Projection You can send images to your projector through a wireless network. To do this, you must install the optional Epson 802.11b/g/n wireless LAN module, and then set up your projector and computer for wireless projection. Note: If your projector is connected via a LAN cable to a network that includes a wireless access point, you can connect to the projector wirelessly through the access point using the EasyMP Network Projection software without the need for the optional wireless module. After installing the module and setting up the projector, install the network software from the Epson Projector Software CD or download the software, as necessary. Use the following software and documentation to set up, control, and monitor wireless projection: • EasyMP Network Projection software sets up your computer for wireless network projection. See the EasyMP Network Projection Operation Guide for instructions. • EasyMP Monitor software (Windows only) lets you monitor and control your projector through the network. You can download the latest software and documentation from the Epson web site. Go to epson.com/support (U.S.) or epson.ca/support (Canada) and select your projector. Installing the Wireless LAN Module Using Quick Wireless Connection (Windows Only) Selecting Wireless Network Settings Manually Selecting Wireless Network Settings in Windows Selecting Wireless Network Settings in OS X Setting Up Wireless Network Security Parent topic: Using the Projector on a Network Related references Optional Equipment and Replacement Parts 52
-
 1
1 -
2
-
3
-
4
-
5
-
6
-
7
-
8
-
9
-
10
-
11
-
12
-
13
-
14
-
15
-
16
-
17
-
18
-
19
-
20
-
21
-
22
-
23
-
24
-
25
-
26
-
27
-
28
-
29
-
30
-
31
-
32
-
33
-
34
-
35
-
36
-
37
-
38
-
39
-
40
-
41
-
42
-
43
-
44
-
45
-
46
-
 47
47 -
 48
48 -
 49
49 -
 50
50 -
 51
51 -
 52
52 -
 53
53 -
 54
54 -
 55
55 -
 56
56 -
 57
57 -
58
-
59
-
60
-
61
-
62
-
63
-
64
-
65
-
66
-
67
-
68
-
69
-
70
-
71
-
72
-
73
-
74
-
75
-
76
-
77
-
78
-
79
-
80
-
81
-
82
-
83
-
84
-
85
-
86
-
87
-
88
-
89
-
90
-
91
-
92
-
93
-
94
-
95
-
96
-
97
-
98
-
99
-
100
-
101
-
102
-
103
-
104
-
105
-
106
-
107
-
108
-
109
-
110
-
111
-
112
-
113
-
114
-
115
-
116
-
117
-
118
-
119
-
120
-
121
-
122
-
123
-
124
-
125
-
126
-
127
-
128
-
129
-
130
-
131
-
132
-
133
-
134
-
135
-
136
-
137
-
138
-
139
-
140
-
141
-
142
-
143
-
144
-
145
-
146
-
147
-
148
-
149
-
150
-
151
-
152
-
153
-
154
-
155
-
156
-
157
-
158
-
159
-
160
-
161
-
162
-
163
-
164
-
165
-
166
-
167
-
168
-
169
-
170
-
171
-
172
-
173
-
174
-
175
-
176
-
177
-
178
-
179
-
180
-
181
-
182
-
183
-
184
-
185
-
186
-
187
-
188
-
189
-
190
-
191
-
192
-
193
-
194
-
195
-
196
-
197
-
198
-
199
-
200
-
201
-
202
-
203
-
204
-
205
-
206
-
207
-
208
-
209
-
210
-
211
-
212
-
213
-
214
-
215
-
216
-
217
-
218
-
219
-
220
-
221
-
222
-
223
-
224
-
225
-
226
-
227
-
228
-
229
-
230
-
231
-
232
-
233
-
234
-
235
-
236
-
237
-
238
-
239
-
240
 |
 |
