Epson 5350 User Manual - Page 84
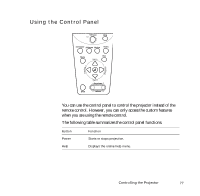
Button, Function, for the PowerLite 5350, or XGA for the PowerLite 7250 - powerlite replacement
 |
View all Epson 5350 manuals
Add to My Manuals
Save this manual to your list of manuals |
Page 84 highlights
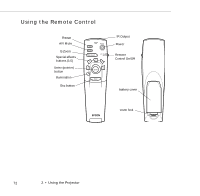
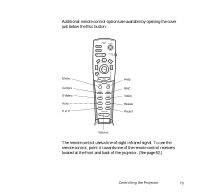
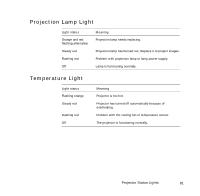
Button Comp1 S-Video Auto P in P Help BNC Video Resize Preset - Volume + Function Switches to the Computer 1 image. Switches to the S-Video image. Optimizes the computer image. Displays a video or S-video image in a subscreen on the main display. Use the Enter button to reposition the Picture in Picture (P in P) screen, or the E-Zoom button to enlarge or reduce the image. Changes made to the P in P screen location and size are automatically carried over to the next P in P session. Displays the online help menu. Switches to the Computer2/BNC image. Switches to the Video image. Switches the display dot mode and resize mode for VGA, XGA, SVGA, and SXGA input. You cannot resize the image if the input resolution matches the output resolution of the projector (SVGA for the PowerLite 5350, or XGA for the PowerLite 7250 and 7350). Saves and recalls up to five different session settings (resolution, tracking, sync signal and position). To save the current session settings, press the Preset button and it will be assigned the next available number 1through 5. To recall a setting, press the Preset button a second time and move to the desired session number. To overwrite a saved setting, move to the setting you want to replace and press Enter. When the confirmation message displays, choose Yes and press Enter. Adjusts the volume. 76 2 • Using the Projector
-
 1
1 -
2
-
3
-
4
-
5
-
6
-
7
-
8
-
9
-
10
-
11
-
12
-
13
-
14
-
15
-
16
-
17
-
18
-
19
-
20
-
21
-
22
-
23
-
24
-
25
-
26
-
27
-
28
-
29
-
30
-
31
-
32
-
33
-
34
-
35
-
36
-
37
-
38
-
39
-
40
-
41
-
42
-
43
-
44
-
45
-
46
-
47
-
48
-
49
-
50
-
51
-
52
-
53
-
54
-
55
-
56
-
57
-
58
-
59
-
60
-
61
-
62
-
63
-
64
-
65
-
66
-
67
-
68
-
69
-
70
-
71
-
72
-
73
-
74
-
75
-
76
-
77
-
78
-
 79
79 -
 80
80 -
 81
81 -
 82
82 -
 83
83 -
 84
84 -
 85
85 -
 86
86 -
 87
87 -
 88
88 -
 89
89 -
90
-
91
-
92
-
93
-
94
-
95
-
96
-
97
-
98
-
99
-
100
-
101
-
102
-
103
-
104
-
105
-
106
-
107
-
108
-
109
-
110
-
111
-
112
-
113
-
114
-
115
-
116
-
117
-
118
-
119
-
120
-
121
-
122
-
123
-
124
-
125
-
126
-
127
-
128
-
129
-
130
-
131
-
132
-
133
-
134
-
135
-
136
-
137
-
138
-
139
-
140
-
141
-
142
-
143
-
144
-
145
-
146
-
147
-
148
-
149
-
150
-
151
-
152
-
153
-
154
-
155
-
156
-
157
-
158
-
159
-
160
-
161
-
162
-
163
-
164
-
165
-
166
-
167
-
168
-
169
-
170
-
171
-
172
-
173
-
174
-
175
-
176
-
177
-
178
-
179
-
180
-
181
-
182
 |
 |