Epson 685Wi Users Guide - Page 63
Using Quick Wireless Connection (Windows)
 |
View all Epson 685Wi manuals
Add to My Manuals
Save this manual to your list of manuals |
Page 63 highlights
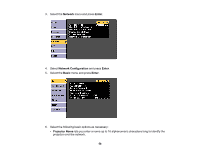
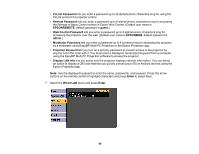
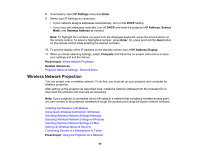
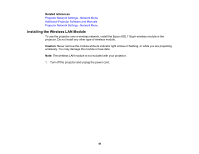
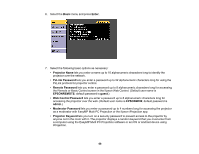
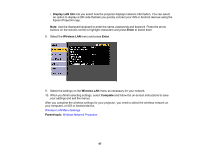
3. Insert the wireless LAN module into the port shown here. 4. Replace the cable cover and tighten the screws. 5. Plug in and turn on the projector. Parent topic: Wireless Network Projection Using Quick Wireless Connection (Windows) You can create a Quick Wireless Connection USB Key to quickly connect the projector to a Windows computer wirelessly. Then you can project your presentation and remove the key when you are done. Note: A USB flash drive is not included with your projector. 1. Create a Quick Wireless Connection USB Key with a USB flash drive and the EasyMP Multi PC Projection software. Note: See the EasyMP Multi PC Projection Operation Guide for instructions. 2. Turn on the projector. 63
-
 1
1 -
2
-
3
-
4
-
5
-
6
-
7
-
8
-
9
-
10
-
11
-
12
-
13
-
14
-
15
-
16
-
17
-
18
-
19
-
20
-
21
-
22
-
23
-
24
-
25
-
26
-
27
-
28
-
29
-
30
-
31
-
32
-
33
-
34
-
35
-
36
-
37
-
38
-
39
-
40
-
41
-
42
-
43
-
44
-
45
-
46
-
47
-
48
-
49
-
50
-
51
-
52
-
53
-
54
-
55
-
56
-
57
-
 58
58 -
 59
59 -
 60
60 -
 61
61 -
 62
62 -
 63
63 -
 64
64 -
 65
65 -
 66
66 -
 67
67 -
 68
68 -
69
-
70
-
71
-
72
-
73
-
74
-
75
-
76
-
77
-
78
-
79
-
80
-
81
-
82
-
83
-
84
-
85
-
86
-
87
-
88
-
89
-
90
-
91
-
92
-
93
-
94
-
95
-
96
-
97
-
98
-
99
-
100
-
101
-
102
-
103
-
104
-
105
-
106
-
107
-
108
-
109
-
110
-
111
-
112
-
113
-
114
-
115
-
116
-
117
-
118
-
119
-
120
-
121
-
122
-
123
-
124
-
125
-
126
-
127
-
128
-
129
-
130
-
131
-
132
-
133
-
134
-
135
-
136
-
137
-
138
-
139
-
140
-
141
-
142
-
143
-
144
-
145
-
146
-
147
-
148
-
149
-
150
-
151
-
152
-
153
-
154
-
155
-
156
-
157
-
158
-
159
-
160
-
161
-
162
-
163
-
164
-
165
-
166
-
167
-
168
-
169
-
170
-
171
-
172
-
173
-
174
-
175
-
176
-
177
-
178
-
179
-
180
-
181
-
182
-
183
-
184
-
185
-
186
-
187
-
188
-
189
-
190
-
191
-
192
-
193
-
194
-
195
-
196
-
197
-
198
-
199
-
200
-
201
-
202
-
203
-
204
-
205
-
206
-
207
-
208
-
209
-
210
-
211
-
212
-
213
-
214
-
215
-
216
-
217
-
218
-
219
-
220
-
221
-
222
-
223
-
224
-
225
-
226
-
227
-
228
-
229
-
230
-
231
-
232
-
233
-
234
-
235
-
236
-
237
-
238
-
239
-
240
-
241
-
242
-
243
-
244
-
245
-
246
-
247
-
248
-
249
-
250
-
251
-
252
-
253
-
254
-
255
-
256
-
257
-
258
-
259
-
260
-
261
-
262
-
263
-
264
-
265
-
266
-
267
-
268
-
269
-
270
-
271
-
272
-
273
-
274
-
275
-
276
-
277
-
278
-
279
-
280
-
281
-
282
-
283
-
284
-
285
-
286
-
287
-
288
-
289
-
290
-
291
-
292
-
293
-
294
-
295
-
296
-
297
-
298
-
299
-
300
-
301
-
302
-
303
-
304
-
305
-
306
-
307
-
308
-
309
-
310
-
311
-
312
-
313
-
314
-
315
-
316
-
317
-
318
-
319
-
320
-
321
-
322
-
323
-
324
-
325
-
326
-
327
-
328
-
329
-
330
-
331
 |
 |

63
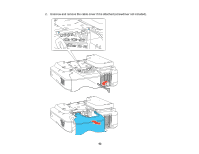
3.
Insert the wireless LAN module into the port shown here.
4.
Replace the cable cover and tighten the screws.
5.
Plug in and turn on the projector.
Parent topic:
Wireless Network Projection
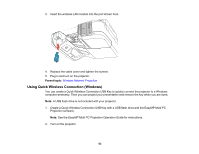
Using Quick Wireless Connection (Windows)
You can create a Quick Wireless Connection USB Key to quickly connect the projector to a Windows
computer wirelessly. Then you can project your presentation and remove the key when you are done.
Note:
A USB flash drive is not included with your projector.
1.
Create a Quick Wireless Connection USB Key with a USB flash drive and the EasyMP Multi PC
Projection software.
Note:
See the
EasyMP Multi PC Projection Operation Guide
for instructions.
2.
Turn on the projector.