Epson 685Wi Operation Guide - Easy Interactive Tools v4.20 - Page 13
Using Easy Interactive Tools
 |
View all Epson 685Wi manuals
Add to My Manuals
Save this manual to your list of manuals |
Page 13 highlights
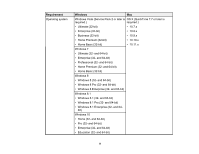
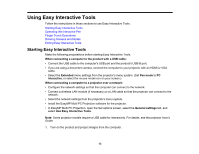
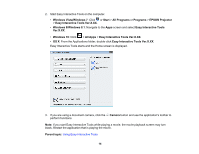
Using Easy Interactive Tools Follow the instructions in these sections to use Easy Interactive Tools. Starting Easy Interactive Tools Operating the Interactive Pen Finger Touch Operations Drawing Screens and Modes Exiting Easy Interactive Tools Starting Easy Interactive Tools Make the following preparations before starting Easy Interactive Tools. When connecting a computer to the product with a USB cable: • Connect the USB cable to the computer's USB port and the product's USB-B port. • If you are using a document camera, connect the computer to your projector with an HDMI or VGA cable. • Select the Extended menu settings from the projector's menu system. (Set Pen mode to PC interactive, or select the mouse mode icon on your screen.) When connecting a computer to a projector over a network: • Configure the network settings so that the computer can connect to the network. • Connect a wireless LAN module (if necessary) or a LAN cable so that the projector can connect to the network. • Select the network settings from the projector's menu system. • Install the EasyMP Multi PC Projection software for the projector. • In EasyMP Multi PC Projection, open the Set options screen, select the General settings tab, and select Use Easy Interactive Tools. Note: Some projector models require a USB cable for interactivity. For details, see the projector User's Guide. 1. Turn on the product and project images from the computer. 13
-
 1
1 -
2
-
3
-
4
-
5
-
6
-
7
-
 8
8 -
 9
9 -
 10
10 -
 11
11 -
 12
12 -
 13
13 -
 14
14 -
 15
15 -
 16
16 -
 17
17 -
 18
18 -
19
-
20
-
21
-
22
-
23
-
24
-
25
-
26
-
27
-
28
-
29
-
30
-
31
-
32
-
33
-
34
-
35
-
36
-
37
-
38
-
39
-
40
-
41
-
42
-
43
-
44
-
45
-
46
-
47
-
48
-
49
-
50
-
51
-
52
-
53
-
54
-
55
-
56
-
57
-
58
-
59
-
60
-
61
 |
 |
