Epson 7800p User Manual - Page 27
Connecting to the BNC Connectors, Enter the projector's Setting menu, then make sure the BNC
 |
View all Epson 7800p manuals
Add to My Manuals
Save this manual to your list of manuals |
Page 27 highlights
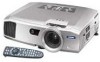
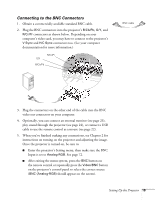
Connecting to the BNC Connectors 1. Obtain a commercially available standard BNC cable. 2. Plug the BNC connectors into the projector's B/Cb/Pb, G/Y, and R/Cr/Pr connectors as shown below. Depending on your computer's video card, you may have to connect to the projector's V Sync and H/C Sync connectors too. (See your computer documentation for more information.) R/Cr/Pr G/Y B/Cb/Pb BNC cable 3. Plug the connectors on the other end of the cable into the BNC video out connectors on your computer. 4. Optionally, you can connect an external monitor (see page 23), play sound through the projector (see page 24), or connect a USB cable to use the remote control as a mouse (see page 22). 5. When you've finished making any connections, see Chapter 2 for instructions on turning on the projector and adjusting the image. Once the projector is turned on, be sure to: ■ Enter the projector's Setting menu, then make sure the BNC Input is set to Analog-RGB. See page 72. ■ After exiting the menu system, press the BNC button on the remote control or repeatedly press the Video/BNC button on the projector's control panel to select the correct source (BNC (Analog-RGB) should appear on the screen). Setting Up the Projector 19
-
 1
1 -
2
-
3
-
4
-
5
-
6
-
7
-
8
-
9
-
10
-
11
-
12
-
13
-
14
-
15
-
16
-
17
-
18
-
19
-
20
-
21
-
 22
22 -
 23
23 -
 24
24 -
 25
25 -
 26
26 -
 27
27 -
 28
28 -
 29
29 -
 30
30 -
 31
31 -
 32
32 -
33
-
34
-
35
-
36
-
37
-
38
-
39
-
40
-
41
-
42
-
43
-
44
-
45
-
46
-
47
-
48
-
49
-
50
-
51
-
52
-
53
-
54
-
55
-
56
-
57
-
58
-
59
-
60
-
61
-
62
-
63
-
64
-
65
-
66
-
67
-
68
-
69
-
70
-
71
-
72
-
73
-
74
-
75
-
76
-
77
-
78
-
79
-
80
-
81
-
82
-
83
-
84
-
85
-
86
-
87
-
88
-
89
-
90
-
91
-
92
-
93
-
94
-
95
-
96
-
97
-
98
-
99
-
100
-
101
-
102
-
103
-
104
-
105
-
106
-
107
-
108
-
109
-
110
-
111
-
112
-
113
-
114
-
115
-
116
-
117
-
118
-
119
-
120
-
121
-
122
-
123
-
124
-
125
-
126
-
127
-
128
-
129
-
130
-
131
-
132
-
133
-
134
-
135
-
136
-
137
-
138
-
139
-
140
-
141
-
142
-
143
-
144
-
145
-
146
 |
 |