Epson 826W Quick Setup - Page 5
Project over the network - software
 |
UPC - 010343873056
View all Epson 826W manuals
Add to My Manuals
Save this manual to your list of manuals |
Page 5 highlights
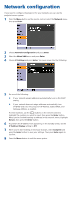
Project over the network Install EMP NS Connection on each computer that will project over the network. Use the CD labeled Epson Projector Software for Meeting & Monitoring to install EMP NS Connection. If you need to configure the projector for your network, see "Network Configuration." 1 Press the LAN button on the remote control. 2 Start EMP NS Connection on your computer. Windows: Select Start > Programs or All Programs > EPSON Projector > EMP NS Connection. Mac OS® X: Double-click the EMP NS Connection icon in your Applications folder. 3 Select Advanced Connection Mode and click OK. 4 Select the projector you want to connect to, then click Connect. If you don't see the projector you want, click the Automatic search button. 5 If you see a message asking for a keyword, enter the four digits that appear on the LAN standby screen and click OK. Your computer image is projected, with a floating toolbar: When you're done presenting, click Disconnect on the toolbar. NOTE: Using the optional Wireless LAN module, you can project wirelessly. To purchase the Wireless LAN module or other accessories, see "Optional Accessories." For more information about using the projector on a network, see your User's Guide and EasyMP Operation Guide.
-
 1
1 -
 2
2 -
 3
3 -
 4
4 -
 5
5 -
 6
6 -
 7
7 -
 8
8
 |
 |
