Epson 99WH Operation Guide - EasyMP Network Projection - Page 55
Arranging the Multi-Screen Display (Windows)
 |
View all Epson 99WH manuals
Add to My Manuals
Save this manual to your list of manuals |
Page 55 highlights
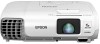
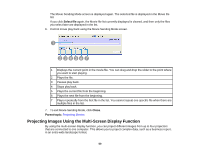
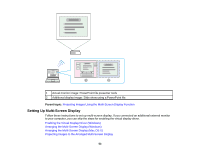
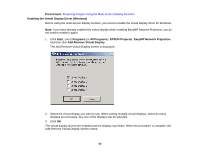
Note: If the virtual display driver has been enabled so that the mouse pointer can be moved outside the limits of the screen, there may be occasions when you lose track of the location of the pointer. If you are not using a virtual display, clear the virtual display checkbox on the Add-Remove Virtual Display screen so that the mouse pointer moves back inside the screen's display area. To subsequently use multiscreen display function again, place a check mark next to the required display on the Add-Remove Virtual Display screen. Parent topic: Setting Up Multi-Screen Display Arranging the Multi-Screen Display (Windows) You can arrange the position of each display. If you are using a virtual display, enable the virtual display before arranging the multi-display. 1. If you use an external display, connect it to the computer. 2. Check the following items when connecting over a wireless LAN and modify the settings as necessary. If the following items are not set correctly, the multi-screen display function cannot be used. • The SSID for the computer and each projector must be the same. (For Quick Connection Mode) • The wireless LAN system for the computer and each projector must be the same. 3. Click Start, select Programs (or All Programs), EPSON Projector, EasyMP Network Projection, and then click EasyMP Network Projection V2.XX to start EasyMP Network Projection. 4. Select Quick Connection Mode or Advanced Connection Mode, and then click OK. Note: When you connect to multiple projectors to project different images from each projector, select Advanced Connection Mode. 55
-
 1
1 -
2
-
3
-
4
-
5
-
6
-
7
-
8
-
9
-
10
-
11
-
12
-
13
-
14
-
15
-
16
-
17
-
18
-
19
-
20
-
21
-
22
-
23
-
24
-
25
-
26
-
27
-
28
-
29
-
30
-
31
-
32
-
33
-
34
-
35
-
36
-
37
-
38
-
39
-
40
-
41
-
42
-
43
-
44
-
45
-
46
-
47
-
48
-
49
-
 50
50 -
 51
51 -
 52
52 -
 53
53 -
 54
54 -
 55
55 -
 56
56 -
 57
57 -
 58
58 -
 59
59 -
 60
60 -
61
-
62
-
63
-
64
-
65
-
66
-
67
-
68
-
69
-
70
-
71
-
72
-
73
-
74
-
75
-
76
-
77
-
78
-
79
-
80
-
81
-
82
-
83
-
84
-
85
-
86
-
87
-
88
-
89
-
90
-
91
-
92
-
93
-
94
-
95
-
96
-
97
-
98
-
99
-
100
-
101
-
102
-
103
-
104
-
105
-
106
-
107
-
108
-
109
 |
 |
