Epson BrightLink 475Wi Installation Guide - Page 33
Warning, Connect the power cord and other cables to the projector
 |
View all Epson BrightLink 475Wi manuals
Add to My Manuals
Save this manual to your list of manuals |
Page 33 highlights
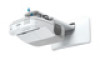
English 3. Tighten the M4 x 12 mm hexagon socket head cap bolts (x2) ( ). Slide plate Projector interface side Bolt positions Washer Spring washer M4 x 12 mm hexagon socket head cap bolts Alignment marks Warning When installing or adjusting the wall mount, do not use adhesives to prevent the screws from loosening and do not use lubricants or oils on the projector slide plate. This may cause the case to crack and the projector to fall, resulting in personal injury or property damage. I Connect the power cord and other cables to the projector Connect any necessary cables such as the power cord, computer cable, HDMI cable, and USB cable to the projector. Power cord Computer cable USB cable If you are planning to run the cables inside the wall, make sure you follow all local electrical codes. If you are running the cables outside the wall, use a cable management system to keep the cables from obstructing the image. An optional cable management system is available from Epson (part # ELPCK01). 33
-
 1
1 -
2
-
3
-
4
-
5
-
6
-
7
-
8
-
9
-
10
-
11
-
12
-
13
-
14
-
15
-
16
-
17
-
18
-
19
-
20
-
21
-
22
-
23
-
24
-
25
-
26
-
27
-
 28
28 -
 29
29 -
 30
30 -
 31
31 -
 32
32 -
 33
33 -
 34
34 -
 35
35 -
 36
36 -
 37
37 -
 38
38 -
39
-
40
-
41
-
42
-
43
-
44
-
45
-
46
-
47
-
48
-
49
-
50
-
51
-
52
-
53
-
54
-
55
-
56
-
57
-
58
-
59
-
60
-
61
-
62
-
63
-
64
-
65
-
66
-
67
-
68
-
69
-
70
-
71
-
72
-
73
-
74
-
75
-
76
-
77
-
78
-
79
-
80
-
81
-
82
-
83
-
84
-
85
-
86
-
87
-
88
 |
 |
