Epson BrightLink 480i Connection Guide
Epson BrightLink 480i Manual
 |
View all Epson BrightLink 480i manuals
Add to My Manuals
Save this manual to your list of manuals |
Epson BrightLink 480i manual content summary:
- Epson BrightLink 480i | Connection Guide - Page 1
BrightLink users can also annotate without connecting a computer or any other device to the projector. This guide helps you connect the projector for maximum functionality and ease of use. After the projector has been installed on the wall or mounted on a table, follow the instructions in this guide - Epson BrightLink 480i | Connection Guide - Page 2
to the projector's Computer1 port, select Computer 1. If you connected the computer to the projector's HDMI port, select HDMI. A computer connected to the selected source (and also connected to the projector with a USB cable) will work with Easy Interactive Tools and have dual-pen support. 2 - Epson BrightLink 480i | Connection Guide - Page 3
Projection software). Users can also connect wirelessly from an iPad®, iPhone®, or iPod® touch using the optional EPSON iProjection™ app. When the projector is connected to these devices, only the built-in toolbar is available (single pen support). Wireless router or access point Wireless network - Epson BrightLink 480i | Connection Guide - Page 4
USB ports, such as the EPSON DC-11 and EPSON DC-06, the best way to connect is directly to the computer's USB port, as shown below. This will enable full interactivity and dual pen support (using Easy Interactive Tools software) on the document camera image. To projector Although you can connect the - Epson BrightLink 480i | Connection Guide - Page 5
connection Component to VGA connection HDMI connection The projector's built-in toolbar can be used for annotating on the video image from any of these sources. However, it must be a different source from the one selected for Easy Interactive Function in the Extended menu, as described on page - Epson BrightLink 480i | Connection Guide - Page 6
, labeled EPSON Projector Software for Easy Interactive Function. ■ For Macs, you need to install Easy Interactive Driver and Easy Interactive Tools. For Windows, you only need Easy Interactive Tools. ■ For Linux, the pen will function as a mouse, but Easy Interactive Tools is not supported. Third
-
 1
1 -
 2
2 -
 3
3 -
 4
4 -
 5
5 -
 6
6
 |
 |
1
BrightLink 475Wi/480i/485Wi
Connection Guide
BrightLink
®
interactive projectors provide many options for connecting computers,
document cameras, video devices, and more. BrightLink users can also annotate without
connecting a computer or any other device to the projector.
This guide helps you connect the projector for maximum functionality and ease of use.
After the projector has been installed on the wall or mounted on a table, follow the
instructions in this guide to connect the equipment that will be used with the projector. You
may need to consult with the school’s tech coordinator or IT director (or with the classroom
teacher) on what equipment to use and which connections they prefer for various devices.
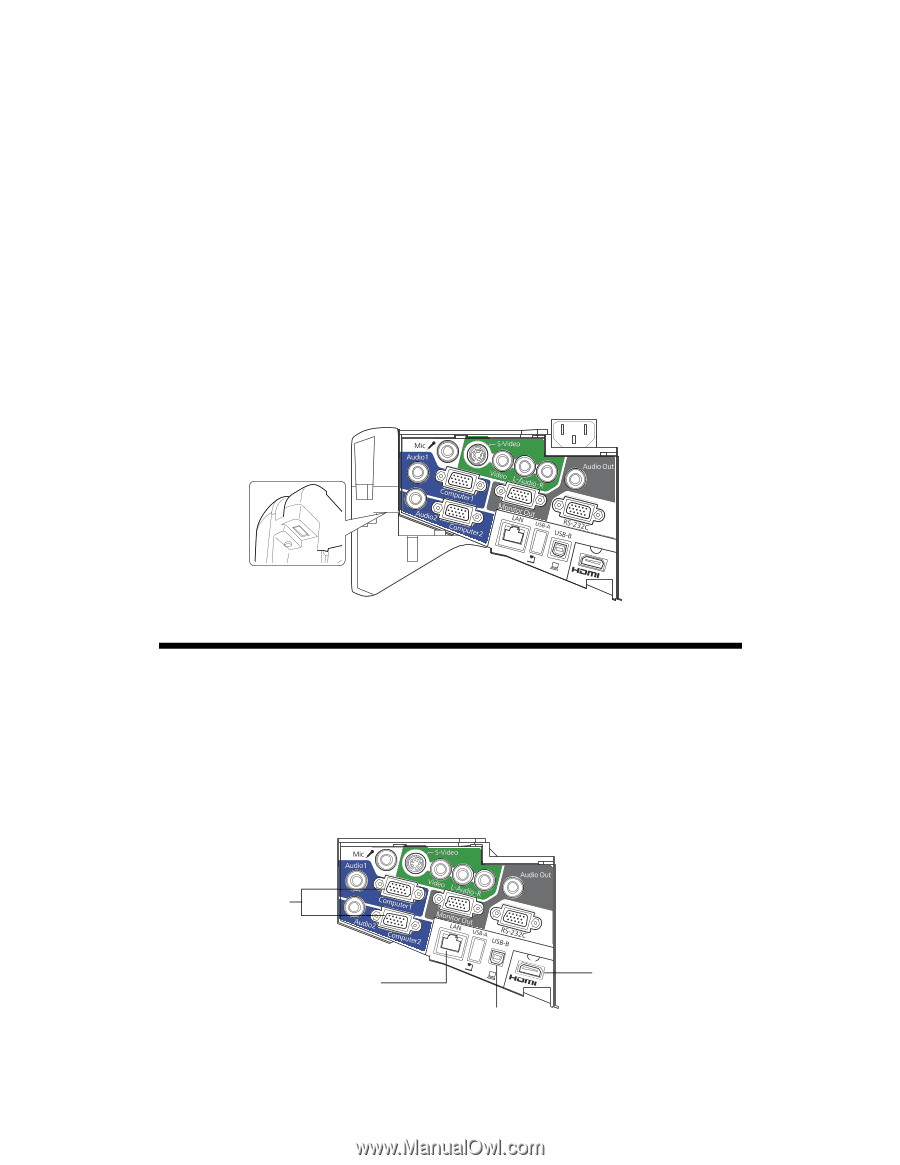
The following illustration shows the projector’s interface panel and available ports.
Connecting Computers
You can use any of the following ports to connect computers to the projector:
■
Computer1
or
Computer2
(VGA connections)
■
HDMI
■
USB-B
(USB display, not recommended because of reduced interactive performance)
■
LAN
(RJ-45)
VGA connection
HDMI connection
USB connection required (in addition to other
connections) for full interactivity and dual pen support
LAN connection