Epson BrightLink 485Wi Installation Guide - Page 32
Attach the projector to the wall mount
 |
View all Epson BrightLink 485Wi manuals
Add to My Manuals
Save this manual to your list of manuals |
Page 32 highlights
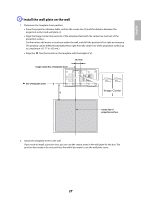
2. Tighten the M6 x 20 mm hexagon shoulder bolt to secure the wall mount ( ). M6 x 20 mm hexagon shoulder bolt H Attach the projector to the wall mount 1. Loosen the two screws and remove the cable cover from the projector. Screws (x2) Cable cover 2. Insert the slide plate into the wall mount from the interface side of the projector ( ). Align the 3-axis adjustment unit with the slide plate's alignment mark ( ). 32
-
 1
1 -
2
-
3
-
4
-
5
-
6
-
7
-
8
-
9
-
10
-
11
-
12
-
13
-
14
-
15
-
16
-
17
-
18
-
19
-
20
-
21
-
22
-
23
-
24
-
25
-
26
-
 27
27 -
 28
28 -
 29
29 -
 30
30 -
 31
31 -
 32
32 -
 33
33 -
 34
34 -
 35
35 -
 36
36 -
 37
37 -
38
-
39
-
40
-
41
-
42
-
43
-
44
-
45
-
46
-
47
-
48
-
49
-
50
-
51
-
52
-
53
-
54
-
55
-
56
-
57
-
58
-
59
-
60
-
61
-
62
-
63
-
64
-
65
-
66
-
67
-
68
-
69
-
70
-
71
-
72
-
73
-
74
-
75
-
76
-
77
-
78
-
79
-
80
-
81
-
82
-
83
-
84
-
85
-
86
-
87
-
88
 |
 |

32
2.
Tighten the M6 x 20 mm hexagon shoulder bolt to secure the wall mount (
).
H
Attach the projector to the wall mount
1.
Loosen the two screws and remove the cable cover from the projector.
2.
Insert the slide plate into the wall mount from the interface side of the projector (
).
Align the 3-axis adjustment unit with the slide plate’s alignment mark (
).
M6 x 20 mm hexagon shoulder bolt
Cable cover
Screws (x2)