Epson C11C498001 Quick Reference Guide - Page 2
Printing with Special Effects, Printing an Index, Printing Snapshots, Printing Special Layouts,
 |
UPC - 010343843509
View all Epson C11C498001 manuals
Add to My Manuals
Save this manual to your list of manuals |
Page 2 highlights
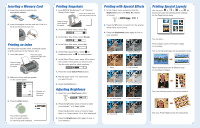
Inserting a Memory Card 1. Insert your memory card into the appropriate adapter. 2. Insert the adapter into the card slot. Push it in firmly so the button pops out. Printing an Index An index print includes small, numbered copies of all the pictures on the memory card. 1. Load plain paper. Place the paper against the right side of the feeder Slide the edge guide against the paper 2. Make sure these settings appear on the control panel: 3. Press the Print button. Number of photos on the card Your index is printed. Use it to select photos for reprinting and enlarging. Printing Snapshots 1. Load EPSON® Borderless 4" x 6" Premium Glossy Photo Paper. Insert short edge first with the glossy side up Slide the edge guide against the paper 2. In the Print Mode menu, select Set. 3. In the Paper Type menu, select Glossy. Glossy 4. In the Paper Size menu, select 4x6. 5. In the Page Layout menu, select for borderless prints, or for white borders. 6. In the Select Photo menu, press to select the number of the photo you want to print. See the index print for photo numbers. 7. Press the round Select Photo button. 8. Repeat steps 6 and 7 for each photo you want to print. 9. Press the Print button. Adjusting Brightness 1. Press the round Brightness button. 2. Press the button once or twice to make your pictures 1 or 2 steps lighter. Press the button once or twice to make them 1 or 2 steps darker (-1 or -2 is displayed). 3. Press the Brightness button again to lock in your selection. Printing with Special Effects 1. In the Copies menu, press and hold the Brightness button until Filter No. flashes on screen. 2. Press the button to select from the special effect filters shown below. 3. Press the Brightness button again to lock in your selection. no filter 1-black and white 2-sepia 3-high contrast 4-one level brighter 5-two levels brighter 6-one level darker 7-two levels darker 8-more vivid 9-sharper Printing Special Layouts You can print 2, 3, 4, or 20 photos per page by selecting these settings on the Page Layout menu. You can also... Print multiple copies of the same image on one page. Turn a normal landscape into a panoramic photo. Take a portrait and print 8 different sizes on one sheet of paper. Turn your favorite picture into photo stickers. See your Printer Basics book for instructions.
-
 1
1 -
 2
2
 |
 |
