Epson C11C573081BA Product Information Guide - Page 7
Cleaning the Print Head, Head Cleaning utility. - printer ink
 |
View all Epson C11C573081BA manuals
Add to My Manuals
Save this manual to your list of manuals |
Page 7 highlights
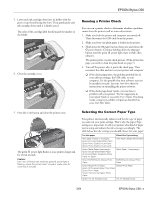
5. Open the cartridge cover. EPSON Stylus C66 10. Close the cartridge cover. 6. Pinch the back tab of the empty cartridge as you lift it out of the printer. 11. Close the printer cover and press the H ink button. The printer begins charging the ink delivery system. The green P power light flashes and the printer makes noise. Charging takes about half a minute. When it's finished, the green P power light stops flashing and stays on, and the red H ink light goes out. Caution: Never turn off the printer while the P power light is flashing, unless the printer hasn't moved or made noise for more than 5 minutes. 7. Before you remove the new cartridge from its package, shake it four or five times. 8. Unwrap the new ink cartridge and lower it into the holder. Push down gently until the cartridge is firmly seated. Caution Don't touch the green circuit board on the front of the cartridge; you may inhibit normal operation and printing. 9. If you need to replace other ink cartridges, repeat steps 5 through 7 before continuing with step 10. Cleaning the Print Head If your printouts are unexpectedly light, or dots or lines are missing, you may need to clean the print head. This unclogs the nozzles so they can deliver ink properly. Print head cleaning uses ink, so clean it only if quality declines. This section explains how to clean the print head using the Head Cleaning utility. You can also clean the print head by holding down the H ink button on the printer for three seconds. (This only works when the red H ink light is off. Caution: When you don't turn on your printer for a long time, print quality can decline, so turn it on and print a few pages at least once a month to maintain good print quality. 3/04 EPSON Stylus C66 - 7
-
 1
1 -
 2
2 -
 3
3 -
 4
4 -
 5
5 -
 6
6 -
 7
7 -
 8
8 -
 9
9 -
 10
10
 |
 |
