Epson CX5200 Product Information Guide - Page 4
Loading Paper, Single Sheets, Envelopes - windows 7
 |
UPC - 010343844575
View all Epson CX5200 manuals
Add to My Manuals
Save this manual to your list of manuals |
Page 4 highlights
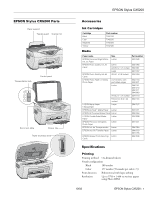
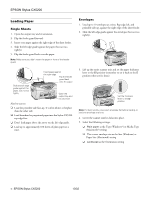
EPSON Stylus CX5200 Loading Paper Single Sheets 1. Open the output tray and its extension. 2. Flip the feeder guard forward. 3. Insert your paper against the right edge of the sheet feeder. 4. Slide the left edge guide against the paper (but not too tightly). 5. Flip the feeder guard back over the paper. Note: Make sure you didn't insert the paper in front of the feeder guard. Slide the left edge guide against the paper, but not too tightly Insert paper against the right edge Flip the feeder guard back onto the paper Open the output tray and its extension Also be sure to: ❏ Load the printable side face-up. It's often whiter or brighter than the other side. ❏ Load letterhead or preprinted paper into the Stylus CX5200 top edge first. ❏ Don't load paper above the arrow on the left edge guide. ❏ Load up to approximately 100 sheets of plain paper at a time. Envelopes 1. Load up to 10 envelopes at a time, flap edge left, and printable side up, against the right edge of the sheet feeder. 2. Slide the left edge guide against the envelopes (but not too tightly). 3. Lift up the entire scanner unit and set the paper thickness lever to the ^ position (remember to set it back to the m position when you're done). Set the thickness lever to the ^ position Note: For best results, press each envelope flat before loading, or load one envelope at a time. 4. Lower the scanner until it clicks into place. 5. Select the following settings: ❏ Plain paper as the Type (Windows®) or Media Type (Macintosh®) setting ❏ The correct envelope size as the Size (Windows) or Paper Size (Macintosh) setting ❏ Landscape as the Orientation setting 4 - EPSON Stylus CX5200 10/02
-
 1
1 -
 2
2 -
 3
3 -
 4
4 -
 5
5 -
 6
6 -
 7
7 -
 8
8 -
 9
9 -
 10
10 -
11
 |
 |
