Epson ELPDC11 Document Camera Quick Start - Page 1
Epson ELPDC11 Document Camera - DC-11 Document Camera Manual
 |
View all Epson ELPDC11 Document Camera manuals
Add to My Manuals
Save this manual to your list of manuals |
Page 1 highlights
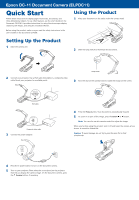
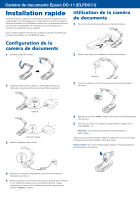
Epson DC-11 Document Camera (ELPDC11) Quick Start Follow these instructions to display pages from books, documents, and three-dimensional objects. To use other features, see the User's Guide on the Document CD-ROM. It provides instructions for using the microscope adapter, capturing still images, and using the included software. Before using the product, make sure you read the safety instructions in the User's Guide on the Document CD-ROM. Using the Product 1 Place your document on the table under the camera head. Setting Up the Product 1 Raise the camera arm. 2 Slide the lamp switch to illuminate the document. 2 Connect your projector. Use a VGA cable (included) or a composite video cable (check your projector for available ports). Lamp switch 3 Turn the dial on the camera head to rotate the image on the screen. VGA cable Composite video cable 3 Connect the power adapter. 4 Press the Focus button. Your document is automatically focused. 5 To zoom in on part of the image, press the Zoom or button. Note: You can also use the remote control to adjust the image. When you're done using the product, turn it off and lower the camera arm as shown. It cannot be folded flat. Caution: To avoid damage, do not try to press the arm flat or fold it backwards. 4 Press the power button to turn on the document camera. 5 Turn on your projector. Then select the source (port) on the projector that lets you display the camera image. On the document camera, press the Source button, if necessary.
-
 1
1 -
 2
2 -
 3
3 -
 4
4
 |
 |