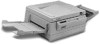
Epson EPL-6000 Product Information Guide - Page 8
General Printer Maintenance - toner
 |
View all Epson EPL-6000 manuals
Add to My Manuals
Save this manual to your list of manuals |
Page 8 highlights
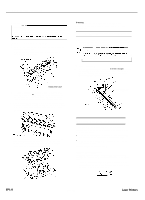
EPL-6000 LASER PRINTER Cleaning the laser beam lens Note: Cleaning the lens is required at an interval of 10,000 pages (the same interval as for changing the drum). If you wish, you can clean the lens when you change the drum and skip this procedure when you change the toner cartridge. If you plan to skip this procedure. go to step 3 for information on reassembling your Follow these steps to clean the laser beam lens: 1. Locate the lens, which is the clear plastic component inside the top cover of your printer. 2 Clean the lens with a lens cleaning cloth or other clean, soft cloth. Do not use alcohol Cleaning the transfer charger and discharge wires Follow the steps below to clean the transfer charger wire and discharge wire. Note: Locate some isopropyl alcohol to use for cleaning purposes before proceeding 1. Make sure the printer is turned off, then disconnect the power cord from the wall outlet. Also be sure that the printer cover is open and that the basket is removed from the printer. WARNING: This procedure exposes the green drum unit, which is in the basket. Because the drum is light-sensitive, minutes, maximum. It is recommended that you cover the drum unit with a soft cloth or sheet of paper whenever the drum is exposed. 2 Locate a cotton swab. 3. with the printer cover open, locate the transfer charger wire and the discharge wire, which are in indentations at the bottom of the printer, beneath where the basket normally rests. These wires are thin and difficult to spot instantly. Raised printer cover 3. To ready your printer for printing reinstall your basket. (Press down simultaneously on the drum unit's two green handles until the drum unit clicks into place.) Then close the printer cover. Plug in the power cord and turn your printer back on. 4. Gently clean the main charger wire with a cotton swab dipped in alcohol. Run the swab along the length of the wire. You need to insert the cotton swab a fraction of an inch into the slot to reach the wire. 5. With the top cover of the printer open, align the arrow on the back of the basket with the arrow on the printer case. (The arrows point toward each other when the unit is properly installed.) Gently lower the basket into place. Transfer charger wire I General Printer Maintenance In addition to the maintenance called for by the display panel messages, the following simple maintenance procedures may be occasionally necessary: l Cleaning the developer unit. You should clean the developer unit if vertical white lines appear on your printed page. l Cleaning the main charger wire. You should clean this wire if print quality declines. These procedures are described below. Cleaning the developer unit If vertical white lines appear on your printed page, you need to clean the developer unit with the developer cleaner. Follow these steps: 1. Locate the developer cleaner. A cleaner is included with the accessory pack that comes with your printer. A cleaner is also packed with replacement drum units. EPL-8 7/18/89 Laser Printers
-
 1
1 -
2
-
 3
3 -
 4
4 -
 5
5 -
 6
6 -
 7
7 -
 8
8 -
 9
9
 |
 |
