Epson Expression 10000XL - Photo Edition Product Information Guide - Page 6
Scanning an Image, button to see a preview of your scan.
 |
View all Epson Expression 10000XL - Photo Edition manuals
Add to My Manuals
Save this manual to your list of manuals |
Page 6 highlights
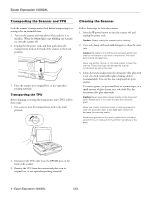
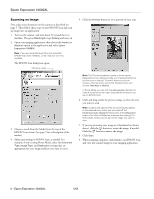
Epson Expression 10000XL Scanning an Image First, place your document on the scanner as described on page 5. Then follow these steps to start EPSON Scan and scan an image into an application: 1. Turn on the scanner, and wait about 30 seconds for it to initialize. The green Ready light stops flashing and stays on. 2. Open your imaging application, then choose the Import (or Acquire) option in the application and select Epson Expression 10000XL. Note: If you are using Windows XP and choose WIAEPSON Expression 10000XL, certain features won't be available. The EPSON Scan dialog box opens. Choose a mode 5. Click the Preview button to see a preview of your scan. 3. Choose a mode from the Mode list at the top of the EPSON Scan screen. (See page 5 for a description of the modes.) 4. Adjust any settings in EPSON Scan, as needed. For example, if you're using Home Mode, select the Document Type, Image Type, and Destination settings that are appropriate for your image and how you want to use it. Note: The Thumbnail preview screen is shown above. Depending on your selected mode, you may see the Normal preview screen instead. To switch between preview screens, click the arrow next to the Preview button and choose Thumbnail or Normal. In Home Mode, you can click the Auto preview checkbox to make the preview screen open automatically whenever you launch EPSON Scan. 6. Click and drag within the preview image to select the area you want to scan. Note: Image quality adjustments are automatically applied to the selected area, unless you've turned off the Continuous auto exposure setting (click the Configuration button, then click the Color tab to access this setting). For best results, select only the part of the image you want to scan. 7. If you're previewing your image as a thumbnail (as shown above), click the button to rotate the image, if needed. Click the button to mirror the image. 8. Click Scan. 9. When scanning completes, click Close to exit EPSON Scan and view the scanned image in your imaging application. 6 - Epson Expression 10000XL 5/04
-
 1
1 -
 2
2 -
 3
3 -
 4
4 -
 5
5 -
 6
6 -
 7
7 -
 8
8
 |
 |
