Epson Expression 10000XL User Manual - Page 17
Moving and Resizing Marquees, Applying Image Adjustments
 |
View all Epson Expression 10000XL manuals
Add to My Manuals
Save this manual to your list of manuals |
Page 17 highlights
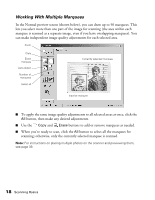
Moving and Resizing Marquees Once you've created a marquee, you can move and resize it if necessary. ■ To move the marquee, place the cursor within its borders. When the cursor turns to a hand symbol, click and drag the marquee to a new position. Hold down the Shift key to limit movement to the horizontal or vertical directions. ■ To resize the marquee, place the cursor on its edge or corner. When the cursor turns into an arrow symbol, click and drag to resize the selection area. Hold down the Shift key to resize the marquee proportionally. If you're viewing your image on the Thumbnail preview screen and it appears sideways or upside down, click the button to rotate the image upright. Click the button to create a mirror image. Applying Image Adjustments After positioning the marquee where you want it, you can make additional image quality adjustments. The adjustments apply only to the selected area. See page 25 for more information about applying basic exposure and color adjustments. You can also restore color, correct backlighting, or apply special adjustments to enhance your images, as described on page 33. On the Full-size preview screen, you can check the results of your adjustments more closely by clicking the Zoom button. Or (on both preview screens) you can use the Densitometer to inspect the image on a pixel-by-pixel basis. Click the Densitometer button, then hold your mouse pointer over the image to view color components on the Densitometer screen. For details, click the Help button. Scanning Basics 17
-
 1
1 -
2
-
3
-
4
-
5
-
6
-
7
-
8
-
9
-
10
-
11
-
 12
12 -
 13
13 -
 14
14 -
 15
15 -
 16
16 -
 17
17 -
 18
18 -
 19
19 -
 20
20 -
 21
21 -
 22
22 -
23
-
24
-
25
-
26
-
27
-
28
-
29
-
30
-
31
-
32
-
33
-
34
-
35
-
36
-
37
-
38
-
39
-
40
-
41
-
42
-
43
-
44
-
45
-
46
-
47
-
48
-
49
-
50
-
51
-
52
-
53
-
54
-
55
-
56
-
57
-
58
-
59
-
60
-
61
-
62
-
63
-
64
-
65
-
66
-
67
-
68
-
69
-
70
-
71
-
72
-
73
-
74
-
75
-
76
-
77
-
78
-
79
-
80
-
81
-
82
-
83
-
84
-
85
-
86
-
87
-
88
-
89
-
90
-
91
-
92
-
93
-
94
-
95
-
96
 |
 |
