Epson G7100NL Operation Guide - EasyMP Multi PC Projection v2.00 - Page 27
EasyMP Multi PC Projection Ver.X.XX, Projection Ver.X.XX
 |
View all Epson G7100NL manuals
Add to My Manuals
Save this manual to your list of manuals |
Page 27 highlights
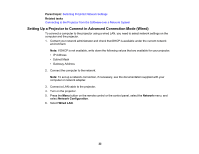
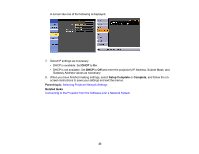
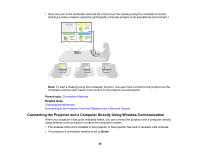
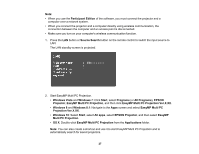
Note: • When you use the Participant Edition of the software, you must connect the projector and a computer over a network system. • When you connect the projector and a computer directly using wireless communication, the connection between the computer and an access point is disconnected. • Make sure you turn on your computer's wireless communication function. 1. Press the LAN button or Source Search button on the remote control to switch the input source to LAN. The LAN standby screen is projected. 2. Start EasyMP Multi PC Projection. • Windows Vista and Windows 7: Click Start, select Programs (or All Programs), EPSON Projector, EasyMP Multi PC Projection, and then click EasyMP Multi PC Projection Ver.X.XX. • Windows 8 and Windows 8.1: Navigate to the Apps screen and select EasyMP Multi PC Projection Ver.X.XX. • Windows 10: Select Start, select All apps, select EPSON Projector, and then select EasyMP Multi PC Projection. • OS X: Double-click EasyMP Multi PC Projection from the Applications folder. Note: You can also create a shortcut and use it to start EasyMP Multi PC Projection and to automatically search for saved projectors. 27
-
 1
1 -
2
-
3
-
4
-
5
-
6
-
7
-
8
-
9
-
10
-
11
-
12
-
13
-
14
-
15
-
16
-
17
-
18
-
19
-
20
-
21
-
 22
22 -
 23
23 -
 24
24 -
 25
25 -
 26
26 -
 27
27 -
 28
28 -
 29
29 -
 30
30 -
 31
31 -
 32
32 -
33
-
34
-
35
-
36
-
37
-
38
-
39
-
40
-
41
-
42
-
43
-
44
-
45
-
46
-
47
-
48
-
49
-
50
-
51
-
52
-
53
-
54
-
55
-
56
-
57
-
58
-
59
-
60
-
61
-
62
-
63
-
64
-
65
-
66
-
67
-
68
-
69
-
70
-
71
-
72
-
73
-
74
-
75
-
76
-
77
-
78
-
79
-
80
-
81
-
82
-
83
-
84
-
85
-
86
-
87
-
88
-
89
-
90
-
91
-
92
-
93
-
94
-
95
-
96
-
97
-
98
-
99
-
100
-
101
-
102
-
103
-
104
-
105
-
106
-
107
-
108
-
109
-
110
-
111
-
112
-
113
 |
 |
