Epson G7400U Users Guide - Page 47
Connecting to an External Computer Monitor, A/V Output
 |
View all Epson G7400U manuals
Add to My Manuals
Save this manual to your list of manuals |
Page 47 highlights
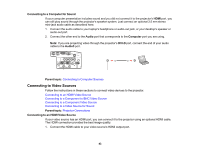
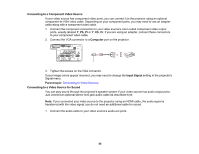
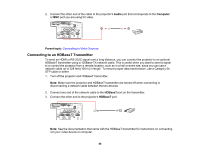
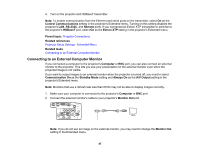
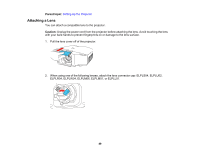
4. Turn on the projector and HDBaseT transmitter. Note: To enable communication from the Ethernet and serial ports on the transmitter, select On as the Control Communications setting in the projector's Extended menu. Turning on this setting disables the projector's LAN, RS-232C, and Remote ports. If you connected an Extron XTP transmitter or switcher to the projector's HDBaseT port, select On as the Extron XTP setting in the projector's Extended menu. Parent topic: Projector Connections Related references Projector Setup Settings - Extended Menu Related tasks Connecting to an External Computer Monitor Connecting to an External Computer Monitor If you connected a computer to the projector's Computer or BNC port, you can also connect an external monitor to the projector. This lets you see your presentation on the external monitor even when the projected image is not visible. If you want to output images to an external monitor when the projector is turned off, you need to select Communication On as the Standby Mode setting and Always On as the A/V Output setting in the projector's Extended menu. Note: Monitors that use a refresh rate less than 60 Hz may not be able to display images correctly. 1. Make sure your computer is connected to the projector's Computer or BNC port. 2. Connect the external monitor's cable to your projector's Monitor Out port. Note: If you do not see an image on the external monitor, you may need to change the Monitor Out setting in the Extended menu. 47
-
 1
1 -
2
-
3
-
4
-
5
-
6
-
7
-
8
-
9
-
10
-
11
-
12
-
13
-
14
-
15
-
16
-
17
-
18
-
19
-
20
-
21
-
22
-
23
-
24
-
25
-
26
-
27
-
28
-
29
-
30
-
31
-
32
-
33
-
34
-
35
-
36
-
37
-
38
-
39
-
40
-
41
-
 42
42 -
 43
43 -
 44
44 -
 45
45 -
 46
46 -
 47
47 -
 48
48 -
 49
49 -
 50
50 -
 51
51 -
 52
52 -
53
-
54
-
55
-
56
-
57
-
58
-
59
-
60
-
61
-
62
-
63
-
64
-
65
-
66
-
67
-
68
-
69
-
70
-
71
-
72
-
73
-
74
-
75
-
76
-
77
-
78
-
79
-
80
-
81
-
82
-
83
-
84
-
85
-
86
-
87
-
88
-
89
-
90
-
91
-
92
-
93
-
94
-
95
-
96
-
97
-
98
-
99
-
100
-
101
-
102
-
103
-
104
-
105
-
106
-
107
-
108
-
109
-
110
-
111
-
112
-
113
-
114
-
115
-
116
-
117
-
118
-
119
-
120
-
121
-
122
-
123
-
124
-
125
-
126
-
127
-
128
-
129
-
130
-
131
-
132
-
133
-
134
-
135
-
136
-
137
-
138
-
139
-
140
-
141
-
142
-
143
-
144
-
145
-
146
-
147
-
148
-
149
-
150
-
151
-
152
-
153
-
154
-
155
-
156
-
157
-
158
-
159
-
160
-
161
-
162
-
163
-
164
-
165
-
166
-
167
-
168
-
169
-
170
-
171
-
172
-
173
-
174
-
175
-
176
-
177
-
178
-
179
-
180
-
181
-
182
-
183
-
184
-
185
-
186
-
187
-
188
-
189
-
190
-
191
-
192
-
193
-
194
-
195
-
196
-
197
-
198
-
199
-
200
-
201
-
202
-
203
-
204
-
205
-
206
-
207
-
208
-
209
-
210
-
211
-
212
-
213
-
214
-
215
-
216
-
217
-
218
-
219
-
220
-
221
-
222
-
223
-
224
-
225
-
226
-
227
-
228
-
229
-
230
-
231
-
232
-
233
-
234
-
235
-
236
-
237
-
238
-
239
-
240
-
241
-
242
-
243
-
244
-
245
-
246
-
247
-
248
-
249
-
250
-
251
-
252
-
253
-
254
-
255
-
256
-
257
-
258
-
259
-
260
-
261
-
262
-
263
-
264
-
265
-
266
-
267
-
268
-
269
-
270
-
271
-
272
-
273
-
274
-
275
-
276
-
277
-
278
-
279
-
280
-
281
-
282
-
283
-
284
-
285
-
286
-
287
-
288
-
289
-
290
-
291
-
292
-
293
-
294
-
295
-
296
-
297
-
298
-
299
 |
 |