Epson G7905U Operation Guide - EasyMP Multi PC Projection v2.00 - Page 49
Perform one of the following operations to change the number of available panels in the projection
 |
View all Epson G7905U manuals
Add to My Manuals
Save this manual to your list of manuals |
Page 49 highlights
1. Click the button on the toolbar. The projection control screen is displayed. 2. Click the panel of the user to be projected in the projection area. The selected panel is framed in blue. 3. Perform one of the following operations to change the number of available panels in the projection area. • Project one panel in full screen mode: Click the button. • Split the projected display in two and projecting the selected panel and the adjacent right or left panel: Click the button. • Split the projected display in four and projecting the all four panels: Click the button. The number of panels changes and the background color for panels being projected becomes white. 49
-
 1
1 -
2
-
3
-
4
-
5
-
6
-
7
-
8
-
9
-
10
-
11
-
12
-
13
-
14
-
15
-
16
-
17
-
18
-
19
-
20
-
21
-
22
-
23
-
24
-
25
-
26
-
27
-
28
-
29
-
30
-
31
-
32
-
33
-
34
-
35
-
36
-
37
-
38
-
39
-
40
-
41
-
42
-
43
-
 44
44 -
 45
45 -
 46
46 -
 47
47 -
 48
48 -
 49
49 -
 50
50 -
 51
51 -
 52
52 -
 53
53 -
 54
54 -
55
-
56
-
57
-
58
-
59
-
60
-
61
-
62
-
63
-
64
-
65
-
66
-
67
-
68
-
69
-
70
-
71
-
72
-
73
-
74
-
75
-
76
-
77
-
78
-
79
-
80
-
81
-
82
-
83
-
84
-
85
-
86
-
87
-
88
-
89
-
90
-
91
-
92
-
93
-
94
-
95
-
96
-
97
-
98
-
99
-
100
-
101
-
102
-
103
-
104
-
105
-
106
-
107
-
108
-
109
-
110
-
111
-
112
-
113
 |
 |

49
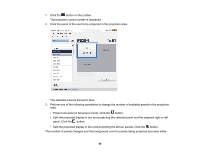
1.
Click the
button on the toolbar.
The projection control screen is displayed.
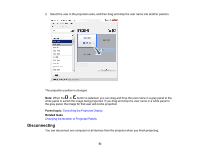
2.
Click the panel of the user to be projected in the projection area.
The selected panel is framed in blue.
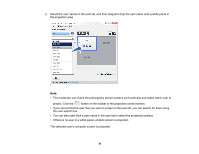
3.
Perform one of the following operations to change the number of available panels in the projection
area.
• Project one panel in full screen mode: Click the
button.
• Split the projected display in two and projecting the selected panel and the adjacent right or left
panel: Click the
button.
• Split the projected display in four and projecting the all four panels: Click the
button.
The number of panels changes and the background color for panels being projected becomes white.