Epson LQ-510X Product Information Guide - Page 4
NEW LQ-510 DOT-MATRIX PRINTER, Commands in Numerical Order - lq 510 dot matrix printer
 |
View all Epson LQ-510X manuals
Add to My Manuals
Save this manual to your list of manuals |
Page 4 highlights
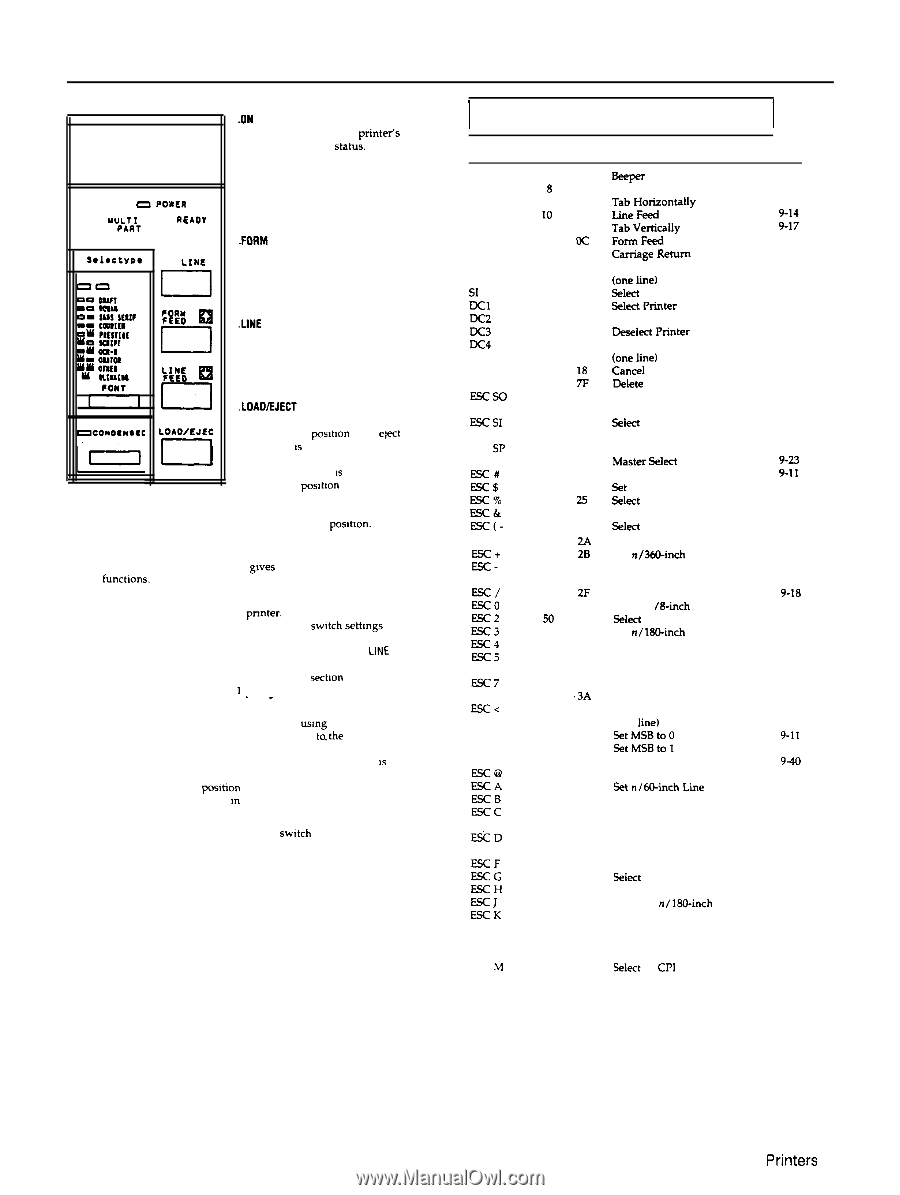
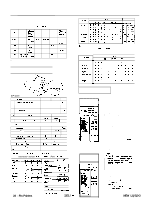
NEW LQ-510 DOT-MATRIX PRINTER Buttons a PO#CR 0 'up~*~xy 0 REAOY 0 PAPER OUT 0 ON LINE I FFOEREY0 $)9 El LfElNEE0 a .ON LINE This button controls the printefs on line and off line statis. Press this button to put the printer on line or to take it off line. When the printer is on line, the ON LINE light is on and the printer can receive and print data from the computer. -FORM FEED When the printer is off line, press this button to elect a single sheet of paper or to advance continuous paper to the top ot the next page .LINE FEED When the printer is off line, press this button to advance the paper one line, or hold it down to advance the paper continuously. I LOAO/EJEC I .LOAD/EJECT This button is used to feed paper to the loading posItion or to elect paper that 1s already loaded. Paper is ejected forward if the paper release lever IS set to the single-sheet posItIon and backward (out of the paper path) if the release lever is set to the continuous paper posltlon. Other control panel features The control panel of your printer also gwes you access to several special funchons. Self test: Both a draft and Letter Quality self test function are built into the pnnter. The self test printout lets you check the current DIP swtch settmgs and operating status of the printer. You can start the printer's self test by holding down the LINE FEED button or the FORM FEED button while turning on the printer. See the s&Ion on the self test in Chapter I f_or m-ore information. Micro-adjustment: By pressing the FORM FEED button immediately after loading paper or when using short tear-off, you can make fine adjustments tathe loading and short tear-off positions. These positions can only be adjusted while the MULTI-PART light IS blinking. See the sections on adjusting the loading position and using the short tear-off function later m this chapter. Data dump: By holding down both the LINE FEED and FORM FEED buttons while you swtch on the printer, you turn on the data dump mode. This feature allows advanced users to locate the source of communications problems between the computer and printer. I Commands in Numerical Order I ASCII BEL BS HT LF VT FF CR so SI DC1 DC2 DC3 DC4 CAN DEL Escso ESC SI ESCEM ESC SP ESC! ESC# Escs ESC% ESC& Esc('ESC' ESC+ Esc- ESC/ ESC0 ESC2 ESC3 ESC4 !?SCj ESC6 ESC7 ESC: ESC< ESC= ESC> ESC? ESC@ ESCA FSCB EECC ESC C0 E&D ESC E E!XF ESCG ESCH =I ESC L ESC IM Dec. Hex. Description Page 7 07 Beeper 9-12 8 08 Backspace 9-20 9 09 Tab Horizontally 9-21 10 OA Y-14 11 OB 12 oc 9-13 13 OD 9-12 14 OE 9-26 15 OF 9-25 17 11 9-8 18 12 9-26 19 13 9-9 20 14 9-27 24 I8 9-12 127 7F 9-9 14 OE (one line) 9-27 15 OF 9-26 25 19 9-10 32 20 9-33 33 21 35 23 Cancel MSB Control 36 24 Set Absolute Print Position. . . . . 9-20 37 25 S&ct User-defined Set 9-37 38 26 Define User-defined Characters 9-36 40 28 select score 9-31 42 2A Select Graphics Mode 9-39 43 28 Set n/3604nch Line Spacing . . . . 9-15 45 2D Turn Underline Mode On/Off 9-32 47 2F Select Vertical Tab Channel . . . . 9-18 48 30 Select 1 /e-inch Line Spacing . . . 9-15 50 32 Select 1 /&inch Line Spacing . . . 9-15 5 1 33 Set n/180-inch Line Spacing . . . . 9-16 52 34 Select Italic Mode 9-34 53 35 Cancel Italic Mode 9-35 54 36 Enable Printable Characters . . . . 9-37 55 37 Enable Upper Control Codes . . . 9-37 58 .3A Copy ROM to RAM 9-36 60 3c Select Unidirectional Mode (one line 9-9 6 1 3D SetMSBtoO 9-11 62 3E SetMSBtol 9-11 63 3F Reassign Graphics Mode 9-40 64 40 Initialize Printer 9-8 65 4 1 Set n/a-inch Lie Spacing. . . . . 9-16 66 42 Set Vertical Tabs 9-l 7 67 43 Set Page Length in Lines 9-13 67 43 Set Page Length in Inches. ..... 9-13 68 44 Set Horizontal Tabs 9-22 69 45 Select Emphasized Mode 9-28 70 46 Cancel Emphasized Mode . . . . . 9-28 71 47 Select Double-strike Mode . . . . . 9-29 72 48 Cancel Double-strike Mode . . . . 9-29 74 4A Perform n/180-inch Line Feed 9-16 75 4B Select Single-density Graphics Mode 9-38 76 4 c Select Double-density Graphics Mode 9-38 77 4 D %+?ct 12 CPI 9-24 NEW LQ-510-4 12/31/90 2 4 - Pin Printers
-
 1
1 -
 2
2 -
 3
3 -
 4
4 -
 5
5 -
 6
6
 |
 |