Epson LX-90 User Manual - Page 15
Replacing the Tractor Unit, into place.
 |
View all Epson LX-90 manuals
Add to My Manuals
Save this manual to your list of manuals |
Page 15 highlights
Replacing the Tractor Unit Replacing the tractor after you have removed it is easy. Pull the friction lever on the left side of the printer toward you, and hold the tractor with the gears to the right as shown below. I I Tilt the tractor back so that the rear notches on the fittings fit over the rear pegs in the tractor slots; then tilt the unit forward until it clicks into place. That's all there is to it. 12
-
 1
1 -
2
-
3
-
4
-
5
-
6
-
7
-
8
-
9
-
 10
10 -
 11
11 -
 12
12 -
 13
13 -
 14
14 -
 15
15 -
 16
16 -
 17
17 -
 18
18
 |
 |

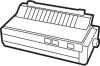
Replacing the Tractor Unit
Replacing the tractor after you have removed it is easy.
Pull the friction lever on the left side of the printer toward you, and
hold the tractor with the gears to the right as shown below.
I
I
Tilt the tractor back so that the rear notches on the fittings fit over
the rear pegs in the tractor slots; then tilt the unit forward until it clicks
into place.
That’s all there is to it.
12