Epson MovieMate 62 User's Guide - Page 26
Adjusting the Picture
 |
View all Epson MovieMate 62 manuals
Add to My Manuals
Save this manual to your list of manuals |
Page 26 highlights
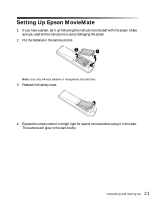
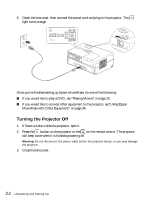
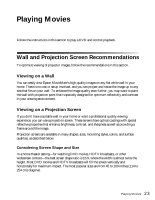
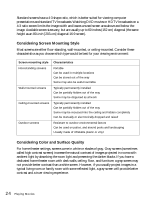
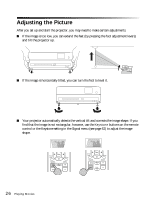
Adjusting the Picture After you set up and start the projector, you may need to make certain adjustments. ■ If the image is too low, you can extend the feet (by pressing the foot adjustment levers) and tilt the projector up. ■ If the image is horizontally tilted, you can turn the feet to level it. ■ Your projector automatically detects the vertical tilt and corrects the image shape. If you find that the image is not rectangular, however, use the Keystone buttons on the remote control or the Keystone setting in the Signal menu (see page 52) to adjust the image shape. 26 Playing Movies
-
 1
1 -
2
-
3
-
4
-
5
-
6
-
7
-
8
-
9
-
10
-
11
-
12
-
13
-
14
-
15
-
16
-
17
-
18
-
19
-
20
-
 21
21 -
 22
22 -
 23
23 -
 24
24 -
 25
25 -
 26
26 -
 27
27 -
 28
28 -
 29
29 -
 30
30 -
 31
31 -
32
-
33
-
34
-
35
-
36
-
37
-
38
-
39
-
40
-
41
-
42
-
43
-
44
-
45
-
46
-
47
-
48
-
49
-
50
-
51
-
52
-
53
-
54
-
55
-
56
-
57
-
58
-
59
-
60
-
61
-
62
-
63
-
64
-
65
-
66
-
67
-
68
-
69
-
70
-
71
-
72
-
73
-
74
-
75
-
76
-
77
-
78
-
79
-
80
 |
 |

26
Playing Movies
Adjusting the Picture
After you set up and start the projector, you may need to make certain adjustments.
■
If the image is too low, you can extend the feet (by pressing the foot adjustment levers)
and tilt the projector up.
■
If the image is horizontally tilted, you can turn the feet to level it.
■
Your projector automatically detects the vertical tilt and corrects the image shape. If you
find that the image is not rectangular, however, use the
Keystone
buttons on the remote
control or the Keystone setting in the Signal menu (see page 52) to adjust the image
shape.