Epson Perfection 1250 Photo Product Support Bulletin - Page 17
Installation Instructions - smart panel download
 |
View all Epson Perfection 1250 Photo manuals
Add to My Manuals
Save this manual to your list of manuals |
Page 17 highlights
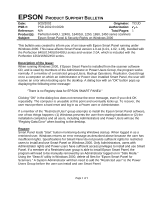
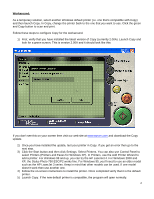
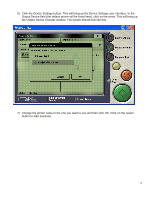
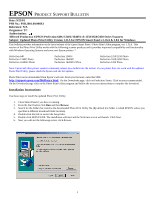
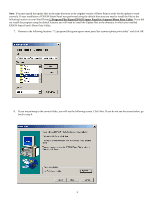
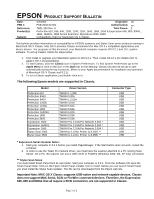
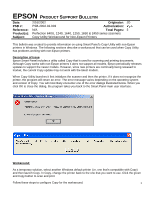
EPSON PRODUCT SUPPORT BULLETIN Date: 9/25/01 PSB No.: PSB.2001.09.006R3 Reference: N/A Originator: TC Authorization: Affected Product(s): EPSON Perfection 640U/1240U/1640SU & 1250/1650/2450 Series Scanners Subject: Updated Photo Print Utility Version 1.31A for EPSON Smart Panel v.1.0xA & 2.0A for Windows This bulletin provides information on the latest release of the Epson Smart Panel - Photo Print Utility program, ver. 1.31A. This version of the Photo Print Utility works with the following scanner products and it provides improved compatibility and functionality with Windows Operating Systems and some non-Epson printers. * Perfection 640 Perfection 1240U Photo Perfection 1640SU Photo Perfection 1240U Perfection 1640SU Perfection 1640SU Office Perfection 1250/1250 Photo Perfection 1650/1650 Photo Perfection 2450 Photo Note: Epson and other printer vendors continually release new models into the market. If your printer does not work with the updated Photo Print Utility, please check the Epson web site for updates. Photo Print can be downloaded from Epson's web site. From your browser, enter this URL: http://support.epson.com/filelibrary.html. On the Downloads page, click on Perfection Series. Click on your scanner model. On the Downloads page click on the Photo Print Utility program and follow the on-screen instructions to complete the download. Installation Instructions: Use these steps to install the updated Photo Print Utility. 1. Close Smart Panel if you have it running. 2. From the Start button click Run and then Browse. 3. Search for the folder that contains the downloaded Photo Print Utility file (By default this folder is called EPSON, unless you specified a different download folder location). 4. Double-click this file to extract the Setup files. 5. Double-click SETUP.EXE. The installation will start and the Welcome screen will launch. Click Next. 6. Next you will see the following screen, click Browse. 1
-
 1
1 -
2
-
3
-
4
-
5
-
6
-
7
-
8
-
9
-
10
-
11
-
 12
12 -
 13
13 -
 14
14 -
 15
15 -
 16
16 -
 17
17 -
 18
18 -
 19
19 -
 20
20 -
 21
21 -
 22
22 -
23
-
24
-
25
-
26
-
27
-
28
-
29
-
30
-
31
-
32
-
33
-
34
-
35
-
36
 |
 |