Epson PictureMate Deluxe Product Information Guide - Page 10
Using the Optional Battery, Start Here, Using PictureMate Without a Computer, User's Guide
 |
View all Epson PictureMate Deluxe manuals
Add to My Manuals
Save this manual to your list of manuals |
Page 10 highlights
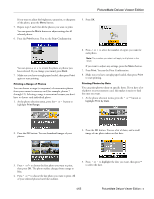
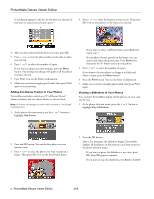
PictureMate Deluxe Viewer Edition 4. Push down the top of the paper support and close it against PictureMate. Then lower the photo viewer screen and close the output tray. 3. Slide in the battery as shown until it clicks into place: 4. Make sure the battery is pushed in all the way so that it locks into place as shown: 5. Disconnect the power cord and any connected USB cable from the back of PictureMate. Lock 6. Pack PictureMate and its power cable (both parts) into the box that PictureMate came in, or in the optional PictureMate Carrying Case. Caution: Make sure the photo cartridge is installed before transporting. Don't place PictureMate on its side or upside down, or ink may leak. Note: If your prints don't look as good after PictureMate has been moved, try aligning the print head (see page 9). Using the Optional Battery With a fully charged battery, you can print from 50 to 80 photos. Follow these steps to install the optional battery. 1. Turn the printer off and unplug the AC adapter. 2. Open the battery cover on the back of the printer. 5. Close the battery cover. After you install the battery, you need to charge it by connecting the AC adapter and plugging in the printer. It takes about 2 hours to fully charge the battery when PictureMate is off, and longer when it is in use. Related Documentation CPD-19365 CPD-19367 CPD-19430 CPD-19366 PictureMate Start Here Using PictureMate Without a Computer book Using PictureMate With a Computer book PictureMate Deluxe Viewer Edition CD-ROM with electronic User's Guide 10 - PictureMate Deluxe Viewer Edition 4/05
-
 1
1 -
2
-
3
-
4
-
 5
5 -
 6
6 -
 7
7 -
 8
8 -
 9
9 -
 10
10
 |
 |
