Epson PictureMate User Manual (P.I.M Plug-in) - Page 3
How Does P.I.M. II Work in Adobe Photoshop?, Importing a P.I.M. Image - show
 |
UPC - 010343849952
View all Epson PictureMate manuals
Add to My Manuals
Save this manual to your list of manuals |
Page 3 highlights
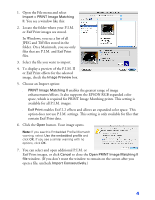
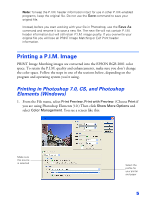
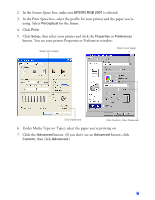
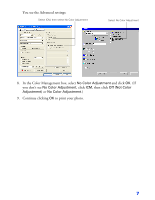
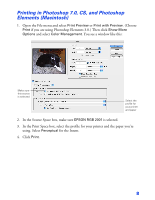
How Does P.I.M. II Work in Adobe Photoshop? Adobe Photoshop does not retain the PRINT Image Matching or Exif Print information separately in the header file when you import your P.I.M. or Exif Print image. Instead, it creates a profile by converting the information into the file and embedding a color space called EPSON RGB 2001. This profile supports all the PRINT Image Matching color advantages and enhancements. You can crop, rotate, resize, work with layers, use filters, and even make selective color adjustments to the P.I.M. II image while retaining P.I.M. II quality. However, you will lose the P.I.M. II enhancements if you apply global color adjustments to your image (such as Auto Levels, Auto Contrast, Auto Color, etc.). If you try to use your new Adobe Photoshop file in another P.I.M.-enabled software program, it will not be recognized as a P.I.M. image. If you want to keep the P.I.M. header information intact for use in other P.I.M.-enabled programs, keep the original file. Do not use the Save command on your original file. Instead, use the Save As command and rename it to save a new file. The new file will not contain P.I.M. header information but will still retain P.I.M. image quality. If you overwrite your original file you will lose all PRINT Image Matching and Exif Print header information. Importing a P.I.M. Image Follow these steps to import a P.I.M. image into Adobe Photoshop 6.0, 7.0, CS, or Photoshop Elements 1.0, 2.0, or 3.0. Note: If you're using Photoshop Elements, you need to change your color settings before importing a P.I.M. image. Open the Edit menu or Photoshop menu (Mac OS X) and select Color Settings. Choose Full Color Management or Full color management - optimized for Print and click OK. Some of the illustrations below show Macintosh screens. Your screens will look different if you're using Windows, but you'll choose the same settings. 3
-
 1
1 -
 2
2 -
 3
3 -
 4
4 -
 5
5 -
 6
6 -
 7
7 -
 8
8 -
 9
9 -
10
-
11
-
12
 |
 |