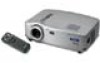
Epson PowerLite 51c User Manual - Page 38
Operating the Projector with the Remote Control - replacement remote
 |
View all Epson PowerLite 51c manuals
Add to My Manuals
Save this manual to your list of manuals |
Page 38 highlights
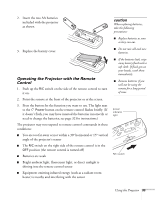
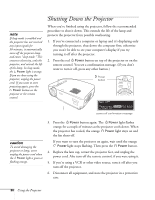
2. Insert the two AA batteries included with the projector as shown. 3. Replace the battery cover. Operating the Projector with the Remote Control 1. Push up the R/C switch on the side of the remote control to turn it on. 2. Point the remote at the front of the projector or at the screen. 3. Press the button for the function you want to use. The light next to the Power button on the remote control flashes briefly. (If it doesn't flash, you may have inserted the batteries incorrectly or need to change the batteries; see page 32 for instructions.) The projector may not respond to remote control commands in these conditions: I You are too far away or not within a 30° horizontal or 15° vertical angle of the projector's sensor I The R/C switch on the right side of the remote control is in the OFF position (the remote control is turned off) I Batteries are weak I Bright ambient light, fluorescent light, or direct sunlight is shining into the remote control sensor I Equipment emitting infrared energy (such as a radiant room heater) is nearby and interfering with the sensor caution When replacing batteries, take the following precautions: I Replace batteries as soon as they run out. I Do not mix old and new batteries. I If the batteries leak, wipe away battery fluid with a soft cloth. If fluid gets on your hands, wash them immediately. I Remove batteries if you will not be using the remote for a long period of time. power indicator light R/C switch Using the Projector 33
-
 1
1 -
2
-
3
-
4
-
5
-
6
-
7
-
8
-
9
-
10
-
11
-
12
-
13
-
14
-
15
-
16
-
17
-
18
-
19
-
20
-
21
-
22
-
23
-
24
-
25
-
26
-
27
-
28
-
29
-
30
-
31
-
32
-
 33
33 -
 34
34 -
 35
35 -
 36
36 -
 37
37 -
 38
38 -
 39
39 -
 40
40 -
 41
41 -
 42
42 -
 43
43 -
44
-
45
-
46
-
47
-
48
-
49
-
50
-
51
-
52
-
53
-
54
-
55
-
56
-
57
-
58
-
59
-
60
-
61
-
62
-
63
-
64
-
65
-
66
-
67
-
68
-
69
-
70
-
71
-
72
-
73
-
74
-
75
-
76
-
77
-
78
-
79
-
80
-
81
-
82
-
83
-
84
-
85
-
86
 |
 |
