Epson PowerLite 580 Quick Setup - Page 1
Epson PowerLite 580 Manual
 |
View all Epson PowerLite 580 manuals
Add to My Manuals
Save this manual to your list of manuals |
Page 1 highlights
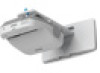
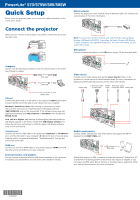
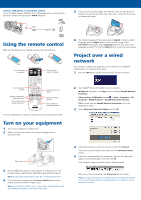
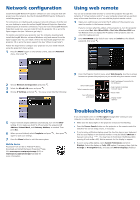
PowerLite® 570/575W/580/585W Quick Setup Before using the projector, make sure you read the safety instructions in the online User's Guide. Connect the projector Before you can connect to the projector, you need to remove the screws and the cable cover. Wired network Connect the projector to your network using an Ethernet cable. See "Project over a wired network" for more information. Note: To connect to a wireless network, you must install the optional Epson Wireless LAN Module (ELPAP07). To purchase the Epson Wireless LAN Module or other accessories, see "Optional accessories". For more information, see the online User's Guide. Microphone Connect a dynamic microphone to the Mic port, using a 3.5 mm mini-jack cable. Computer Choose from the following connections. See the sections below or the online User's Guide for details. VGA cable USB cable Video device Connect up to 6 video devices and use the Source Search button on the projector or remote control to switch between them. For more information on playing sound through the projector, see the online User's Guide. Audio cable Component video S-Video RCA video cable to VGA cable cable (composite video) HDMI cable HDMI cable USB port Connect the square end of a USB cable to the projector's USB-B (square) port. Connect the flat end of the cable to any USB port on your computer. Windows® 2000 SP4 or later: After turning on the projector, follow the on-screen instructions to install the Epson® USB Display software (EMP_UDSE.EXE; only on first connection). If the software screen does not display automatically, open My Computer or Computer, then double-click EPSON_PJ_UD. OS X 10.5.8 or higher: After turning on the projector, the setup folder for USB Display appears in the Finder. Double-click USB Display Installer and follow the on-screen instructions to install the Epson USB Display software (only on first connection). Computer port Connect one end of a VGA cable to the projector's Computer1 or Computer2 port, and the other end to your computer's monitor port. If you are using a laptop, switch it to external display (see "Troubleshooting"). You can also connect an audio cable. HDMI port Connect one end of an HDMI cable to one of the projector's HDMI ports and the other end to an HDMI port on your computer. External monitor and speakers You can connect an external monitor and external speakers to your projector to enhance your presentations. See the online User's Guide for details. Mobile media device Connect tablets, smartphones, and other devices that support the MHL™ standard to the HDMI 1/MHL port. MHL cable Devices that support an MHL connection include the Samsung™ Galaxy Note II™ and the Roku® Streaming Stick™. Some devices may require an adapter or may not require an MHL cable. Not all features or functions may be supported. Check your device's documentation for more information.
-
 1
1 -
 2
2 -
 3
3 -
 4
4
 |
 |
