Epson PowerLite 61p User Manual - Page 20
Connecting an External Monitor, projection on the screen. - lcd
 |
View all Epson PowerLite 61p manuals
Add to My Manuals
Save this manual to your list of manuals |
Page 20 highlights
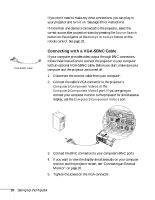
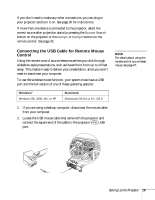
3. Connect the flat end of the cable to an available USB port on your computer. 4. If necessary, configure your laptop to work with an external mouse. If you don't need to make any other connections, you can plug in your projector and turn it on. See page 30 for instructions. note Some LCD monitors may not be able to display the image correctly. If you have trouble displaying the image, connect a multiscan monitor. If you're projecting computer images, make sure the computer's refresh rate is set to 65 Hz or greater. Connecting an External Monitor If you want to see your presentation close-up as well as on the projection screen, you can connect an external monitor to the projector. This lets you view images on your computer monitor while the projector is in standby mode (plugged in but not turned on) and check your presentation or switch between picture sources even if you've pressed the A/V Mute button on the remote control to turn off projection on the screen. Simultaneous display is possible only when the computer is connected to the projector's Computer1/Component Video1 port. Make sure the projector and computer are off. Then connect the monitor's cable to the projector's Monitor Out port, as shown: If you don't need to make any other connections, you can plug in your projector and turn it on. See page 30 for instructions. 20 Setting Up the Projector
-
 1
1 -
2
-
3
-
4
-
5
-
6
-
7
-
8
-
9
-
10
-
11
-
12
-
13
-
14
-
 15
15 -
 16
16 -
 17
17 -
 18
18 -
 19
19 -
 20
20 -
 21
21 -
 22
22 -
 23
23 -
 24
24 -
 25
25 -
26
-
27
-
28
-
29
-
30
-
31
-
32
-
33
-
34
-
35
-
36
-
37
-
38
-
39
-
40
-
41
-
42
-
43
-
44
-
45
-
46
-
47
-
48
-
49
-
50
-
51
-
52
-
53
-
54
-
55
-
56
-
57
-
58
-
59
-
60
-
61
-
62
-
63
-
64
-
65
-
66
-
67
-
68
-
69
-
70
-
71
-
72
-
73
-
74
-
75
-
76
-
77
-
78
-
79
-
80
-
81
-
82
-
83
-
84
-
85
-
86
-
87
-
88
-
89
-
90
-
91
-
92
-
93
-
94
-
95
-
96
-
97
-
98
-
99
-
100
-
101
-
102
-
103
-
104
-
105
-
106
-
107
-
108
-
109
-
110
-
111
-
112
-
113
-
114
-
115
-
116
 |
 |
