Epson PowerLite 8100NL Product Information Guide - Page 9
EPSON PowerLite 8100i/9100i - 9, Open the cover just below the, button to access these
 |
View all Epson PowerLite 8100NL manuals
Add to My Manuals
Save this manual to your list of manuals |
Page 9 highlights
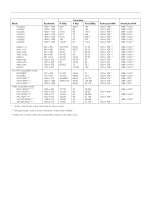
EPSON PowerLite 8100i/9100i Projector Freeze A/V mute E-Zoom Special effects buttons (1-5) light button IR output Freeze A/V Mute E-Zoom Power R/C ON OFF 3 2 5 4 1 Enter Esc Power R/C ON/OFF Enter (pointer) button Esc button Open the cover just below the Esc button to access these remote control buttons: Menu Comp1 Auto P in P E@sy-MP Help Comp2/YCbCr Video Resize Preset Volume This table summarizes the functions on the remote control. Button Function Power R/C ON/OFF Freeze Starts or stops the projector. Turns the remote control on or off. Keeps the current computer or video image on the screen. Button Function A/V mute Turns off the audio and video, displaying the black, blue, or user logo background. E-Zoom Enlarges or reduces the image size from 1x to 4x (in 24 steps). Pressing the right side of the button enlarges the image, pressing the left side of the button reduces the image. To display a portion of an enlarged image which is outside the display area, press the Enter button and scroll the image to the desired location. Effects buttons Display preprogrammed special drawing effects on the screen. Additional effects can be selected through the Effect menu or programmed using the EMP Link V software. Enter (pointer button) Use the Enter button to navigate the menus or use the remote as a mouse pointer when the projector is connected to the computer with the main cable and the mouse cable. When the image source is Computer, the Enter button acts as a mouse left-click. Light Illuminates all buttons on the remote control temporarily. Esc Stops the current function. Pressing Esc while viewing a menu or the online help displays the previous screen or menu. When the image source is a computer, the Esc button acts as a mouse right-click. Menu Displays or hides the menu. Help Displays the online help menu. Comp1 Switches to the Computer 1 image. Comp2/YCbCr Switches to the Computer 2 or component video source. Video Switches to the standard composite video or S-Video source. Auto Optimizes the computer image. Resize Switches the display dot mode and resize mode for VGA, SVGA, SXGA, and UXGA input. P in P Displays a video or S-video image in a subscreen on the main display. Use the Enter button to reposition the Picture in Picture (P in P) screen, or the E-Zoom button to enlarge or reduce the image. Changes made to the P in P screen location and size are automatically carried over to the next P in P session. Preset Saves and recalls up to five different session settings (resolution, tracking, sync signal, and position). To save the current session settings, press the Preset button and it will be assigned the next available number, 1 through 5. To recall a setting, press the Preset button a second time and move to the desired session number. To overwrite a saved setting, move to the setting you want to replace and press Enter. When the confirmation message displays, choose Yes and press Enter. - Volume + Adjusts the volume. 3/01 EPSON PowerLite 8100i/9100i - 9
-
 1
1 -
2
-
3
-
 4
4 -
 5
5 -
 6
6 -
 7
7 -
 8
8 -
 9
9 -
 10
10 -
 11
11 -
 12
12
 |
 |
