Epson PowerLite 8300i Product Information Guide - Page 12
Using the Control Panel, strong light source such as direct sunlight shines into the infrared
 |
View all Epson PowerLite 8300i manuals
Add to My Manuals
Save this manual to your list of manuals |
Page 12 highlights
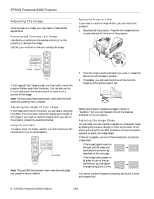
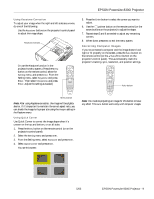
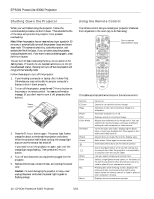
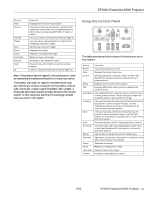
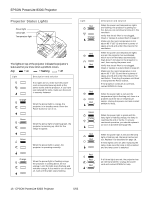
EPSON PowerLite 8300i Projector Button Help Source Preview Preset Auto Focus Zoom Lens Shift Volume Num ID Function Displays the on-screen help system. Press one of the Source buttons to switch to the equipment connected to the corresponding port (DVI, Comp1, Comp2, EasyMP, BNC, S-Video, or Video) Lets you preview connected sources (see page 6). Lets you select a preset selection of options for displaying computer images. Optimizes a computer image. Sharpens the image. Reduces or enlarges the image. Raises or lowers the image. Increases or decreases the sound. Press this key until it lights to use the numeric keypad. Used for setting remote control ID (see page 12). Note: If the projector does not respond to the remote control, make sure batteries are installed and the switch on its side is turned on. The projector also might not respond if the batteries are weak; you're standing at too great a distance from the projector; ambient light is too bright; a certain type of fluorescent light is present; a strong light source (such as direct sunlight) shines into the infrared receiver; or other equipment emitting infrared energy is present (such as a radiant room heater). Using the Control Panel This table summarizes the functions of the buttons on top of the projector. Button Function Power Turns the projector on or off. Help Displays the online help menu. Source Switches between Computer, Video, S-Video, and EasyMP (for wireless network and memory card presentations). Menu Displays the on-screen menu system. ESC Pressing ESC while viewing a menu displays the previous menu. Auto/Enter Use as Enter button to select an option when the menu or help system is active. When computer images are displayed, press to auto-adjust the image. Tracking Lets you manually eliminate vertical banding that may be present in some computer images. Use the Tracking buttons as arrow keys to navigate the onscreen menu and help systems. Sync Lets you manually correct blurriness that may be present in some computer images. Use the Sync buttons as arrow keys to navigate the on-screen menu and help systems. Shift Press and hold to use the Tracking and Sync buttons. A/V Mute Turns off audio and video, displaying the black, blue, or user logo background. Press again to turn audio and video back on. Resize Adjusts how an image fits into the display area. Keystone Squares an image that's 'keystoned' or tapered on the sides after tilting up the projector. Focus Sharpens the image. Zoom Reduces or enlarges the image. Lens Shift Raises or lowers the image. Volume Increases or decreases the sound. 5/03 EPSON PowerLite 8300i Projector - 11
-
 1
1 -
2
-
3
-
4
-
5
-
6
-
 7
7 -
 8
8 -
 9
9 -
 10
10 -
 11
11 -
 12
12 -
 13
13 -
 14
14 -
 15
15 -
 16
16 -
 17
17 -
18
-
19
-
20
 |
 |
