Epson PowerLite 9000NL Quick Start - Page 2
Projector at a Glance
 |
View all Epson PowerLite 9000NL manuals
Add to My Manuals
Save this manual to your list of manuals |
Page 2 highlights
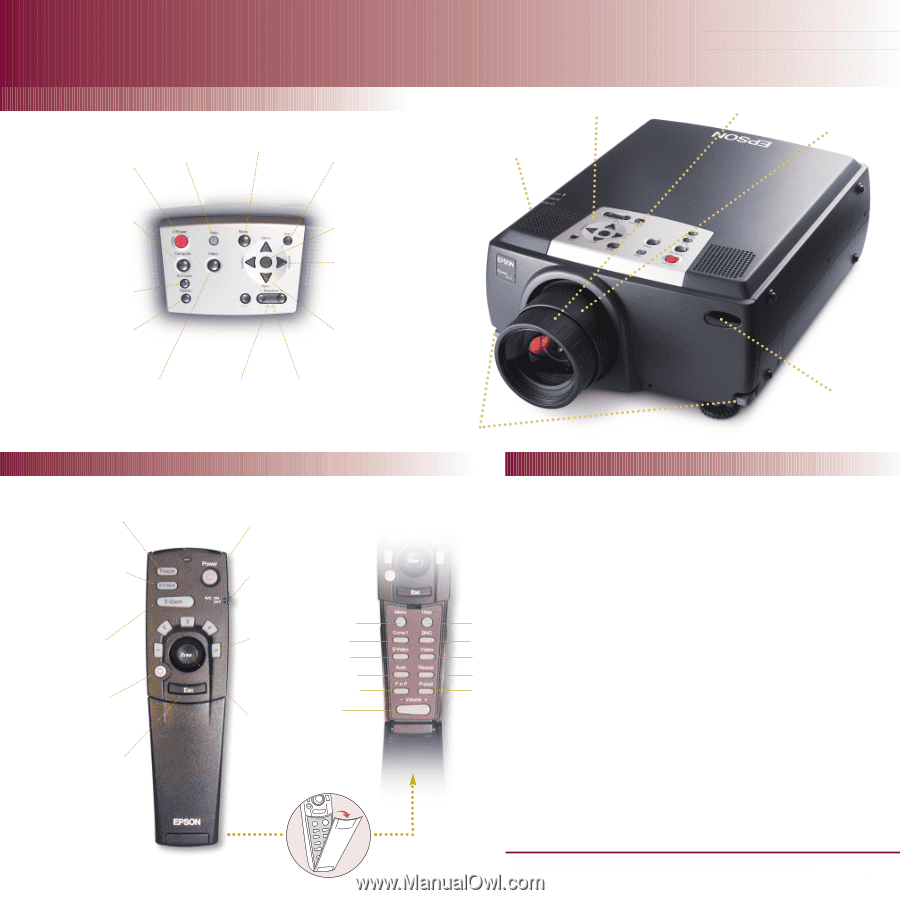
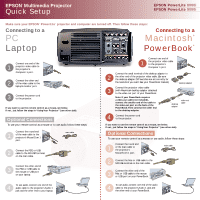
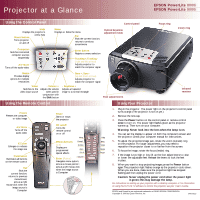
Projector at a Glance EPSON PowerLite 8000i EPSON PowerLite 9000i Using the Control Panel Help Displays the projector's Power button online help Turns projector on and off Computer Switches connected computer sources sequentially A/V Mute Turns off the audio-video Control panel Menu Displays or hides the menu Esc Ends the current function; returns to previous screen/menu Optical keystone adjustment knob Enter button Registers a menu selection Tracking +,Tracking (right and left arrows) Adjusts projector to match the computer signal Focus ring Zoom ring Resize Provides display options for multiple resolutions Video Switches to the video input source - Volume + Adjusts the volume when used in conjunction with the Shift button Sync +, Sync (up and down arrows) Adjusts projector to match the computer signal - Keystone + Adjusts a trapezoid image to a normal rectangle Foot adjust levers Infrared receiver Using the Remote Control Using Your Projector Freeze Freezes the computer or video image A/V Mute Turns off the audio-video E-Zoom Enlarges or reduces the image size Illumination Illuminates all buttons on the remote control Esc Ends the current function; returns to previous menu/screen; acts as a right mouse-click when the image source is Computer Power Starts or stops the projector RC on/off Turns the remote control on or off Menu Effects buttons (1-5) Display preprogrammed special effects Comp1 S-Video Auto P in P Enter (Pointer) - Volume + Navigates menu system; acts as a mouse pointer; acts as a left mouse-click when the image source is Computer OPEN ESC EPSON 1. Plug in the projector. The power light on the projector's control panel turns orange. (The projector is not on yet.) 2. Remove the lens cap. 3. Press the Power button on the control panel or remote control once to turn on. The power light flashes green as the projector warms up. Then turn on your computer. Warning: Never look into the lens when the lamp is on. 4. You can set the display to appear on both the computer's screen and Help the projector. Check your computer manual for instructions. BNC 5. To adjust the projected image size, rotate the zoom (outside) ring Video on the projector. For larger adjustments, you may need to reposition the projector closer to or farther from the screen. Resize Preset 6. To focus the image, rotate the focus (inside) ring. 7. If the image is too high or low, lift up the foot adjust levers to raise or lower the adjustable feet. Release the levers to lock the feet in place. 8. When you want to stop projecting images, press the Power button again.The projection light flashes orange as the projector cools down. When you are done, make sure the projection light has stopped flashing and then unplug the power cord. Caution: Never unplug the power cord when the power light is green; this may damage the lamp. For instructions on setting up your projector with a desktop computer or for information on using the ELP Link IV software to control the projector, see your User's Guide. EPSON and PowerLite are registered trademarks of SEIKO EPSON CORPORATION. Copyright © 1999 by Epson America, Inc. CPD 9113
-
 1
1 -
 2
2
 |
 |