Epson PowerLite 97H Operation Guide - EasyMP Multi PC Projection - Page 77
User Settings, Set option, Connected Projector, Quit as, Quit as Moderator, Moderator, Become
 |
View all Epson PowerLite 97H manuals
Add to My Manuals
Save this manual to your list of manuals |
Page 77 highlights
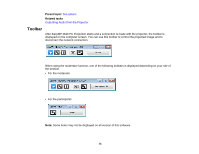
4 User search box 5 User list 6 Connected Projector Name 7 Quit as Moderator/Become Moderator 8 Moderator 9 Projection area 10 Target panel Enter the user name you want to search for, and then click the button. The search results are displayed in the user list. Click the button to return to the original user list. Displays the user names for the computers connected to the projectors. You can connect up to 50 devices between computers that are running EasyMP Multi PC Projection and smartphones or tablets that are running Epson iProjection. When you drag and drop a user name to a white panel in the projection area, the computer screen is projected. The background for users that are currently being projected is blue and users that are in the projection area but not currently projecting is gray. Even if a user left the session, their name remains in the user list and their text color is gray. The default setting for the user name is the computer name. You can change the user name on the User Settings tab on the Set option screen, or the search screen. Displays the name of the projector you are currently connected to. When you click the projector name, Web Remote is displayed. In Web Remote, you can make projector operations on your computer screen in the same way as using the remote control. See the User's Guide supplied with the projector for more details on Web Remote. Click the Quit as Moderator button to stop being the moderator, or the Become Moderator button to become the moderator. The displayed button varies depending on the connection method. Displays the moderator name when there is a moderator. When the background color for a panel is white, the computer screen for the user in that panel is projected. If there is no user in the white panel, a black screen is projected. By dragging and dropping the user name, you can change the screen being projected and the position at which the computer screen is projected. Move the target panel framed in blue by clicking on one of the panels in the projection area. You can project the computer screen where the target panel is positioned when you click one of the change projection buttons. 77
-
 1
1 -
2
-
3
-
4
-
5
-
6
-
7
-
8
-
9
-
10
-
11
-
12
-
13
-
14
-
15
-
16
-
17
-
18
-
19
-
20
-
21
-
22
-
23
-
24
-
25
-
26
-
27
-
28
-
29
-
30
-
31
-
32
-
33
-
34
-
35
-
36
-
37
-
38
-
39
-
40
-
41
-
42
-
43
-
44
-
45
-
46
-
47
-
48
-
49
-
50
-
51
-
52
-
53
-
54
-
55
-
56
-
57
-
58
-
59
-
60
-
61
-
62
-
63
-
64
-
65
-
66
-
67
-
68
-
69
-
70
-
71
-
 72
72 -
 73
73 -
 74
74 -
 75
75 -
 76
76 -
 77
77 -
 78
78 -
 79
79 -
 80
80 -
 81
81 -
 82
82 -
83
-
84
-
85
-
86
-
87
 |
 |