Epson PowerLite Pro Z8050WNL User's Guide - Page 35
Adjusting the Image, Adjusting the Position
 |
View all Epson PowerLite Pro Z8050WNL manuals
Add to My Manuals
Save this manual to your list of manuals |
Page 35 highlights
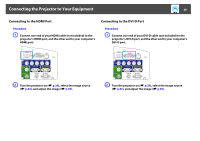
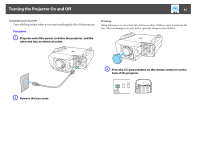
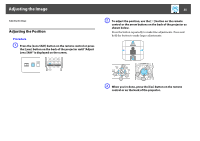
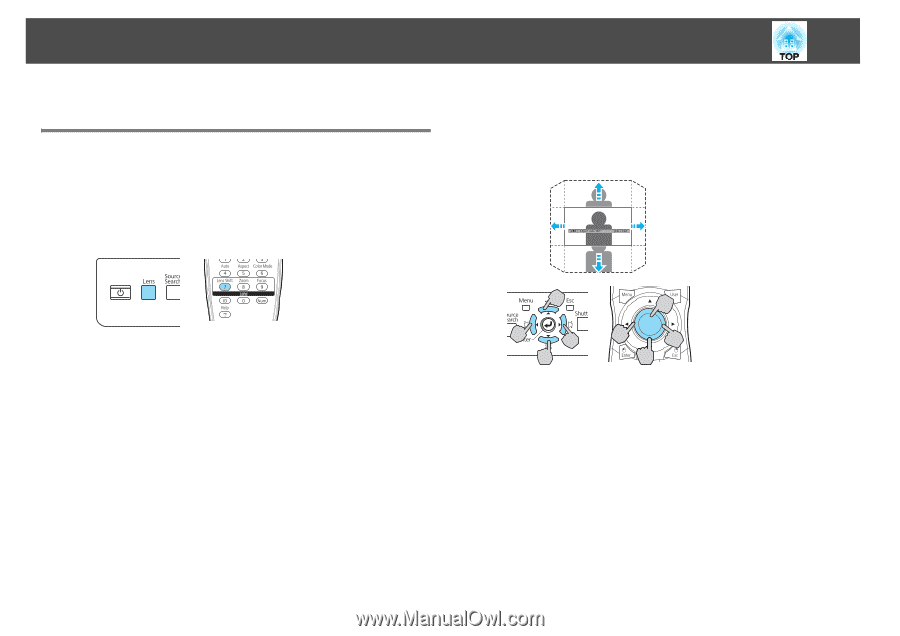
Adjusting the Image Adjusting the Image Adjusting the Position Procedure A Press the [Lens Shift] button on the remote control or press the [Lens] button on the back of the projector until "Adjust Lens Shift" is displayed on the screen. 35 B To adjust the position, use the [h] button on the remote control or the arrow buttons on the back of the projector as shown below. Press the button repeatedly to make fine adjustments. Press and hold the button to make larger adjustments. C When you're done, press the [Esc] button on the remote control or on the back of the projector.
-
 1
1 -
2
-
3
-
4
-
5
-
6
-
7
-
8
-
9
-
10
-
11
-
12
-
13
-
14
-
15
-
16
-
17
-
18
-
19
-
20
-
21
-
22
-
23
-
24
-
25
-
26
-
27
-
28
-
29
-
 30
30 -
 31
31 -
 32
32 -
 33
33 -
 34
34 -
 35
35 -
 36
36 -
 37
37 -
 38
38 -
 39
39 -
 40
40 -
41
-
42
-
43
-
44
-
45
-
46
-
47
-
48
-
49
-
50
-
51
-
52
-
53
-
54
-
55
-
56
-
57
-
58
-
59
-
60
-
61
-
62
-
63
-
64
-
65
-
66
-
67
-
68
-
69
-
70
-
71
-
72
-
73
-
74
-
75
-
76
-
77
-
78
-
79
-
80
-
81
-
82
-
83
-
84
-
85
-
86
-
87
-
88
-
89
-
90
-
91
-
92
-
93
-
94
-
95
-
96
-
97
-
98
-
99
-
100
-
101
-
102
-
103
-
104
-
105
-
106
-
107
-
108
-
109
-
110
-
111
-
112
-
113
-
114
-
115
-
116
-
117
-
118
-
119
-
120
-
121
-
122
-
123
-
124
-
125
-
126
-
127
-
128
-
129
-
130
-
131
-
132
-
133
-
134
-
135
-
136
-
137
-
138
-
139
-
140
-
141
-
142
-
143
-
144
-
145
-
146
-
147
-
148
-
149
-
150
-
151
-
152
-
153
-
154
-
155
-
156
-
157
-
158
-
159
-
160
-
161
-
162
-
163
-
164
-
165
-
166
-
167
-
168
-
169
 |
 |
Adjusting the Image
35
Adjusting the Image
Adjusting the Position
Procedure
A
Press the [Lens Shift] button on the remote control or press
the [Lens] button on the back of the projector until "Adjust
Lens Shift" is displayed on the screen.
B
To adjust the position, use the [
h
] button on the remote
control or the arrow buttons on the back of the projector as
shown below.
Press the button repeatedly to make fine adjustments. Press and
hold the button to make larger adjustments.
C
When you’re done, press the [Esc] button on the remote
control or on the back of the projector.