Epson R300 User Manual (P.I.M Plug-in) - Page 4
files that are P.I.M. and Exif Print, Import > PRINT Image Matching, Image Preview - windows 7
 |
UPC - 010343848818
View all Epson R300 manuals
Add to My Manuals
Save this manual to your list of manuals |
Page 4 highlights
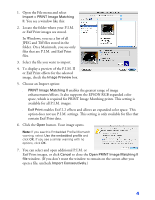
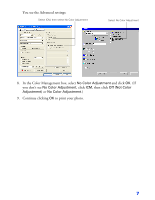
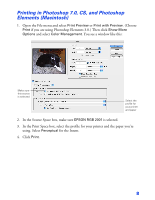
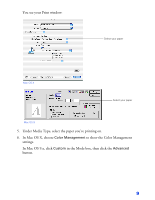
1. Open the File menu and select Import > PRINT Image Matching II. You see a window like this: 2. Locate the folder where your P.I.M. or Exif Print images are stored. In Windows, you see a list of all JPEG and Tiff files stored in the folder. On a Macintosh, you see only files that are P.I.M. and Exif Print files. 3. Select the file you want to import. 4. To display a preview of the P.I.M. II or Exif Print effects for the selected image, check the Image Preview box. 5. Choose an Import option: ■ PRINT Image Matching II enables the greatest range of image enhancements/effects. It also supports the EPSON RGB expanded color space, which is required for PRINT Image Matching prints. This setting is available for all P.I.M. images. ■ Exif Print enables Exif 2.2 effects and allows an expanded color space. This option does not use P.I.M. settings. This setting is only available for files that contain Exif Print data. 6. Click the Open button. Your image opens. Note: If you see this Embedded Profile Mismatch warning, select Use the embedded profile and click OK. If you see a similar warning with no options, click OK. 7. You can select and open additional P.I.M. or Exif Print images, or click Cancel to close the Open PRINT Image Matching II file window. (If you don't want the window to remain on the screen after you open a file, uncheck Import Consecutively.) 4
-
 1
1 -
 2
2 -
 3
3 -
 4
4 -
 5
5 -
 6
6 -
 7
7 -
 8
8 -
 9
9 -
 10
10 -
11
-
12
 |
 |
