Epson RX700 Product Information Guide
Epson RX700 - Stylus Photo Color Inkjet Manual
 |
UPC - 010343853775
View all Epson RX700 manuals
Add to My Manuals
Save this manual to your list of manuals |
Epson RX700 manual content summary:
- Epson RX700 | Product Information Guide - Page 1
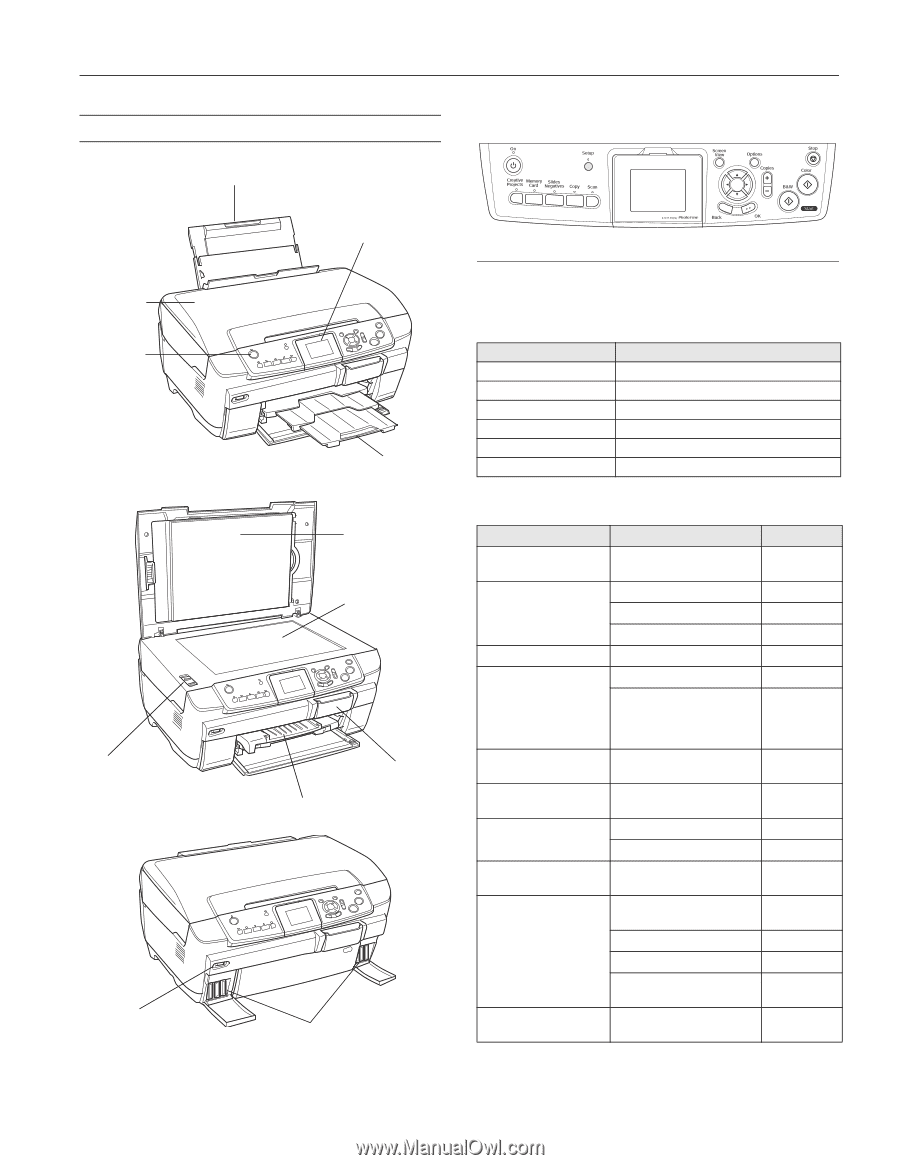
Epson Stylus Photo RX700 Product Parts Paper support Control panel Scanner lid On (power) button Scanner transportation lock EXT. I/F (USB) port LCD screen Output tray Document mat Scanner glass CD/DVD guide Memory card slot cover Ink cartridges Accessories Ink Cartridges Cartridge Black - Epson RX700 | Product Information Guide - Page 2
Epson Stylus Photo RX700 Paper name Epson Premium Luster Photo Paper Epson Photo Quality Self Adhesive Sheets Epson Ink Jet Transparencies Epson Iron-On Transfer Paper Epson Glossy Photo Greeting Card Kit Epson Semigloss Scrapbook Photo Paper PremierArtTM Matte Scrapbook Photo Paper Epson Photo - Epson RX700 | Product Information Guide - Page 3
Epson Stylus Photo RX700 Margins Standard sheets With minimum margin setting Envelopes Top (A): 0.12 inch (3.0 mm) Left (B-L): 0.12 inch (3.0 mm) Right (B-R): 0.12 inch (3.0 mm) Bottom (C): 0.12 inch (3.0 mm) Top (A): 0.10 inch (2.5 mm) Left (B-L): 0.10 inch (2.5 mm) Right (B-R): 0.10 inch (2.5 mm - Epson RX700 | Product Information Guide - Page 4
Epson Stylus Photo RX700 Safety Approvals Safety standards EMC UL 60950, CSA C22.2 No. 60950 FCC part 15 subpart B class B CSA C108.8 class B Supported (Secure Digital) Card MMC (MultiMediaCard) miniSD Card* * Adapter required CompactFlashTM Type I and Type II IBM MicrodriveTM Loading Paper - Epson RX700 | Product Information Guide - Page 5
4. Slide the edge guide against the left side of the paper. Epson Stylus Photo RX700 2. Open the front cover. 5. Extend the output tray. Press 3. Extend the output tray. Loading Epson Paper Load specialty Epson papers in the rear sheet feeder only. Plain paper may also be loaded in the rear - Epson RX700 | Product Information Guide - Page 6
Epson Stylus Photo RX700 Copying Without a Computer You can make color or black-and-white copies of scrapbooking materials, photos, and other items. To reprint your photos without white borders around the edges, use the Borderless layout setting and select an Epson photo paper in one of these sizes - Epson RX700 | Product Information Guide - Page 7
up to 100 sheets of Epson Premium Bright White Paper in the front tray instead of plain paper. Note: When printing from a computer, there are additional paper type settings you can use. See the electronic Reference Guide to select the best setting for your paper. 5/05 Epson Stylus Photo RX700 - 7 - Epson RX700 | Product Information Guide - Page 8
from Slides or Negatives You can use the film holder that came with the Epson Stylus Photo RX700 to scan 35-mm slides or strips of negative and positive film. Removing the Document Mat and Film Holder 1. Open the scanner lid and remove the document mat. Placing 35-mm Slides in the Holder 1. Fit - Epson RX700 | Product Information Guide - Page 9
Remove the film strip cover. Epson Stylus Photo RX700 Scanning and Printing Your Photos 1. Close the scanner lid. 2. Slide your film strip into the holder. Note: The photos should be mirror-imaged when restore color to faded slides or negatives (see page 10). 5/05 Epson Stylus Photo RX700 - 9 - Epson RX700 | Product Information Guide - Page 10
Press the Creative Projects button. 2. Select Reprint/Restore Photos then press OK. 3. Place one or two photos on the scanner glass. Align them with the edges of the glass, and make sure they're separated by at least 1/2 inch. Then press OK. 10 - Epson Stylus Photo RX700 Note: If the edges of your - Epson RX700 | Product Information Guide - Page 11
Epson Stylus Photo RX700 4. Load one or more sheets (up to 20) of Epson Premium Glossy Photo Paper. 5. Select the Paper Size of the paper you loaded, turn Restoration ON, and then press OK. Your photos are scanned. 6. Use the l and r arrow buttons to preview each of your photos. While a photo is - Epson RX700 | Product Information Guide - Page 12
Epson Stylus Photo RX700 4. Press the x Color button to copy in color, or the x B&W button to copy in grayscale. Your disk is printed. To cancel printing, press the y Stop button. 5. When printing is complete, pull the tray out of the printer and let the disk dry fully before handling it. Note: If - Epson RX700 | Product Information Guide - Page 13
camera ❏ Data storage device, such as a USB thumb drive (flash memory device), CD-ROM, or Iomega® Zip drive ❏ Bluetooth®-enabled device (requires an optional Bluetooth Photo Print adapter) See the Basics book and electronic Reference Guide for more information. 5/05 Epson Stylus Photo RX700 - 13 - Epson RX700 | Product Information Guide - Page 14
Epson Stylus Photo RX700 Scanning to a File With EPSON Scan Follow these steps to scan directly to a file on your computer: 1. Place your document on the scanner glass (see page 6). 2. Start EPSON Scan. Windows: Select Start > All Programs (or Programs) > EPSON Scan > EPSON Scan. Macintosh: Double- - Epson RX700 | Product Information Guide - Page 15
Epson Stylus Photo RX700 Replacing Ink Cartridges When you print with low ink cartridges, you see a message on the RX700 screen. Look at this icon in the upper-right corner of the Copy or Preview screens to check ink status. Ink levels When a cartridge is more than six months old, print quality - Epson RX700 | Product Information Guide - Page 16
, align the print head (see "Aligning the Print Head" on this page). Related Documentation CPD-19734 CPD-19735 CPD-19736 Epson Stylus Photo RX700 CD-ROM (includes electronic Reference Guide) Epson Stylus Photo RX700 Start Here Epson Stylus Photo RX700 Basics 16 - Epson Stylus Photo RX700 5/05
-
 1
1 -
 2
2 -
 3
3 -
 4
4 -
 5
5 -
 6
6 -
 7
7 -
8
-
9
-
10
-
11
-
12
-
13
-
14
-
15
-
16
 |
 |
Epson Stylus Photo RX700
5/05
Epson Stylus Photo RX700
- 1
Product Parts
Accessories
Ink Cartridges
Media
Paper support
LCD screen
Scanner lid
On (power)
button
Output tray
Document mat
Scanner glass
Memory card
slot cover
Scanner
transportation lock
Ink
cartridges
EXT. I/F
(USB) port
CD/DVD guide
Cartridge
Part number
Black
T559120
Cyan
T559220
Magenta
T559320
Yellow
T559420
Light Cyan
T559520
Light Magenta
T559620
Paper name
Size
Part number
Epson
®
Premium Bright
White Paper
Letter (8.5 × 11 inches)
S041586
Epson Photo Quality Ink
Jet Paper
Letter (8.5 × 11 inches)
S041062
A4 (8.3 × 11.7 inches)
S041061
Legal (8.5 × 14 inches)
S041067
Epson Photo Paper
Letter (8.5 × 11 inches)
S041140
Epson Glossy Photo
Paper
Borderless 4 × 6 inches
S041809
Letter (8.5 × 11 inches)
S041141
S041649
S041271
S041272
Epson All-Purpose
Glossy Paper
Letter (8.5 × 11 inches)
S041654
Epson ColorLife
®
Photo
Paper
Letter (8.5 × 11 inches)
S041500
Epson Matte Paper
Heavyweight
Borderless 8 × 10 inches
S041467
Letter (8.5 × 11 inches)
S041257
Epson Double-Sided
Matte Paper
Letter (8.5 × 11 inches)
S041568
Epson Premium Glossy
Photo Paper
Borderless 4 × 6 inches
S041727
S041808
Borderless 5 × 7 inches
S041464
Borderless 8 × 10 inches
S041465
Letter (8.5 × 11 inches)
S041286
S041667
Epson Premium
Semigloss Photo Paper
Letter (8.5 × 11 inches)
S041331
Control panel