Epson Stylus COLOR 480SXU Product Information Guide - Page 4
Setting Up the Printer the First Time - printer driver
 |
View all Epson Stylus COLOR 480SXU manuals
Add to My Manuals
Save this manual to your list of manuals |
Page 4 highlights
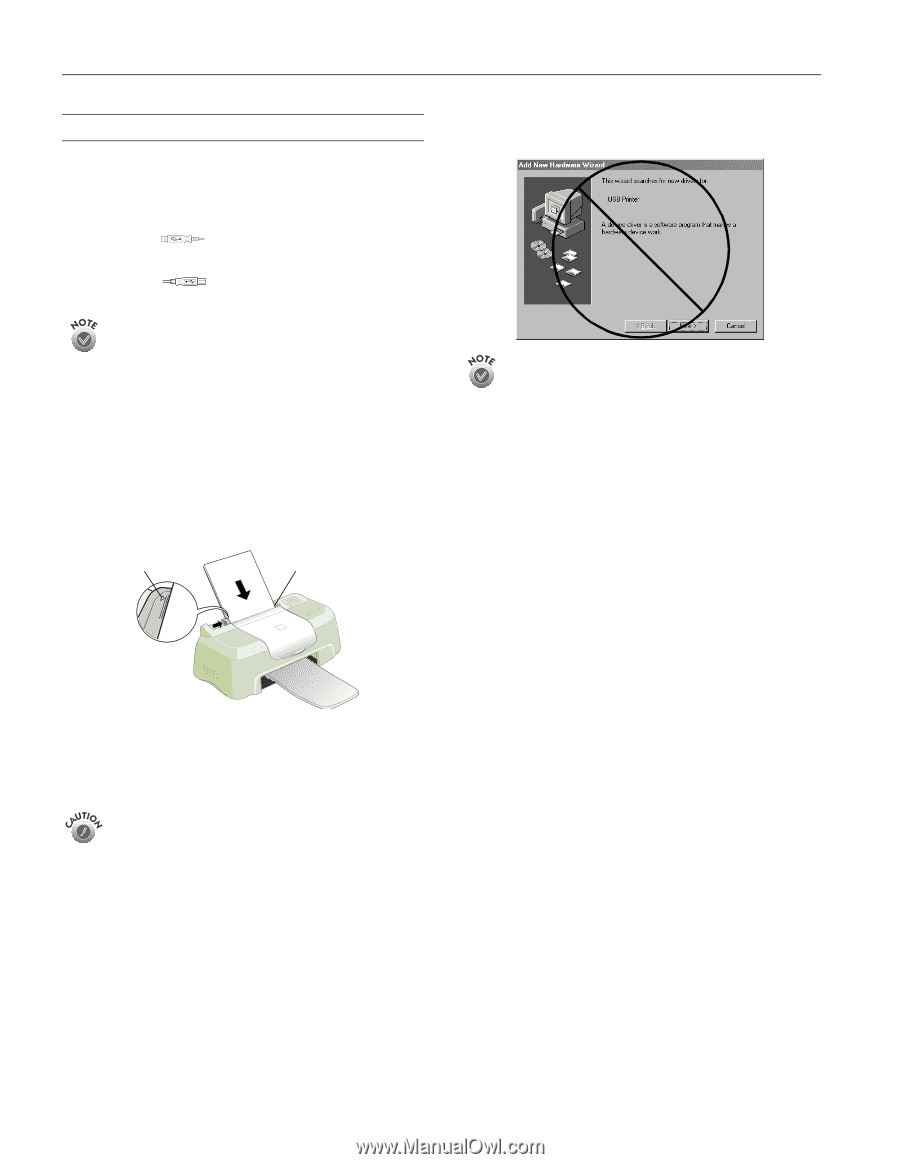
EPSON Stylus Color 480SXU Setting Up the Printer the First Time Connect the Printer and Computer 1. Make sure the printer is unplugged and your computer is turned off. 2. Connect the square end of the USB cable to your printer's USB port. 3. Connect the flat end of the cable to your computer's USB port or a first tier USB hub port. If you're using a USB hub, connect the printer to the first tier of the hub. If the printer doesn't work there, connect it directly to a USB port on your computer. Turn On Your Computer Turn on your computer first and wait until you see your desktop icons. (With Windows 2000, log on as necessary.) Load Paper Set paper carefully in the slot in the top of the printer; don't push it deeper into the slot. Slide the left edge guide against the paper. Load paper only up to this arrow Slide paper against the right edge Plug In the Printer Plug the printer's power cord into a grounded electrical outlet. The printer is now powered on. It moves its print head and makes some noise. Don't use an outlet controlled by a wall switch or timer, or one on the same circuit as a large appliance, to avoid damaging the printer's power supply. When you see this screen, click Cancel. You can't install your printer software that way. If you don't see a screen like this, unplug the USB connector from your computer and reconnect it. Install the Software Locate the CD-ROM that came with your printer and carefully follow these instructions. 1. Insert your printer software CD-ROM in a CD-ROM or DVD drive. 2. Double-click the My Computer icon on your screen. 3. Double-click the EPSON CD-ROM or DVD icon. 4. Double-click the EPSON icon to start the installer. (Don't select any other icon in the folder.) 5. Read the license agreement and click Agree. You see the Main Menu. 6. Click Install Printer Driver. You see the printer driver installation screen. 7. Make sure your model is highlighted, then click OK. The installer copies files to your computer and displays a series of windows. 8. Wait a few moments, then continue with the next section to install ink cartridges. 4 - EPSON Stylus Color 480SXU 9/00
-
 1
1 -
 2
2 -
 3
3 -
 4
4 -
 5
5 -
 6
6 -
 7
7 -
 8
8 -
 9
9 -
 10
10
 |
 |