Epson Stylus COLOR 777i Start Here Card - Page 2
Windows - printer driver
 |
View all Epson Stylus COLOR 777i manuals
Add to My Manuals
Save this manual to your list of manuals |
Page 2 highlights
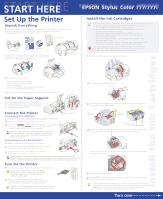
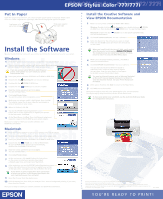
EPESPOSNO® SNty® lSust®yCloulso®rC7o7l7o/7r777i77/ 777i Put In Paper Open the output tray extension. Set a stack of plain paper lightly in the paper feeder; don't force it in. Place it against the right edge, slide the left edge guide against the paper. Load paper only up to this arrow Slide paper against the right edge Install the Software Locate the CD-ROM that came with your printer and follow the instructions here for your system. Windows 1 Press the power button to turn on your printer, if it's not already on. 2 Turn on your computer and wait until you see your Windows program icons. Windows (On Windows 2000 or Windows NT®, log on as necessary.) If you see a screen about Windows detecting your printer, click Cancel. You can't install your printer software that way. 3 Insert your printer software CD-ROM in a CD-ROM or DVD drive. 4 Double-click the My Computer icon on your desktop. 5 Double-click the EPSON CD-ROM icon. 6 Double-click the EPSON icon to start the installer. 7 Read the license agreement and click Agree. You see the Main Menu. 8 Click Install Printer Driver. You see the printer driver installation screen. 9 Make sure your printer model is highlighted, then click OK. The installer copies files to your computer and displays a series of windows on your screen. 10 When it's finished, click OK. 11 You see the EPSON Product Registration screen. Follow the on-screen instructions to register your printer. At the last screen, click Done. 12 At the Main Menu, click Exit. Then click Yes and restart your computer. Leave in the CD-ROM as your system restarts. Now you're ready to install your creative software and EPSON documentation. Macintosh Macintosh 1 Press the power button to turn on your printer, if it's not already on. 2 Turn on your Macintosh and wait until you see your program icons. 3 Insert your printer software CD-ROM in a CD-ROM or DVD drive. 4 Double-click the EPSON icon in the CD-ROM folder. (If your CD-ROM folder doesn't open automatically, double-click the EPSON CD-ROM icon.) 5 Read the license agreement and click Agree. You see the Main Menu. 6 Click Install Printer Driver. 7 At the next screen, click Install. Follow the instructions on the screen to install your printer driver, select a default paper size, and restart your Macintosh. 8 After restarting, you see the EPSON Product Registration screen. Follow the instructions on the screen to register your printer. At the last screen, click Quit. Leave the CD-ROM in the drive. If you choose to print a registration form, you'll need to select your printer in the Chooser (described in the next steps) before your form will print. 9 Open the Chooser from the Apple menu. 10 Click the SC 777 icon, then click your USB port icon. Turn on background printing, if you want, then close the Chooser. Now you're ready to install your creative software and EPSON documentation. Install the Creative Software and View EPSON Documentation 1 Return to your printer software CD-ROM's Main Menu: Windows: Double-click the My Computer icon, double-click your EPSON CD-ROM icon, then double-click the EPSON icon. You see the Main Menu. Macintosh: Double-click the You see the Main Menu. EPSON icon in the EPSON CD-ROM folder. 2 Click Install Creative Software. You see a submenu. 3 Select the button for the software you want to install. Then click the Install button and follow the instructions on the screen. When you install Corel Print House™ 2000, you'll need to enter this product serial number: PR2NO-73721P2658. The installation may also restart your system. If it does, return to step 1 to access the Main Menu again. 4 When you're finished installing software, click Back to return to the Main Menu. 5 Click View EPSON Documentation. You see a submenu. You can view the electronic Reference Guide or watch Fix-it FlixSM movies to learn how to replace ink cartridges, clean the print head, or load paper. For details, see your Printer Basics book. You need an Internet browser, such as Netscape Navigator® or Microsoft® Internet Explorer (version 3.0 or later) to view the electronic manual. See your Printer Basics book for details. 6 When you're finished, click Back to return to the Main Menu. 7 Click Exit to exit the installer. Now you're ready to print with your EPSON Stylus Color 777/777i printer! For simple step-by-step instructions, see the Printer Basics book. To share your printer over a network, see the electronic Reference Guide for configuration instructions. EPSON and EPSON Stylus are registered trademarks of SEIKO EPSON CORPORATION. Fix-it Flix is a service mark of Epson America, Inc. General Notice: Other product names are for identification purposes only and may be trademarks of their respective owners. EPSON disclaims any and all rights in those marks. Copyright © 2000 by Epson America, Inc. Printed on recycled paper. 8/00 CPD-10841 YOU'RE READY TO PRINT!
-
 1
1 -
 2
2
 |
 |
