Epson Stylus CX3200 Start Here Card - Page 1
Epson Stylus CX3200 - All-in-One Printer Manual
 |
View all Epson Stylus CX3200 manuals
Add to My Manuals
Save this manual to your list of manuals |
Page 1 highlights
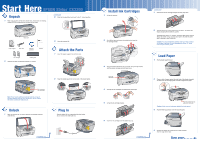
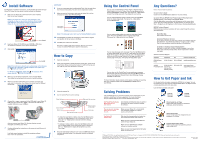
Start Here EPSON Stylus® CX3200 1 Unpack 1 Make sure you have all the parts shown here. If any parts are missing, contact EPSON as described on the back of this sheet. continued 2 Slide the transportation lock back to the unlock position. Stylus CX Paper support USB cable Software CD-ROM Booklet Ink cartridges Feeder guard 2 Remove any tape and packing materials, as shown. 3 Close the scanner lid. 3 Attach the Parts 1 Insert the paper support into its three slots. 2 Snap the feeder guard into its two slots in the sheet feeder. Do not remove this sticker yet Note: There may be additional packing materials or tape in locations different from the ones shown here. Do not remove the sticker covering the USB port yet. 2 Unlock 1 Open the scanner lid, as shown. Remove any packing materials under the lid. 4 Plug In 1 Plug the Stylus CX into a grounded electrical outlet. Do not connect the USB cable yet. continue 5 Install Ink Cartridges 1 Lift up the scanner. continued 7 Press down the ink cartridge clamps until they snap shut. 2 Peel off the tape and remove the plastic piece from the ink cartridge holder. 3 Press and hold the On button for 2 seconds. The green light flashes and the scanner carriage and print head move. Press the On button 4 Unwrap the ink cartridges and remove the yellow tape. 8 Carefully lower the scanner back down into place. The Stylus CX begins charging the ink delivery system. Charging takes about 1 1/2 minutes. The green light flashes and the Stylus CX makes various sounds. Don't turn it off while the green light is flashing or you'll waste ink. Caution: You must install both cartridges and leave them installed for all types of printing. To avoid damaging the Stylus CX, never move the print head by hand. 6 Load Paper 1 Flip the feeder guard forward. 2 Place a stack of paper against the right side of the feeder, beneath the tab. Pinch the left edge guide and slide it against the paper. 5 Lift up the ink cartridge clamps. Open the output tray and pull out the extension Caution: Make sure you load paper behind the feeder guard. 3 Flip the feeder guard back over the stack of paper. 6 Insert the ink cartridges with the labels face-up. continue 4 Position the Stylus CX so the front is at least 9 inches from the edge of the table. Turn over
-
 1
1 -
 2
2
 |
 |
