Epson Stylus NX125 Start Here - Page 3
Install software, Install, NOT CONNECTED - 127 series
 |
View all Epson Stylus NX125 manuals
Add to My Manuals
Save this manual to your list of manuals |
Page 3 highlights
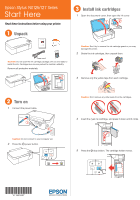
Note: Don't load the paper sideways; always load it short edge first. 2 Insert the Epson Stylus NX125/127 Series software CD. 6 Slide the edge guide over, against the left edge of the paper. Windows: If you see the AutoPlay window, click Run SETUP.EXE. If you see a User Account Control screen, click Continue or Yes. Macintosh®: Double-click the Epson icon, if necessary. 3 Click Install and follow the on-screen instructions. 7 Flip the feeder guard back. 4 When prompted, connect the USB cable. Use any open USB port on your computer. Make sure the printer is turned on. 5 Install software 1 Make sure the printer is NOT CONNECTED to your computer. 5 Mac OS® X 10.4 only: When you see this screen, click Add Printer. Follow the steps on the right side of the screen to add your printer. Click Next to continue, if necessary. Windows®: If you see a Found New Hardware screen, click Cancel and disconnect the USB cable. You can't install your software that way.
-
 1
1 -
 2
2 -
 3
3 -
 4
4
 |
 |
